Good time!
Today's post is not directly related to computer problems, but rather closer to life ...
In some cases, the people say that "Repair is worse than fire ..." (and this is partly true). Often, both best friends and relatives can quarrel because of him.
And in this regard, to significantly simplify everything - maybe a pre-made design of a room (apartment) in 3D! Agree that if you have already agreed on what and how, then the matter is arguing ?!
By the way, looking ahead, I will say that even an unprepared user takes 20-30 minutes. will be able to create a design for an entire apartment - and see how it will look with selected wallpaper, laminate flooring, furniture (in fact, this will be discussed below).
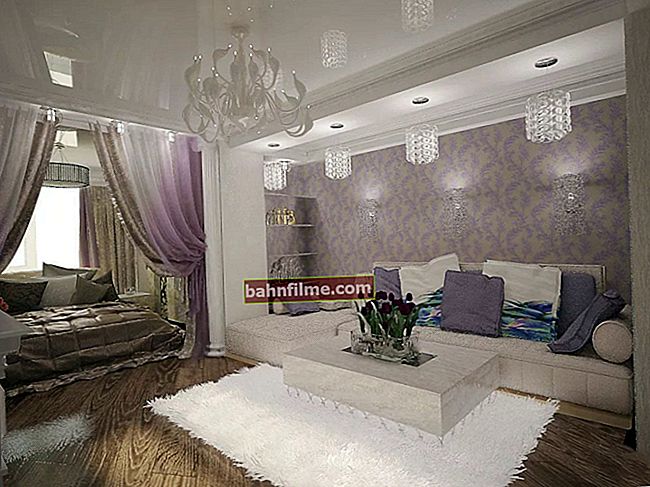
An example of what we will be doing is shown in the screenshot below. Of course, the size of the rooms (and their number), the color scheme of decoration, materials, furniture, you can choose to your taste ...

Design of a typical 1-room Khrushchev
*
How to save money and nerves on renovation: we make a layout (design) of an apartment in 3D
STEP 1: Choosing software, creating a new project
In general, there are hundreds of programs for creating design and various kinds of layouts. However, most of them are difficult to master (will you master them for the sake of 1 repair?).
But among all this diversity there is a simple and effective program that allows for some half an hour to create apartment design in 3D any novice user. It's about software "Interior Design 3D" ... 👇
👉 Interior design 3D
Developers site: //interior3d.su/

This program is for an unprepared user (beginner) who needs to quickly and easily get a 3D design of an apartment, room, house. It is very easy to use the program, all actions are performed step by step.
The program is completely in Russian, supported by Windows XP, 7, 8, 10 (32/64 bits)
Installation programs "Interior Design 3D" standard (no different from other software), so I do not consider it.
At the first start, you will be prompted to either create a new project, or choose one of the most common (there are Stalinkas, Khrushchevs, etc.). In my example, I will make a project from scratch, if there is already a ready-made version for your apartment - you can immediately go to STEP 4.

Create a new project or upload an existing one
By the way, if you have a 2D scan (layout) of your apartment, this can somewhat simplify the task (it will be enough just to circle it). We will proceed from the fact that it does not exist - see the screenshot below ... 👇

Start from scratch
The picture below shows how the main window of the program looks like. At the first start, it may seem that nothing is clear, however not all that difficult! The main thing is to do everything sequentially (step by step), and the problem is solved in just 2-3 dozen mouse clicks.

The main window of the program "Interior Design in 3D"
STEP 2: drawing rooms (according to specific sizes), apartment layout
And so, the main window of the program is divided into 3 parts:
- center (top): 2D layout (layout) of the apartment. This is where we will draw;
- center (bottom): 3D rendering. It is built automatically, depending on what objects we add to the layout;
- right: tools for drawing and adding objects.
To start designing: click on the tool "Draw a room" and sequentially draw a rectangle in the 2D editor (top view).
Please note that when drawing, the program will show you the dimensions of the room in centimeters (100 cm = 1m).

Draw a room (simple rectangle)
👉 Important!
When drawing rooms - their contour must be completed, i.e., having drawn 4 walls (or 5, 6, etc.) with the mouse - you must come to the starting point from where you started drawing. Otherwise, what you drew will not be fixed and disappear.
By the way, after you finish drawing in the 2D editor, the 3D version will be designed automatically! See example below.

3D design is generated automatically
Next, using the same tool, draw your entire apartment (kitchen, living room, hallway, bathroom, etc.). This is done, in general, quickly and easily ...
The exit will be the real layout of the apartment (just like in the documents).

We draw a few more rooms in the same way!
STEP 3: placement of doors, windows, furniture, lamps
To make the room we have drawn more like a real apartment, you need to add windows and doors, arrange at least "basic" furniture ...
Doors
To add doors to the project - find and activate the tool in the right panel of the program "Add door" .

Add door
Then select its type. I would like to note that the collection of the program includes dozens of very different doors: ordinary, and with an arch, and double ...

Choosing a door
After that, move the mouse over one of the walls on the 2D layout and click LMB - the door will be fixed and appear in the project.

Installing a door on a breadboard
Please note that the set belief can be shifted exactly to the real size of your apartment (the program shows the distance to each of the walls from the doorway).

In 3D, the door appears automatically
Window
They are added in the same way as doors. First you need to activate the tool in the right panel "Add window" .

Add window
After that, indicate the type of window (there are many of them: single window, double, triple, windows with arches, etc.).

Window type selection
And install it in the right place in the room. See example below.

The window appeared in the design!
Furniture, plumbing, lamps
It is done in the same way as adding doors and windows, with the exception of one detail ...

Furniture
After you place something from the furniture (for example, a bed) - notice the small yellow dot. It allows you to turn the bed to either side (360 degrees).

Use this point to rotate furniture!
By the way, in the program "Interior Design 3D" a lot of different furniture: wardrobes, beds, dressers, etc. By the way, this section also contains plumbing - you just need to open the selection of bathroom furniture.

Bedroom - choice of bed (chest of drawers)

Furniture and bathroom fixtures
How to change the size of furniture, its color, finish
Despite the large collection of various furniture and paraphernalia in the software "Interior Design 3D" - the dimensions of some closet for clothes can be very different and here the program allows you to set them manually (which is logical) ...
How to change the size of the cabinet (for example): first, double-click with the left mouse button on the desired cabinet (on a 2D layout), its properties will appear in the menu on the right - it remains to indicate its length, height, depth, material and color. How all this is changing - you can immediately see on the 3D model.

Changing the closet for clothes
By the way, there are a lot of materials for furniture: wood, fabric, leather and metal. And there are more than a hundred colors themselves: walnut, rosewood, alder, etc.

Choice of material and colors
Notice how in 2-3 mouse clicks it was possible to change both the size of the cabinet and its colors.

It was - it is (changed the wardrobe)
STEP 4: choice of wall, floor, ceiling finishes - colors and materials (wallpaper, linoleum, laminate, etc.)
And so, the layout of the apartment is drawn, windows, furniture and doors are placed - now you can proceed to the repair (wallpaper, laminate, etc.).
How to do it: first, the desired room is selected (for example, the hall in my example), after which its properties open in the menu on the right.

Select a room and open its properties
In the properties you can change:
- the height of the walls;
- set the material for finishing the floor, ceiling, walls;
- set the color and type of wallpaper, laminate, linoleum, etc. (depending on your choice).

Wall decoration material
As for the material and colors: there is a lot to roam here ... Just take a look at the 2 screenshots below ...

Choice of finishes

Laminate and parquet (floor)
The hall was changed by me in just 1-2 minutes. beyond recognition...

What happened and what happened
Of course, you need to set the interior for each of the rooms in the same way. ☝
STEP 5: viewing the finished project, visualization, saving
When your project is ready, you can not only view the 3D model, but also how to look at the renovation with your own eyes, i.e. to be in this room (a kind of visualization).
To do this, pay attention to the button at the bottom of the window "3D room overview" - by clicking on it, you will change the display mode of the editor and you will be able to personally look at the apartment at any point in it.
Note: on a 2D model, you will have a camera (these are your eyes 👀) - just move it around the apartment and watch how it all looks ...

Room visualization
Last but not least, don't forget to save the project. By the way, in this regard, the program is quite flexible: it allows you to save everything that you have drawn in PDF, an image, export to 3D editors, and even create an estimate for repairs (I did not use the last pieces ...).

Save project
Conclusion: in general, everything about everything can take 20-30 minutes. time. The user is required to click LMB, specify sizes, colors and change properties.
It is still not a long time (~ a few years), and any PC user can handle most of the programs. Many professions may disappear. However, the trend ... 👀
*
That's all for this sim today ...
Happy renovation!
👋