User question
Hello.
I bought a second disk, connected it through an adapter (Optibay) to my laptop, but Windows does not see it. Tell me what can be done?
Hello.
The problem, in general, is not rare ... Most likely, if the disk is new, then it is simply not formatted (initialized). Also, quite often some versions of Windows do not auto-set drive letters (and without a letter, the drive is not visible in "My Computer").
In general, in this note I will show with simple examples the sequence of actions for this problem ...
*
The second disk is not visible - what to do 👇
STEP 1: check if the drive appears in BIOS
And so, the first thing I recommend to start with is to go into BIOS / UEFI and see if the disk is detected. BIOS should recognize and "see" the disk even if it is not formatted (ie there are only 2 options: either "yes" or "no").
Note: of course, if the BIOS does not see the disk, then all the other steps in this article will be useless for you. First you need to deal with other reasons ...
If you have a modern Windows 10 operating system, then to enter the BIOS, just use the menu "Update & Security / Recovery / Special Boot Options" in the OS parameters. After reboot in the tab "Extra options" open link "Firmware parameters" .
In details on how to enter UEFI (BIOS) from the Windows 8, 10 interface - //ocomp.info/kak-voyti-v-bios-iz-windows.html

Windows 10 settings
Also enter BIOS you can use specials. keys (Delete, F2, Esc, F1 - each manufacturer has its own key), which must be pressed immediately after turning on the computer.
Instructions on this topic are here.
As a rule, information about all connected drives is displayed in BIOS / UEFI immediately on the first screen (Main, Information). If the computer sees the disk, then the model of your drive should be displayed in the "Hard Disk" ("Storage") column. See a couple of screenshots below.

BIOS sees both drives connected, the adapter works!

Storage - drives (UEFI, Asus laptop)
If the disks are detected and they are visible in the BIOS, you can go further ...
If not displayed:
- try connecting the drive to another computer / laptop. If you have a special. SATA -> USB adapter - then everything is greatly simplified! Those. our first goal is to make sure that everything is in order with the disk (to carry out diagnostics);
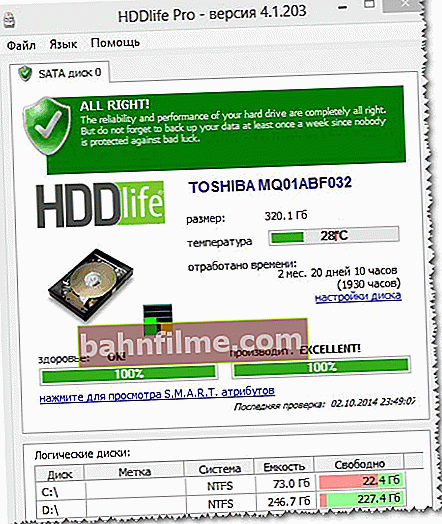
HDD disk status
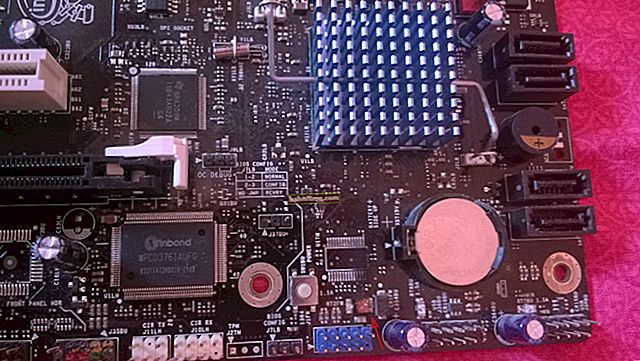
- check all connectors, cables and loops for damage, kinks, etc. If we are talking about Optibay (adapter for laptops) - pay attention to the special. compatibility switch ... Try switching it from "A" to "B" mode (for example). Of course, this must be done in the off state!
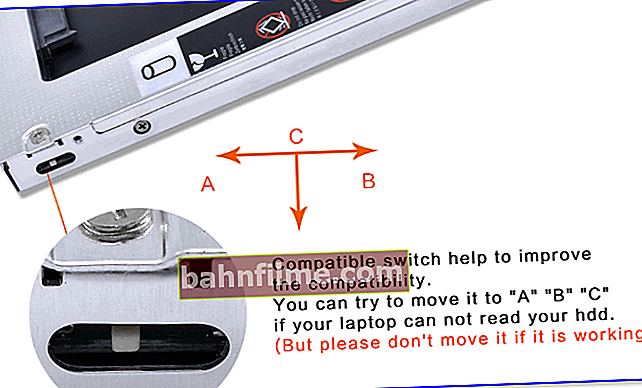
Compatibility switch on Optibay
- try resetting BIOS / UEFI to optimal presets. This is done quite simply, here is the instruction: //ocomp.info/kak-sbrosit-nastroyki-bios.html
- by the way, if the disk is working properly, then it is possible that it simply does not have enough power (this is more important for PCs in which insufficiently powerful power supplies are installed).


STEP 2: initialize the disk (format if new)
In some cases, Windows will not initialize the automatically mapped new drive. Of course, this can be done manually ...
First you need to open a special. utility disk management (built into Windows): just click Win + R and then use the command diskmgmt.msc .
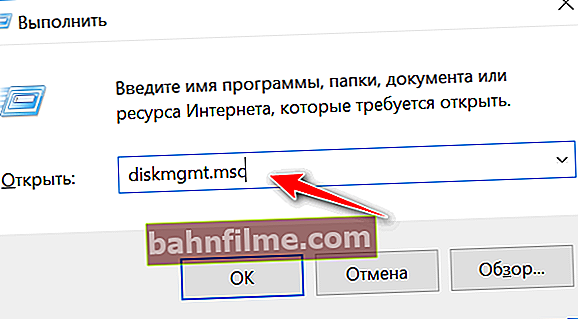
diskmgmt.msc - start disk management
Disk management should display all drives connected to the computer (not formatted and not initialized - including).
As a rule, a "red" circle will be lit above an uninitialized disk - just right-click on this disk and select the function initialization.

Initialize disk
Then specify the partition table (you can leave the default, which Windows recommends) and click OK.

Partition table
Next, a new status will appear under the name of the disk - "Online" ... See screenshot below.
After that, please note that in most cases new disks are unformatted (in disk management - there will be a black bar with an unallocated area opposite them). To format the HDD - just click on this area with the right mouse button and select the option creating a simple volume .

Create simple volume
Next, you need to specify the size of the volume - in most cases, you can leave the default value and click "Further".

Volume size
After that, the drive letter is set (you can specify any free one).

Assign drive letter
Well, the penultimate step is to specify the file system. If you have a portable disk (USB) - I recommend choosing the exFAT file system, otherwise - NTFS.
IMPORTANT ! When formatting a drive, all information on it will be deleted! If your disk is new, then, as a rule, nothing happens on it except the factory utility for creating a quick backup.

Format
If everything went well, after formatting you should see the status of the disk "OK" .

The disk is healthy!
Opening "My computer" - the disk should be displayed like the others. Now you can fully work with it!

You can use the disc!
STEP 3: change (set) the drive letter
Another common problem (especially with Windows 10) is disabling the function of auto-assigning a letter to new connected drives (including flash drives, memory cards, etc.). Of course, if the letter is not assigned (or the one that is already used by another drive is mistakenly selected), the disk will not be displayed in the explorer!
To fix this, you need to go to disk management (Win + R -> diskmgmt.msc), click on the invisible disk and select the option to change the letter (see screenshot below).

Change drive letter
Then change the letter to any other (free).

Edit

New letter ...
As a rule, the disk after such a procedure - the drive immediately becomes visible. ✔
To help!
External drives and flash drives are not displayed on my computer. Windows does not assign letters to connected drives - note link
PS
In some cases, disks can be hidden by viruses (and some of them are not detected by antivirus!) Check Windows for malware using this instruction: //ocomp.info/esli-antivirus-ne-vidit-virusov.html
*
Additions on the topic - will come in handy!
All the best!
👋