Good day.
Those who often shoot video with a phone or camera know that not all videos and photos are of normal quality. Often there is noise in the video, inaccuracies in the contours of objects, the image is either too bright or too dark.
You can try to remove many of these defects. Of course, no one will give 100% guarantees, but the chances of correcting many points are high! 👌
By the way, running ahead, I will say that it is impossible to give an answer in advance how much you can improve your video! It all depends on the original quality: resolution, bit rate, what you were shooting, etc. Therefore, in each case it turns out individually.
Now let's get started ...

Before processing and after processing (what we will do)
*
Several ways to improve video quality: examples
For work we need one very interesting video editor - "Video-MONTAZH". 👇 It is good, first of all, because it allows you to perform even quite complex video processing tasks in just 2-3 mouse clicks ... (of course, he can solve our problem as well)
*
Video INSTALLATION
Developer site: //video-editor.su/
Instructions "How to create your own video"

Simple and intuitive Russian-language video editor. Allows you to edit your own video in a matter of minutes, even for a very novice user. Supports dozens of video file formats (AVI, MKV, FLV, WMV, etc.).
It allows you to significantly improve your video quality by running it through its filters (this is what we will do). The program works in all versions of Windows (including compatible with Windows 10).
*
Note: in this article I will not consider how to download and run the editor, how to add a video to it, and how to apply any effect to the added video.
It seems to me that you will quickly figure this out without me, for example, using my previous articles on cutting video, and gluing 2-3 clips into one (especially the Russian-language program).
*
Saturation - the effect is pleasing to the eye!
Quite often the video lacks chroma (or saturation). Especially when it comes to an old video that has been on your disk for a long time (shelf давно).
Opening it in the Video-MONTAGE program, and then going to the section "Effects" , and turning on the effect "Saturation" - you can freshen up the colors in your video quite a lot.

Files - add videos and photos - Video-Editing 9.25

Effects - Basic - Saturation
For example, I took a video from the famous film about Shurik: after turning on the saturation, the film became noticeably brighter and it will be more pleasant to watch (on the right in the photo below - the picture has become more pleasant, in my opinion)!
Note: if the difference in the film is so noticeable, can you imagine how your videos can sparkle ?! 😉

Was - now / Saturation effect
*
Image stabilization in video
I think that many people in the videos they shot noticed an inaccurate picture. More precisely, as if the boundaries of objects were not precise: there was "noise" near them. You can watch such a video, of course, but it's much nicer to try to remove it.
There is a special function in the editor - image stabilization .
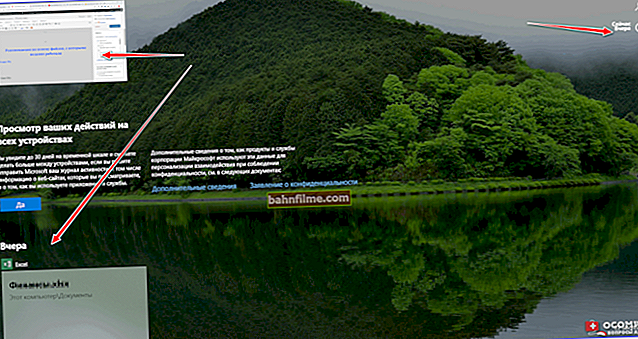
To enable this feature, enter the section "Edit / Improvements" , then enable this checkbox (see the screenshot below 👇). In a couple of seconds, the effect will be applied to your video.

Image stabilization
*
Stabilization is special. A technology used to process photo and video files that compensates for angular and horizontal / vertical camera movements to eliminate image blur.
*
It is quite indicative how the picture can change, shown in the next photo.But again, to say for sure exactly how your image will change is impossible in advance, the degree of improvement depends on too many factors.

Before stabilization (left) and after (right) // VIDEO MONTAZH

Inaccurate - exactly / no stabilization (left) / there is stabilization (right) // VIDEO
By the way, I recommend using stabilization in conjunction with the rest of the effects (about them below) to give the maximum video quality.
*
Auto levels
Used: to improve the accuracy and color balance of the picture
In general, very useful tool for novice users who have embarked on the path of processing video files ... Allows to slightly improve the quality of color rendition in the video, due to the automatic selection of the color balance.
To enable this option: open the section "Edit / Improvements" , then check the box on the left in the menu (see the screen below, arrows 1 and 2 👇).

Edit - Auto Levels
Below I demonstrate a small example from one famous film: the difference, it seems to me, is on the face! On the right, the picture is brighter, the borders are more accurate, blurring is removed, etc.

Auto-levels (left - before processing, right - after)
*
Comprehensive improvement
A nice appendage that can somewhat clarify the brightness of individual characters and objects in the pictures, clarify the boundaries and remove inaccuracies - this is a comprehensive improvement function.
To enable it - go to the section "Edit / Improvements" , then in the menu on the left turn on "Comprehensive improvement" .

Comprehensive improvement / How to enable
As you can see in the example below, the difference, although not so noticeable, is there. The picture on the right, after all, looks livelier ...

Comprehensive improvement
*
Auto-levels + complex improvement
The previous two effects auto-levels and complex improvementI recommend using in combination. For a more illustrative example, I took another video - about the sea (I think that many who had a vacation on the sea have more than one video with it).
By applying two filters in combination, you can achieve a more "juicy" and brighter picture of the water: the waves become clearer, the sky is blue and saturated, the horizon is pronounced. In general, these effects are recommended for use.

Auto-levels + complex improvement
*
Fine workmanship with brightness, contrast and saturation
For some reason, many users underestimate such simple tools as manual adjustment of brightness, contrast, saturation, and color. Meanwhile, if they are used correctly and skillfully, the picture can be significantly improved.
In Video INSTALLATION, these tools are located in the section "Edit / Image" , menu on the left.

We change the contrast, brightness and color background of the picture in the video - Video Editing 9.25
For example, having played a little with the balance of brightness and saturation, I managed to make the picture in the film much brighter and more juicy. In general, I recommend using it!

It was - it is (brightness and saturation)

Working with brightness, contrast, saturation (Left (was), Right (became)
*
Darkening and lightening effects
And finally ...
Is in the program in the section "Edit / Effects" instruments "darken" , "contrast" and "lighten" .

Lightening, darkening, contrasting effects, etc.
They are very helpful in those cases when you shoot a video that depicts: the sky, sea, horizon, landscape, etc. It can also be very useful in low light, or in very bright (perhaps useful when shooting at sunset or sunrise) ...
In the example below, I have shown how the sea changes depending on the use of a particular instrument. It’s hard to believe that it’s one and the same "sea" in the same weather (and indeed, it’s one and the same picture)!

Darkening and lightening
*
In this wayby applying several useful effects and tools, playing with brightness, contrast, and saturation - you can significantly change the quality of the picture in the video, make it more vivid and natural.
*
This concludes the article, good luck!
👋
First publication: 07.02.2017
Correction 11/15/2020