Good day!
Often, when working with a laptop, you need to make a screen in order to show it to other users (for example, to solve various kinds of errors, or when working together on a document / project).
But not all users are able to do this right away: there is no coveted button on the keyboard "Print Screen", then you seem to press on it, but nothing happens ...
In this short article, I want to give you some quick and working ways to create screenshots. I think the note will be very useful (especially in those cases when the matter is urgent, and you are pestered by some mistake ...).
So...
👉 Help!
If you want to take a screenshot of the game screen or a frame from the video (including with arrows and explanations) - see this note
*
Taking a screenshot on a laptop
Method 1: using the Print Screen key
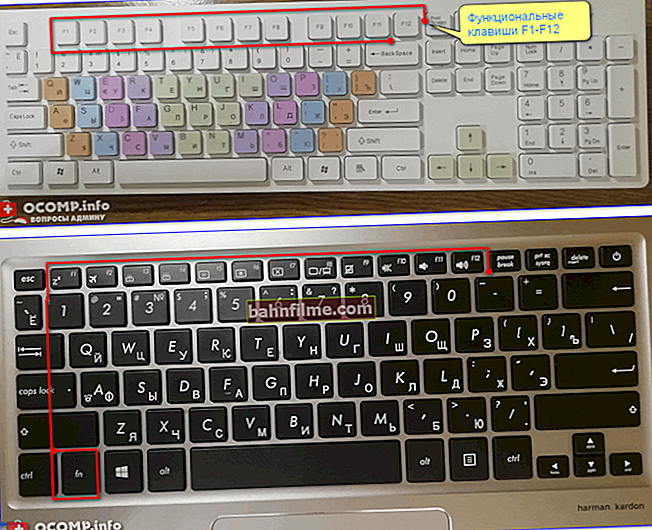
And so, as I said above, almost any keyboard (classic type) has a key for taking screenshots. It is usually called "Print Screen" .
But on laptops, most often, you can find some of its abbreviations. "Prnt Scrn" , "Prt Sc" and other derivatives! Perhaps this is why many beginners simply do not realize that "Prt Sc" is "Print Screen" ...
(usually the "Prt Sc" key is located in the upper right corner of the keyboard, near the F12 ... button)
And so, to take a screenshot - just click once on this button! Everything that was on the screen will be saved to the buffer (i.e., to the computer's memory). See example below.

Press Prt Sc
To "see" the captured screenshot - open the Paint or Word program, and then press the combination of buttons Ctrl + V(this is the "insert" operation) .

Inserting a screen into a document ...
👉 Pay attention!
When working on a laptop, to place a screenshot in the clipboard, it is far from always enough to press one "Prt Sc" button (on some devices the operation of this key is limited in the BIOS settings).
Therefore, if you failed to make a screen in the first way, try pressing the buttons simultaneously: "Fn + Prt Sc" (note: no plus and quotes). Example below 👇.

Press Prt Sc and Fn
Then start Word or Paint in the same way and try to perform the operation "insert" .
By the way, also note that in order not to capture the entire screen, but only one active window, you can use the combination "Fn + Alt + Prt Sc" ... Example below 👇.

Press Prt Sc, Fn and Alt
*
Method 2: scissors tool (Windows)
Windows 7, 8, 10 has a convenient tool for working with screenshots "Scissors" ... To run this program, you can use the "START" menu, or simply enter the name in the search box (example for Windows 10 below).

Launch the scissors (method 1)
In addition, you can use the universal method to launch the "Scissors":
- first you need to press Win + Rto pop up the window "Run" ;
- then into the line "Open" insert SnippingTool.exe
- and click OK.

SnippingTool.exe - running scissors (method 2)
When the program window opens, you can immediately click on "Create" ... See example below.

Create (scissors)
Then, using the mouse, simply select the area that you want to screen (example below).

Select the desired area
Please note that after selecting the desired area, it will appear in the program window "Scissors" ... Now you can save the resulting screen (combination of "Ctrl + S" buttons).

The resulting screen can already be saved
Note that from "Scissors" the screenshot can be sent to Paint 3D (for Windows 10). With the help of Paint 3D, by the way, the picture can be finished and changed beyond recognition ...

Or you can transfer the screen to Paint 3D and change it!
*
Method 3: using screenshots
Now there is a fairly large number of programs designed exclusively for working with graphics: photos, pictures, screenshots. Among this variety there are specials. programs that facilitate both the creation of screens and their editing.
Usually, such software is called screenshots ... Some of the most famous products in this category are: GreenShot, FastStone Capture, Fraps, Snagit, Light Shot, etc.
👉 To help!

The best screenshot programs (top 10) I have given in this article 👍
After installing such software, as a rule, it is enough to click on the Print Screen button, then select the desired area on the screen, and it will be displayed in the mini-editor of the screenshot.
For example, this is how the GreenShot program works (see the screen below). I recommend it for a start ...

Graphic editor GreenShot (opens immediately after clicking on Print Screen and capturing the desired area of the screen)
Then all that remains is to edit the screen (for example, add an arrow to it) and save. Conveniently? Conveniently! 👌
*
Method 4: special. Windows 10 features
If you have a modern Windows 10 operating system installed, then screenshots can be created in an alternative way ...
Option 1
Press the button combination "Win + Prt Sc" : The screen should darken (for a fraction of a second) and then return to its original state.

Windows 10: Press Win + Print Screen to save the screen to the "images" folder
Everything that was on the screen at this moment will be captured on the screen saved in the folder "Pictures / Screenshots" ... See examples below 👇.

This computer - images

Screenshots
Option # 2: if you want to take a screenshot in the game
- First, start the game you want;
- Then press the combination of buttons Win + G (the game menu should appear);
- In the game menu, click on the button "Take Screenshot" (see example below);
- Everything! The screen was saved to disk. Conveniently!

Game bar in Windows 10 (Win + G)
If anyone does not know where to look for a screenshot later, then just open the Windows settings, then the section "Games" , tab "Game DVR" .
Actually, in this window you can find out the folder where the screenshots are saved by default (area "3" see below): you can change it or just open it.

Where are my saved screenshots from games (Windows 10)
*
Method 5: use add. Yandex disk capabilities!
Yandex disk is not only a convenient network storage, but also the ability to make very high-quality screenshots in 2-3 clicks.
👉 To help!

Yandex Disk: how to use it, upload and download files, photos. How to set up auto-creation of a copy of my documents - see instructions
To create a screen:
- first click on the disk icon in the tray with the right mouse button;
- in the context menu select "Screenshots / Take a screenshot of the area" ;
- then select the area of the screen that you want to capture.

Yandex disk - create a screenshot
Immediately after selection, you will see this section in the editor (see example below). You can crop the screen, put arrows / shapes on it, etc. After editing, click on the button "save" .

When the screen is ready, click on "Save"
In general, that's all: the screen will be saved on the Yandex disk in the folder "screenshots" (See example below).

The screen was saved on Yandex disk
Now you can share it with friends (for example) in 1-2 mouse clicks, or insert it into the desired document.
*
That's all for me. Thanks in advance for the additions!
Good luck!
👋
First publication: 04.01.2019
Correction: 01/05/2020