Good day everyone!
I have repeatedly encountered questions from users who could not get the DVD player to play video from a DVD of its own recording.
And, I must tell you, in the overwhelming majority of cases, the users themselves are to blame: the fact is that many write to the disc just the file itself AVI, MKV, MP4, FLV, etc. with films. The player cannot read these files due to the lack of the required codec.
Of course, more modern devices (players) support more and more formats, however, and they do not keep pace with the emergence of new and new HD-rips.
In general, in this article I want to give several ways how you can quickly and easily burn video to a disc that will open on almost any DVD player (even 15 years ago ✌)!
So...
Important!
Before working with the programs below, I recommend that you install a modern set of codecs: //ocomp.info/kodeki-dlya-video-i-audio.html
*
3 Ways to Burn Correct DVD Disc
A couple of important points
For a DVD player to play a disc, it must be properly prepared! If you just burn a movie in FLV format to a disc (like any other file), then, as I said above, the DVD player simply cannot read and play the movie, because it doesn't have the correct codec to decode the file. It's simple on a computer: there is no required codec - downloaded and installed 😉.
To open the disc on a DVD-player: it must be burned in the required format - in the DVD Video format (is a pair of folders on the disk: AUDIO_TS and VIDEO_TS) ... There are a lot of programs for converting AVI, MP4, FLV to DVD-format (but there is one more subtle point!).
The whole point is that the size of a DVD disc (DVD 5) is 4.5 GB. Those. you need to adjust to the size, calculate the bitrate in order to guess and get into this file size after encoding. Of course, this is quite dreary and troublesome!
But there are programs that can automatically convert all the files you choose to the desired format, while maintaining the desired size, and then burn them to a DVD disc. Thus, 2 tasks are solved at once! About such programs - a few lines below ...
Video Master
Site: //video-converter.ru/

This program is a real godsend for your home PC! It allows you to quickly convert videos (supports over 500 formats!), Cut / cut, create DVDs, compress videos for viewing on a phone, set-top boxes, etc.
What is especially captivating, all actions in it are performed in 2-3 mouse clicks, the menu is simple and understandable even for a person who is not knowledgeable in video matters.
I will consider in it everything that needs to be done to solve our problem (step by step).
1) After starting the program, go to the menu "File" and add all videos and movies you want to burn to DVD.
Important! The more files you add (more precisely, the longer the total video time) - the lower the quality will be set. Try not to burn more than 3-4 movies on one disc!

STEP 1 - add video (Video Master)
2) Next, click on the button "Burn DVD" in the lower right part of the program window. See screenshot below.

STEP 2 - choose a DVD burn tool
3) Then you need to select the menu - it will be displayed immediately after you insert the disc into the tray of the DVD player. In general, a very handy thing.
However, you can select the "No Menu" option and jump straight to the recording (that is, bypassing the next step).

STEP 3 - select the menu
4) Then a window will appear in which you can customize the menu in detail: sign each video as you need; choose fonts; change colors; add background, picture, etc. In general, all this is done quite easily and does not need separate comments ...

STEP 4 - setting up the menu
5) And the final touch:
- specify the drive on which the DVD will be burned (as a rule, it is selected automatically);
- set the video type (for our country it is optimal "DVD in PAL standard", as in the example below);
- specify the quality and click Next.

STEP 5, 6, 7 - recording setup, recording
6) It remains only to wait for the end of the process. Conversion and recording times can vary greatly (depending on the power of your PC; on the codecs used to compress the video; on the number of added files; on the speed of your DVD drive, etc.).

STEP 8 - waiting for the end of the recording process
*
ConvertXtoDVD
Website: //ru.vso-software.fr/products/convert_x_to_dvd/

A very good encoder who has written me "correct" and readable video discs more than once or twice. One of its advantages is full automation, which saves you from all the routine tasks: you just select the files you want to add to the DVD and press the convert button!
Advantages:
- Video files recorded by this program are readable on any DVD-player;
- Built-in codecs in the program (not all!);
- Quite fast converter;
- Auto-burn disc after converting;
- Russian language support;
- Support for all popular Windows versions: XP, 7, 8, 10.
I will consider the process of recording a disc in steps.
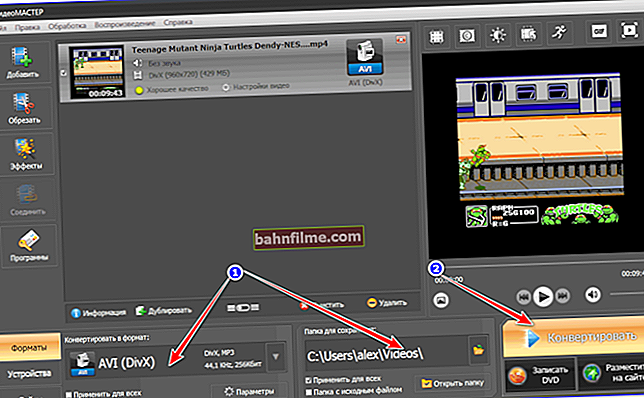
1) After opening the program, you will see a window divided into 2 parts: on the left you will see the files you added, on the right - just a viewer and editor.
The first thing you do is add the files you want to burn to a DVD (arrow-1 in the screenshot below), the second - go to the settings (arrow-2 in the screenshot below).
Note!
In theory, quite a few files can be recorded on a single DVD disc. But the more files you add, the worse the quality (both sound and video) will be! I recommend not to add more than 2-3 films to one disc.

Adding to the project and settings
2) In the program settings: in the "Target format" section, select the video format - PAL (Russia, Europe) (for our country this is the best choice, one of the most popular formats. But, for example, in the USA, NTSC is widespread). DVD resolution - full screen, aspect ratio - automatic.

Target format
3) In the "Encoding options" section, I recommend setting the option automatically (so that the program itself selects the optimal options for the added number of files). As for the overall size, here, in most cases, you need to choose DVD-5 (4300MB) (or DVD-9, which is 2 times larger in volume, but these discs are used less often (in my experience  )).
)).
Conversion priority is normal. If you set it high, then the computer may start to freeze and slow down in the process of performing the task (although sometimes you can buy time ...).

Coding
4) The last thing I recommend setting in the settings is audio. You need to set a couple of options: select the automatic audio format, plus put a tick in front of the "Convert DTS to AC-3 (better compatibility)" item (see the screen below).

Audio settings
5) After the settings are specified and the video files are added, you must:
- Because the program has a built-in editor, you can edit the video (for example, cut out ads, if you made a recording from a TV tuner - the scissors tool; or overlay additional captions, etc.);
- click the convert button (see screenshot below).

Customization and conversion (clickable)
6) The program will start processing the video (convert to the desired format). As a rule, the conversion time is quite long (it depends on the power of your computer, the amount and quality of the added video). At this time, it is better not to load the PC with extraneous tasks and just wait for the operation to complete.

Conversion process
7) After the files are converted, ConvertXtoDVD will prompt you to select a drive and burn the video to disk. In general, there is nothing more to comment on - you can safely insert the recorded disc into any DVD player and enjoy the video!

Choosing a drive to burn a disc
*
Freemake Video Converter
Site: //www.freemake.com/ru/free_video_converter/

Free and very popular video converter. Supports a bunch of different video formats: MP4, AVI, MKV, WMV, MP3, DVD, 3GP, SWF, FLV, HD, MOV, RM, QT, Divx, Xvid, TS, Fraps, etc. The program supports high quality Full HD 1080p video, HD 720p (from any HD cameras).
I also want to note separately its fast work - in my humble opinion, it converts video faster than many other similar programs.
Minus : Free version inserts small screensavers at the end and beginning of the video (when creating a DVD). In my opinion, it is not so scary  .
.
And so, in detail about creating a DVD in Freemake Video Converter ...
1) After starting the program - click the "Video" button and add all the video files that you want to burn to disk. Keep in mind that the more files you add, the worse the quality will be! My advice: when it comes to films, do not add more than 3-4 pieces (standard length is about 1 hour 30 minutes).

Adding video to a project
2) After all the videos are added, you need to click the " Convert to DVD format ". The conversion buttons are located at the bottom of the window (see screenshot below).

Convert the added video to DVD format
3) The next step is to set the conversion parameters. Here you should pay attention to (the screen below illustrates everything that is written below):
- Choosing where to convert video - I recommend just saving the video to an ISO file on your PC's hard drive (ISO is a disc image that can be easily and quickly burned to a regular CD / DVD disc, more on this below in the article);
- Good quality : if the program writes to you that way, then everything is fine. If there is a phrase that the quality is bad, then you have added too many films (video files), and their number needs to be reduced;
- Standard DVD (4.7 GB) - here just indicate the disc on which you are going to record your films;
- PAL 720x576 25 FPS - there is no need to change anything here, in Russia the PAL format is widespread;
- AC, 320 Kbbs, 5.1 - audio format (codec). You can not change;
- Screensaver - minus the free program, we just accept
 .
.
 .
.
Conversion options
4) The conversion process can take quite a long time. At this time, it is better to get away from the computer and do other things (my approach ).

Process of creation
When the conversion is complete, you will have an ISO file in DVD format. Now you need to burn it to disk, a few words about this below ...
How to Burn ISO Image to DVD Disc
There are special utilities for this: Alcohol 120%, Daemon Tools, Nero, Ultra ISO and others. The latest versions of Windows can burn an ISO image without any additional programs (however, the process is built crookedly and is often replete with errors). Therefore, I recommend using Ultra ISO.
Ultra ISO
Website: //www.ezbsystems.com/ultraiso/index.html

One of the most convenient and multifunctional programs for working with ISO images. Any ISO image can be opened, edited and burned to a USB flash drive, CD / DVD disc, external hard drive, etc. If you have to deal with ISO images - I recommend this program as one of the best!
The recording process itself ...
1) After launching Ultra ISO - open the menu file / open and specify the image that you want to burn to the disc (i.e. open the ISO image we created in the Ultra ISO program).

Open ISO file
2) Next, open the menu tools / burn CD image (or press the F7 button). See screenshot below.

Burn CD Image
3) Here you need specify drive in which the CD / DVD disc is inserted for recording, specify write speed (you can leave it at the default maximum), and press the " Write down ".

Image recording
Actually, that's all. After burning the image, the disc can be used for viewing in any DVD-player.
These are not clever programs that allow you to quickly and easily burn video discs.
Have a nice watching!
👋
Article revised: 05/12/19
First publication: 8.12.16