User question
Hello.
Tell me, I ran into a problem. In general, I wanted to reinstall Windows, went into the BIOS settings, changed them. And now my computer doesn’t boot: I can’t install the new system or boot the old one.
How to return the settings in BIOS to factory settings now, how to reset them?
Good day.
Such a question is not uncommon, quite often inexperienced users, having changed any parameters in the BIOS, are faced with a "problem" PC operation, and the need to return everything to its previous state.
In some cases, resetting the settings to the factory defaults is quite simple, in others (when, for example, a password for entering the BIOS / UEFI is set), it is very difficult to do this!
In this article I will try to consider several typical cases for solving a similar problem ...
👉 In general, resetting the BIOS settings, most often, is necessary in the following cases:
- if the computer has stopped working stably, and the nature of the reason is not clear;
- if you cannot enter the BIOS, as it asks for the super-administrator password;
- if Windows does not boot (often after setting up the boot queue);
- if you were overclocking the processor and want to return the frequencies to optimal and safe ones.
*
Ways to reset BIOS / UEFI settings to factory defaults
Using the BIOS menu itself (Load Defaults)
The easiest and fastest way to reset BIOS settings is to use a special menu in the settings, usually it is called as "Load Defaults" .
This menu is available in absolutely all BIOS versions, most often in the section Exit ... I will consider how this is done in steps ... 👇
First you need to enter BIOS
Usually, the button to enter the BIOS menu is written when the computer / laptop is turned on (try restarting your computer to see the first welcome screen).
Most often, this is some kind of button from:F2, F10, Esc, Del (99% of devices support these keys).

Press Del to run SETUP / sample welcome screen (Del button - to enter BIOS)
👉 To help!

1) Perhaps my article with buttons for entering BIOS and Boot Menu from different manufacturers of PCs and laptops will be useful to you.
2) Instructions on how to enter BIOS.
👉 By the way!
Buttons for entering BIOS settings are usually always indicated to the documentation that came with your PC.
One more thing! In some laptop models (in particular, Lenovo), there is a special button on the case for entering the BIOS - more on this here.

Lenovo B70 - BIOS entry button next to the power input. It is most convenient to press with a pencil or pen
*
Load secure settings (default / factory settings)
In general, it is impossible to give universal settings, where in which BIOS version is the necessary tab for resetting the settings is located!
But in most cases (99%), the desired tab is either on first screen (the main one, which you see immediately upon entering), or in the section Exit.
👉For example, the screenshot below shows the Award BIOS (one of the most popular), in which there are two tabs for resetting BIOS settings: Load Optimized Defaults , Load Fail-Safe Defaults ... You can use any.
By the way! After resetting the settings, do not forget to save the settings - the button F10.

The photo below shows an excellent BIOS version - here is the required tab "Load Defaults BIOS" is in the section Exit... After resetting the settings - you need to save the changes made by clicking on "Save Changes and Exit" (translation: "save changes and exit").

In Phoenix (Award BIOS) on laptops, the reset link is called "Load Setup Defaults" (laptops Acer, Dell, etc.), and is located in the section Exit.

In some Dell laptops - the link you need may be called "Restore Defaults" (reset the settings to default, ie to the default settings ☝).

In most cases, it is in this way that you can quickly and easily reset the BIOS settings.
However, in some cases, this method won't work (most often, when changing the BIOS settings is set password, and you have forgotten it or do not know). In this case, skip to the second part of the article ...
Note!
Many laptop users, after resetting the settings, are faced with the fact that the device does not boot (most often, an error like "Operating System Not Found" is issued).
This is due to the fact that the boot mode has been changedBoot Mode, was Legacy, and became UEFI. To fix this, in the BIOS settings you need to change UEFI on the Legacy, and also disable Fast Boot mode (usually, this is done in the section BOOT (download settings)).
An example is shown in the screenshot below: on the left (after the reset), on the right (after the settings).

*
Using a jumper on the motherboard
An example for laptops will be shown at the bottom of the article ...
Almost any PC motherboard has special jumpers for resetting BIOS settings. This jumper is located next to the battery that powers the CMOS memory.
Usually, by default, it is in mode 1-2... To reset the settings - put a jumper in mode 2-3 for a couple of minutes (see photo below).
👉 Important! This operation must be done with the computer completely turned off (you must also disconnect all connected wires and plugs from the system unit)!
Note: The jumper can be named differently. For example, CLRMOS1 (as in the photo below), CLRTC, Clear CMOS, CCMOS, Clear RTC, CRTC ...

The photo shows a jumper used to reset BIOS settings.
If there is no jumper
Some motherboards may not have a jumper at all. But then, usually, there is either a special button for resetting parameters (called CLR CMOS), or there are two special ones. contacts that must be closed with a screwdriver (or any other metal conductor; there are contacts near the Clear CMOS inscription).
Important! They close the contacts or press the CLR CMOS button when the PC is completely turned off (and the power cord is disconnected from the socket)!

The photo shows what the CLR CMOS button looks like on the mat. PC board
Addition!
If you have left to your PC / laptop documentation - it almost always contains this information (look for the BIOS Setup reset section). Perhaps only in cheap Chinese devices this information may not be available ...
*
Using a battery on the mat. board
A little higher, when it came to the jumper, I mentioned that it is easiest to find it by battery ... It resembles an ordinary coin (in size, except 2-3 times thicker), on which, usually, you can see the word "battery" .
As a rule, it is light and iridescent, when you look at the motherboard from above - it immediately catches your eye (see photo below 👇).
For reference!
So here, thanks to this battery, when you turn off the computer, it still remembers the settings in the BIOS, knows the time, year, month, etc. Those. all this happens and is preserved thanks to this small battery - it provides independent power.
As a rule, its energy is enough for 10-15 years of PC operation (sometimes even more). Thus, changing it while using the computer is practically unnecessary (in 10-15 years your PC becomes morally obsolete, and you change it to a newer one).
👉 To reset BIOS settings - you can simply remove this battery and wait 15-20 minutes (better than half an hour for reliability). Here's a quick and easy way!
The photo below shows 2 examples of what this battery looks like on a mat. board.

Note!
Please note that the date, time and other settings that you will need to set after turning on the PC will be reset.
Important!
It is necessary to remove the battery with the PC completely turned off and disconnected from the power supply.
*
Reset password and BIOS settings on laptops
In principle, all of the above is also true for laptops, albeit with some reservations.
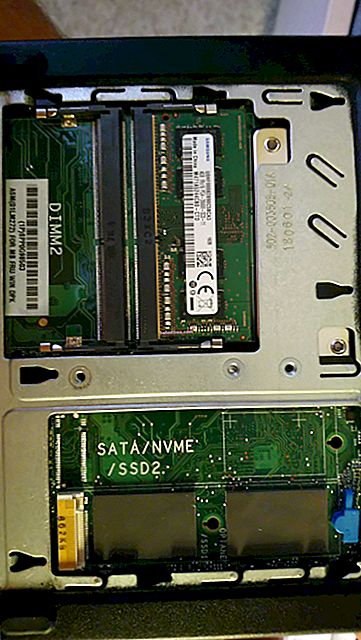
Firstly, the laptop is not so easy to disassemble, especially some models (but often the necessary reset jumpers are located under the cover that protects the RAM, which can be easily opened from the back of the laptop ☝).
Secondly, the laptop does not always "forget" the old passwords after removing the battery (some models have one more non-volatile memory, which, in principle, cannot be turned off by usual methods). In some cases, you cannot do without a service center.
I will consider some points below.
The photo below shows the message that appears on the laptop after turning on. The laptop will not turn on without entering the password ...

Method 1: contacts / jumper
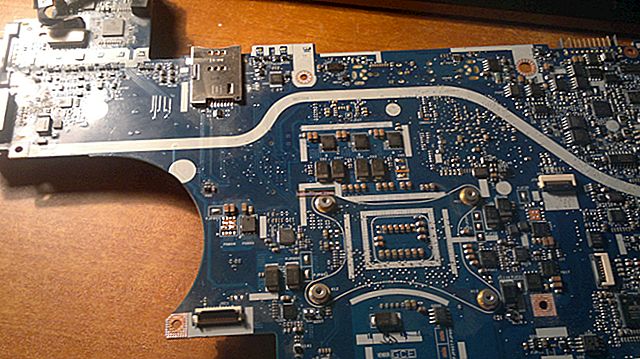
In general, it is unrealistic to give a universal advice for each laptop model! In the article below, I will disassemble a typical Acer laptop and show, using it as an example, how you can reset the BIOS.
In principle, the key difference can only be how to disassemble the laptop, and where the jumper and battery will be located on the mat. board.
And so, let's get started ...
1) First, turn off the laptop and disconnect all cords from it: power, network, mouse, etc.
2) Turn it over and remove the protective covers: from the RAM, hard drive. Also remove the battery (see photo below).
By the way, pay attention to the fact that the battery on laptops is usually held and fixed by a pair of latches. To remove the battery, simply slide them apart.

3) Next, remove the strips of RAM and the hard drive (since usually, under them or next to them, remove the cherished contacts or a jumper). Usually, the contacts that need to be closed are signed asJCMOS (or Clear Cmos or something like that).
Note! Before removing the RAM on the laptop, open the "antennae" that fix the planks. Many do not know this and are in a hurry to remove the bar.

4) Next, close these contacts with a screwdriver or tweezers (as in my example). It will take about 15-30 seconds. time.
Note! If you closed the contacts, and then collected everything and the BIOS did not reset, you need to do the following.
Close the contacts and do not release them: in parallel, connect the power cord to the laptop and turn it on (for 20-30 seconds). Then turn off and open the contacts.

5) Next, connect the hard drive, RAM, install the protective caps, connect the cords and turn on the laptop. The BIOS should have been reset (zeroed out).
Method 2: battery
1) By analogy with the previous method: unplug the laptop, unplug all cords, and turn the laptop over. Remove the battery, protective caps.
Then you should see (or not see - depending on the configuration of your laptop) a small round battery (in the photo below it is shown with a green arrow).

2) Carefully remove it with a small straight screwdriver. Wait 15-20 minutes, then put it in place and assemble the laptop.

3) Turn on and check. In 98% of cases, the BIOS will be reset!
By the way, in some cases, to get to the battery, you have to completely disassemble the laptop.
In general, there is nothing complicated in this, but this operation requires great accuracy, since many thin wires that can be easily damaged.
For example, the photo below shows an ACER laptop, the battery for resetting the password is located under the keyboard ...

Method 3: special. utilities (for example Acer)
For laptops, there is another effective way to reset the BIOS, including the one with a password. We are talking about special utilities for resetting the password, they are often made by various enthusiasts (of course, there is no official support, so their use is at your own peril and risk!).
For example, there are specials for ACER laptops. utility CLNPWD (the developer is not Russian-speaking, unfortunately). It is on it that I will show you how to work with such software.
You will also need one more utility - HP USB DISK STORAGE FORMAT TOOL (she's pretty popular).
A link to download the CLNPWD utility can be found here.
Link to the software portal (HP USB DISK STORAGE FORMAT TOOL).
1) The first thing you do is insert a USB flash drive into the USB port and run the utility HP USB DISK STORAGE FORMAT TOOL.
2) Then you need to select the inserted USB flash drive, specify the file system (FAT 32), enable fast formatting (Quick Format), check the box opposite "using a DOS startup disk" and specify the folder with the DOS version that you want to write (it is recommended by the developer CLNPWD).

3) Then copy the file itself to the USB flash drive (i.e. clnpwd.exe).
4) Restart the laptop and open the Boot Menu (in the example below F12 button). Usually, the button to enter the Boot Menu is displayed on the first screen after turning on the PC.

5) Select the flash drive from which we want to boot.

6) Actually, the last step is to run the utility clnpwd: just type clnpwd and hit enter. Next, the utility will ask you what to reset:
- digit "1" - delete user password;
- digit "2" - deleting the super-administrator password.
I recommend deleting both. Then we reboot the laptop, and we see that the password has disappeared ...

Note!
For different brands of laptops (and even models) - you need to use your own utility.
Also, I will once again warn you that you use them at your own peril and risk. Officially, no one has tested them, and the manufacturer does not give a guarantee (by the way, if your device is under warranty, such a reset method may cause it to be "reset" ...).
*
In general, that's all for now ...
Happy and quick reset!
👋
First publication: 24.02.2017
Correction: 01/05/2020