User question
Hello. Tell me with one problem: I bought a new laptop and it has one hard drive "C: /". Is it possible to split it into two disks (I had 2 on my old computer: one for the system, the other for files).
It is highly desirable without losing data and reinstalling the system. The laptop is from Asus (I won't tell you exactly the model), the OS is Windows 10.
Good day!
Quite a typical situation that usually occurs when buying a new laptop or computer. Of course, there is no crime in this, but it is more convenient to use a computer with several local hard disks (partitions)! 👌

Local drive "C: /"
Imagine the situation: the system "flew", and you need to reinstall it.
If a you have one local drive "C: /" - then you will have to save / transfer all files first, and then install the system.
What if on your drive "C: /" - only Windows and programs, and on another local drive "D: /" (for example) all the documents - then you can "instantly" reinstall the system and make the PC work (and the documents on the "D : / "will remain intact, because when installing Windows, only one disk partition will be formatted on which you are installing the system - that is, the" C: / "drive).
In this article, I will consider a way to split (or split) a hard drive in Windows without losing data (perhaps this is the key condition!), And without installing additional software. 👌
*
How to partition a disk: through disk management
👉 Disk Management is the most necessary tool in Windows to work with any storage devices (HDD, SSD, USB-Flash Drive, etc.) connected to your computer.
I note right away that "Disk Management" is in every modern version of Windows 7/8/10 (possibly, with the exception of different assemblies from "craftsmen").
Most often, "Disk Management" is used in cases: when the disk or flash drive is not visible, when you need to format the media, when you need to change the size of the hard disk partitions (our case), if you need to change the drive letter, etc.
So, just below we will consider how to make two from one local drive "C:" with 110 GB: "C:" and "G:" (all data will remain on the "C:" drive intact!).
Basically, we'll just take some of the free space on the "C:" drive for the new "G:" partition. See the screenshot below, and everything will be clear. 👇

Was (left, 1 disk), now (right, 2 disks) / data in place
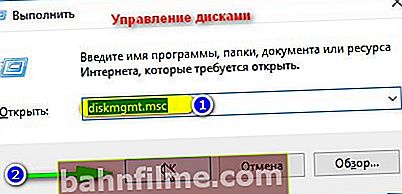
How to open disk management:
- Method number 1. The easiest way (and universal, works in all versions of Windows): press the key combination Win + R , enter the command diskmgmt.msc and press Enter .
Disk management / how to open
- Method number 2. You can open it through the control panel: for this, when you go to the control panel, switch the display to "large icons" and open the section "Administration" then "Computer Management / Disk Management" .
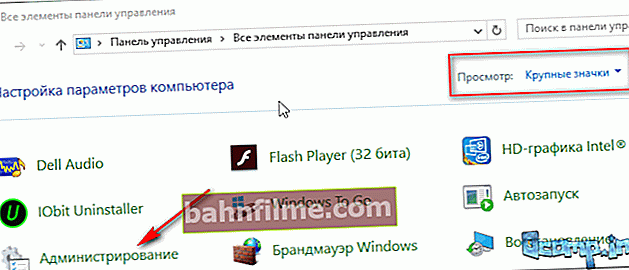
Administration / Windows 10


Now, in fact, you can start partitioning the disk ...
1) Firstwhat needs to be done is to decide from which disk partition you want to take away free space for the new partition.
In my example, I will take away free space from the "C:" drive (you can also do this from any other).
👉 Note!
Please note that in addition to the "C:" drive, there are several partitions on the system drive that are required for system recovery (in my case, 300 and 100 MB).
Here's one simple tip: to avoid problems, just ignore them, and don't delete / edit them!
After After you have selected a section, right-click on it, and in the pop-up context menu, select the function "Shrink Volume" (as in the screenshot below).

Shrink volume
2) Next a small window will appear asking you to wait while requesting available space to compress. As a rule, the waiting time does not exceed 30-60 seconds.

Requesting space to compress
3) Now need to indicate compressible space size (that is, the amount of free MB on the local disk that will be given to another disk).
In the example below (see screenshot 👇), the size of the compressed space is 30,000 MB (number 1) - that is, in fact, we indicate the size of the new partition to be created.
And the total size after compression is 83494 (this is how much disk space you have left from which you take free space).

Compressible space size
4) When the compression operation will be completed, you should have a "black" rectangle on your disk with unallocated space (ie a new disk partition that needs to be formatted).
To do this, just right-click on this section (see screen below), and select from the menu "Create Simple Volume" .

Create simple volume
5) Then specify its size (it is recommended to leave it as default).

Specifying the size of a simple volume
6) In the next step specify a drive letter (any free).

Drive letter
7) The last moment: you need to specify the file system and set the volume label. Recommend to choose NTFS , volume label you can set any (this is the name of the disk that you will see when entering my computer / this computer), and put a tick in front of the item "Quick Format" (as in the picture below 👇).

Layout settings
8) Confirm entered settings and parameters.

Done
Actuallyafter waiting a few seconds, you will see that the partition will be formatted and you can start using it (like any other disk). It will now be visible on "my computer / this computer".
*
How to get things back: merging two sections into one
Suppose that your task is the opposite: to combine two sections into one (see an illustrative example in the screenshot below). For my example, I will use all the same disk partitions that I used in the first part of the article.

Was (left, 2 disks), now (right, 1 disk) - the disk is merged
1) Firstwhat needs to be done is to copy and transfer ALL DATA from the partition of the disk that you want to attach.
For example, if you want to add the "G:" partition to the "C:" drive, then copy all the data from the "G:" partition to other media (at least to the same "C:" drive).
2) After that under volume "G:" (in disk management) right-click and select the function "Delete volume" .
👉 Important! All data on this partition ("G:") of the disk will be deleted!

If you want to get everything back // delete an unnecessary volume
3) By the way, disk management is quite an advanced program, so it will also warn you that the data will be deleted (screen below).

Delete volume // confirm
4) After delete a volume operation, you should see unallocated space (with a black rectangle, as in the screenshot below). Now this unallocated space can be attached to another disk partition, for example, to the "C:" drive.
To do this, simply right-click on the "C:" drive partition and select "Expand Volume" (as in the screenshot below).

Expand volume
5) Now all that remains is to select the volume we recently deleted and add it to the "C:" drive. In general, everything is quite simple (screenshot below 👇).

Add a remote volume
Mission accomplished!
👉 Note.
If you do not have a hard disk drive (HDD), but an SSD (solid state drive), then all the actions presented above will be performed in the same way.
👉 Addition
For formatting, partitioning a disk, changing partitions, etc., there are a number of special programs: Acronis Disk Director, Partition Master Free, AOMEI Partition Assistant, etc.
👉 Remark! Hard disk software: testing, partitioning, formatting, cleaning
Many operations in them are made easier and faster. Therefore, if the functional presented in 👉 disk management , it will not be enough for you, I recommend using one of these programs.
I do not consider them in this article, tk. I think that with the task at hand, the capabilities of "disk management" are more than enough ...
*
That's all for now ...
Good luck!
👋
First publication: 03/11/2017
Correction: 01/15/2020