Hello.
Who would not say what, but the popularity of optical discs is rapidly falling: not even all computers and laptops have a drive for them. And, probably, this is not surprising: after all, an ordinary flash drive that fits into any pocket can easily replace them.
It is also more convenient to use a USB flash drive to install Windows (there is a USB port on any computer!). But for this it must be written / prepared correctly.
In this article, I will consider all the typical questions related to the creation of installation flash drives: programs for this operation, step-by-step settings before recording, the process of creating flash drives with multiple OS (multiboot), UEFI flash drives. But first things first...
♣
Note!

You may find useful an article on how to download an ISO image with Windows 10 OS [officially and legally] - //ocomp.info/kak-skachat-win10-legalno.html
♣
The best programs for creating bootable USB drives
There are quite a few programs of this kind. To cover all of them in one article is a thankless task, and not even necessary. I will give below those programs that I have used (and still use) myself many times when writing my bootable media.
Approx. : how to use this or that program will be discussed in the second part of this article.
Table number 1 (main)
| Program name / site address | Description | Screenshots |
|---|---|---|
| UltraISO
Website: //www.ezbsystems.com/ | One of the best programs for working with ISO-disc images. Allows you to edit them, extract files from them (or add), write images to a USB flash drive / disk, etc. In general, an indispensable program for working with the ISO format, and I have repeatedly recommended it in my articles (and in this format, by the way, almost all Windows operating systems are distributed). | Screen 1 (main program window) |
| Rufus
Website: //rufus.akeo.ie/ | A small free utility that can create almost any bootable USB flash drive, memory card, etc. Allows you to prepare including USB flash drives for UEFI. Another advantage of the utility: it works somewhat faster than other counterparts. Note: there is both a portable version (does not need installation) and a classic one. Works in all Windows OS: XP, 7, 8, 10. | Screen 1 (Rufus settings for writing a bootable USB flash drive) |
| WinSetupFromUSB
Website: //www.winsetupfromusb.com/ | One of the most famous programs for writing bootable media. Allows you to create bootable media with OS: Windows 2000, XP, 7, 8, 10, etc. The program also allows you to create multiboot flash drives (i.e. on which 2-3 or more Windows OS and at boot you can choose which one to install). In general, an indispensable software if you have to create installation media from time to time. | Screen 1 (setting before burning the flash drive) |
| WintoFlash
Website: //wintoflash.com/ | A simple and convenient program for creating bootable media. In the process of creating and configuring you will be accompanied by a wizard: the whole process goes in steps, which is very convenient if you have never used such programs before. Capabilities:
| Screen 1 (main window of WintoFlash) |
| Windows 7 usb dvd download tool
Website: //microsoft.com/ | A simple and convenient utility for writing bootable flash drives from Microsoft itself (therefore it was impossible not to include it in this review  ). ).You can write a bootable USB flash drive with the following Windows OS: 7, 8, 10. The entire recording process is divided into several steps: choosing a flash drive, choosing an image, confirming, recording ... By the way, there is nothing superfluous in the program: the design is in the style of minimalism. In general, I recommend! Among the shortcomings: it is not always possible to write an ISO image from Windows to a 4 GB flash drive (the program asks for 8, although other similar utilities write this image to the same USB flash drive ...). | Screen 1 (the first step is to select an ISO image) |


Helper programs
Daemon tools
Website: //www.daemon-tools.cc/rus/downloads

A small free * program for working with images (supports a huge number of different formats: ISO, MDS / MDF, CCD, etc.). After installing this program, you will have a virtual drive in "my computer" (their number can be increased) in which you can open any of the images. For a computer, it will all look as if you opened a real CD / DVD disc in the drive.
In addition to opening images, you can also create them from various disks. In general, an irreplaceable program on the PC (especially with the development and popularization of disk images).
* Note: in addition to the free version, you can find a paid version on the developer's website (with advanced functionality).
Alcohol 120%
Website: //www.alcohol-soft.com/

An analogue of Daemon Tools, it has the same functions: creating and opening images, support for protected disks, etc. Alcohol 120% is a paid version of the program, there is a free version - Alcohol 52%.
Basically, you can work with both Daemon Tools and Alcohol. The choice is a matter of taste!
Step-by-step creation of a bootable USB flash drive
Windows XP
Once one of the most popular operating systems from Microsoft. Now, of course, its popularity is falling, and yet a fairly large number of PCs run on this particular OS. Therefore, I decided to include it in this article ...
WinToFlash
In my opinion, the easiest way to write a bootable USB flash drive with Windows XP is to use the WinToFlash utility. The fact is that a wizard is built into it, which will guide you through all the hardships ... (by the way, the Lite version is enough for work).
After launching the utility, click on the green checkmark (screen below) - "Wizard for transferring Windows setup to USB".

WintoFlash - Getting Started with the Wizard
Further, the wizard will offer several options to choose from: I chose the second one, because I have just an ISO image from Windows XP.

WintoFlash - select where to copy from.
The next step: you need to specify the path to the image file with Windows XP and select the USB flash drive to which this image will be written.

WintoFlash - choosing a flash drive and image
Actually, in the next step, the program will warn you that all information will be deleted from the disk and will offer to continue. Agree and wait until all files are copied to the USB flash drive.

A warning. Beginning of work.
WinSetupFromUSB
To help! I have more detailed instructions for working with WinSetupFromUSB - //ocomp.info/winsetupfromusb-windows10.html
This program is somewhat different from the previous one. Firstly, there is no wizard here who will guide you through the steps (you need to enter all the settings yourself), and secondly, there is no support for the Russian language ...
First, insert the USB stick into the USB port and run WinSetupFromUSB and the administrator name.
Next, enter the following settings:
- select the inserted USB flash drive;
- click the "Auto format it with FBinst" checkbox, the file system is NTFS;
- specify the path to the folder with the Windows XP distribution kit (the ISO image can be unzipped using the WinRar program, or open it in Daemon Tools (the links to the programs are presented above));
- the final touch - press the "GO" button.

WinSetupFromUSB - create a bootable USB flash drive with Windows XP
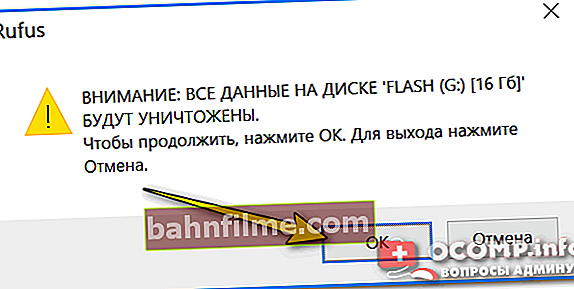
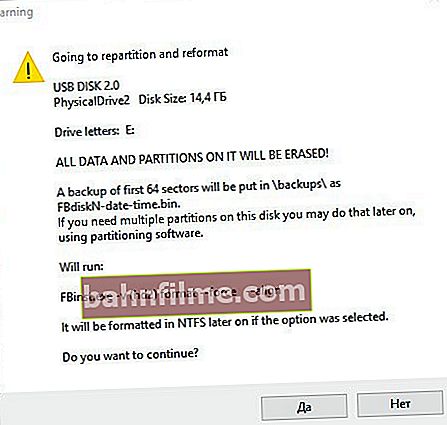
In the next step, the program will warn you that all data on the USB flash drive will be deleted during the process of writing data to it. Just confirm it.
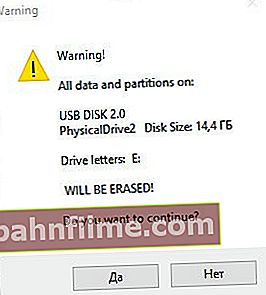
Warning about deleting all information on a USB flash drive
If the flash drive has been successfully registered, you will see the "Job Done" window.
Job Done
Windows 7, 8, 10
In principle, the same utilities can be used to write these OSes - the whole process is identical. I'll show you the whole process step by step using several utilities as an example.
Windows 7 usb / dvd tool
Despite the fact that this utility is designed for Windows 7, you can use it to write to a USB flash drive with Windows 8/10. Because this program is the simplest (it couldn't be easier  ) from everything and the whole process of recording an image in it consists of only 4 steps, I recommend it in the first place.
Step 1: specify the ISO image with Windows OS ("Browse" button, when the image is specified, click "Next").

Specify ISO file
Step 2: select the device to record. In this case, you need to choose either a USB device or a DVD. We choose the first one.

Selecting the recording media for the OS
Step 3: select the letter of the drive to which the recording will be carried out (i.e. indicate the desired flash drive, because several of them can be connected to the PC ...).

Drive letter selection
Step 4: recording process.When the message about the successful completion of the operation (Bootable USB device created successfully) is shown, you can restart the PC and check the USB flash drive ...

USB stick writing process / writing completed successfully
As you can see above, the whole process is extremely simple and not replete with anything superfluous.
UltraISO
- First, open the ISO image in the program - to do this, click the "File / Open" menu.
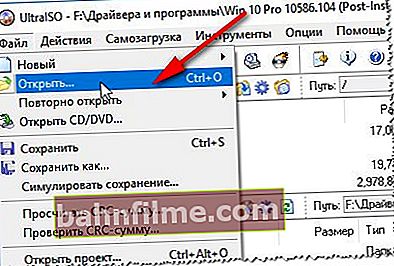
UltraISO - Image Opening
- Next, open the "Boot / Burn hard disk image" menu.
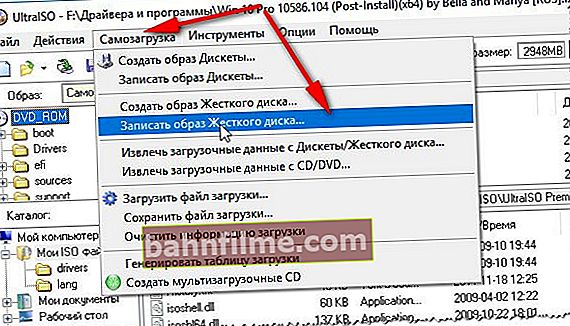
UltraISO - burn hard disk image
- The last step is setting the settings. It is important here: 1) In the "Disk Drive" column, select your USB flash drive; 2) In the "Recording method" column, select USB-HDD + (if the flash drive will not be visible after recording, try USB-HDD without any pros / cons. Not often, but it happens that on some PCs the USB-HDD recording method is preferable); 3) In the "Create Boot Partition" column - uncheck the box; 4) Then click the "Burn" button.
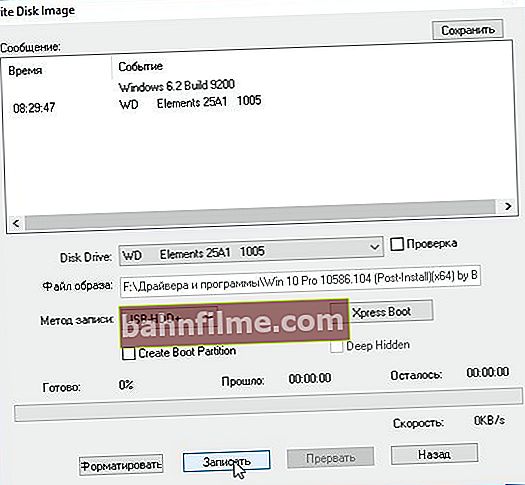
UltraISO - settings for recording a USB flash drive


Rufus
Update article from 01.24.2019: added screenshots of version 3.4. Also on my blog there was an instruction for working with Rufus 3.4 - //ocomp.info/sozdat-zagruz-fleshku-v-rufus.html
- First, we launch the Rufus program as an administrator (it is easy to do: just right-click on the "rufus.exe" file and then select the one you need in the context menu);
- Next, insert the USB stick and go to the Rufus settings: 1) Device: select the inserted USB flash drive; 2) Partition scheme: "MBR for computers with BIOS or UEFI" (the best option); 3) File system: NTFS; 4) You need to specify an ISO image file with Windows OS; 5) Press the record button.
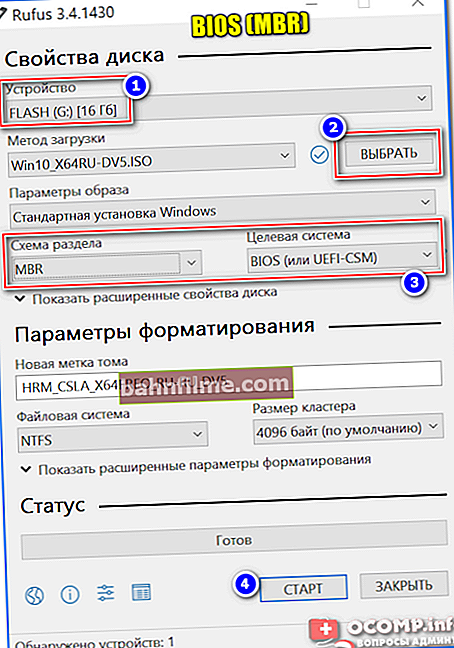
Rufus - creating a USB flash drive for BIOS (MBR)
- Before recording, the program will warn you that all data on the flash drive will be deleted - in response, we just agree.
Rufus warning


UEFI flash drive
UEFI is a new standard, a new interface (so to speak). It is intended to replace the "old" BIOS. One of the main tasks of UEFI is to protect your computer from boot viruses that are loaded together (or before) the Windows operating system boots (sorry for the tautology).
Therefore, in new computers / laptops, if you connect a USB flash drive created in the classical way to their USB port, the PC will not see it! In order for this flash drive to become visible: you need to switch UEFI to Legacy (the spelling may differ slightly, depending on the BIOS / UEFI version) and disable Secure Boot.
In the same part of the article, I will consider a couple of ways how you can create a bootable UEFI flash drive (so that you do not have to turn off Secure Boot protection in the BIOS). So...
Method # 1 - using the WinSetupFromUSB utility
First, run the utility as an administrator (how to do it: right-click on the executable file, then select the desired function in the context menu).
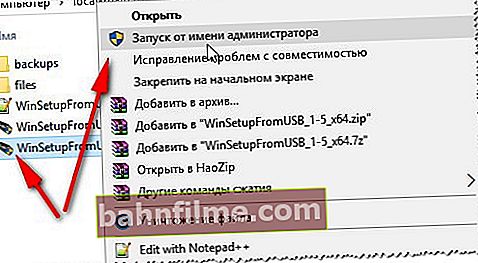
Run WinSetupFromUSB as administrator.
Next, insert the USB flash drive into the USB port and set the following settings in the program:
- Select the USB flash drive (be careful, all data on the USB flash drive will be deleted during recording!);
- Click the "Auto format it with FBinst" checkbox and select the FAT 32 file system (do not touch the rest of the checkboxes);
- Next, select the ISO image file with Windows OS (in the example below, I chose Windows 8);
- Press the GO button and wait for the process to complete.

Configuring WinSetupFromUSB for writing a UEFI flash drive.
Method number 2 - using the Rufus utility
Rufus is a great utility for burning different types of bootable media. All settings are performed in one window, everything is simple and fast.
You also need to run the utility from the administrator (screenshot below).

Rufus - run from admin
Next, you need to insert a USB flash drive into the port and set the following settings:
- select your USB flash drive in the "device" column;
- specify the partition scheme: in this case, select "GPT for computers with UEFI interface";
- file system - FAT 32;
- select an image file;
- press the "Start" button. In principle, all settings are similar to the previous utility, nothing tricky
 .
.

Rufus 3.4 - creating a USB flash drive for UEFI (GPT)
Multiboot flash drive (multiple OS on 1 flash drive!)
On a USB flash drive, you can write not only one version of Windows, but several at once! For example, imagine you have an OS on one flash drive: Windows XP 32 bit, Windows 7 64 bit, Windows 8 64 bit and Windows 10 64bit. In which case, you do not need to carry with you a bunch of flash drives with different OS - with one single one, you can immediately install the desired one. Below I will consider in detail how and what is done ...
To create such a USB flash drive, you need the following:
- multiple ISO images with the systems you want (for example, Windows XP and Windows 7).By the way, it is better to take the Windows XP image with integrated SATA drivers, otherwise you will get a "blue" screen on new motherboards during installation;
- Daemon Tools or Alcohol (if you want to add Windows 2000, XP to a USB flash drive): programs that can open an ISO image (ie, you will see a virtual drive in "my computer", since this is not an ISO image , and a regular disk is inserted into a CD-Rom. Presented in the first part of the article, after the table);
- 8-16 GB flash drive (the more OS you are going to burn, the more spacious the flash drive should be);
- WinSetupFromUSB program (presented at the top of the article, see the first table).
Step-by-step instructions for creating a multiboot flash drive
- Run the WinSetupFromUSB program as administrator. To do this, just go to the program folder, select the executable file and right-click on it, then select "Run as administrator" from the context menu.

Run the software as administrator.
- Next, in Daemon Tools, open the image with Windows 2000/2003 / XP OS (those who will not write these OS to a USB flash drive can skip this step).
The Windows XP ISO image is open in Daemon Tools.
- Insert the USB flash drive into the USB port;
- Next, you need to set the following parameters: 1) specify the inserted USB flash drive (in my case, the "E: \" drive); 2) Check the box "Auto Format it with Fbinst", select the NTFS file system (if you plan to create a USB flash drive for UEFI, choose FAT 32); other checkboxes by default; 3) specify the virtual drive in which the ISO image with Windows XP / 2000 is open; 4) specify the ISO image with Windows 10 (in my case, this OS was chosen for a multiboot flash drive); 5) press the "GO" button - start recording the flash drive. All numbers are illustrated in the screenshot below.
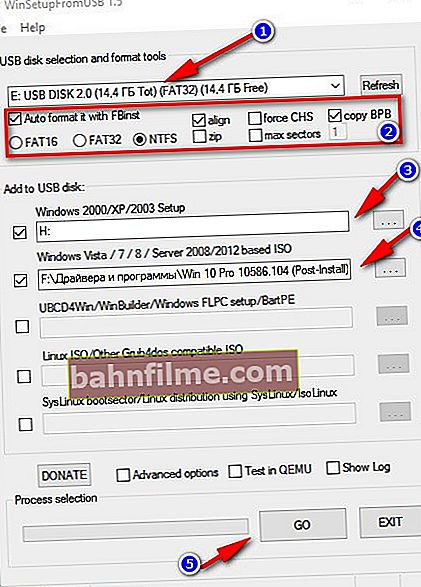
Configuring WinSetupFromUSB before writing a multiboot flash drive.
- Next, the program will ask you whether to start recording exactly. By the way, it is important that all data on the flash drive will be deleted!

Warning 1. We agree.
- Then the program will ask again - the answer is yes.
Warning 2 - click "Yes".
- Further, if everything went well, at the bottom of the window you will see a "green bar" - the program has started working. Recording time depends on the flash drive, the selected images, the speed of your USB-port, PC boot, etc. On average, 5-20 minutes. to record multiple OS. At this time, it is better not to touch the computer and not run resource-intensive tasks on it: games, video / graphics editors, etc.
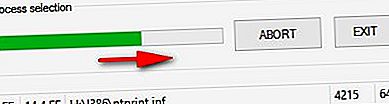
Recording process
- When the USB flash drive is written, you will see the inscription "Job Done". In principle, the USB flash drive can already be used, it now has 2 Windows XP and 10 operating systems! The screen is below.

Job done
- To add another OS, for example Windows 7 - just insert the USB stick again into the USB port, run WinSetupFromUSB (from administrator). Then: 1) select the desired flash drive (note: on which we previously recorded 2 OS) ; 2) specify the ISO image with the added Windows OS; 3) click the "GO" button. Note: please note that you do not need to check the box next to "Auto format it with FBinst", as we did before!

Adding another OS to a USB flash drive
- When another OS is added, you will see a regular window - the job is done. Now the flash drive has 3 OS: Windows XP (32 bit), 7 and 10 (64 bit).
Job done
- If you want to add another OS, for example, Windows 8, you need to do step 9 again (see above). In principle, this way you can add quite a lot of OS to your USB flash drive (so to speak, provide all options
 )...
)...


 )...
)...Checking a multiboot flash drive
To check the created USB flash drive in operation, you need to do the following:
- Go to the BIOS and queue the USB flash drive (you can use the BOOT Menu). For more information about which buttons for running in Bios and calling the Boot Menu, see here: //ocomp.info/goryachie-klavishi-dlya-vh-bios-boot-menu.html
- Insert the USB flash drive into the USB port and restart the computer;
- A window should appear as in the screenshot below: for example, I selected the line Windows NT 6 (this is to select the installation of Windows 7, 8, 10).

Multiboot flash drive - check
After that, if you have 2 or more "new" operating systems, you will see a list with all of them. Choose the option you want and continue with the installation. The screen is shown below, the flash drive is working!

Choosing Windows 7 or Windows 10
On this positive note, I am finishing the article, for additions, as always, I will be grateful.
Good luck !