Good day!
Probably, many have seen photos that capture something incredible: for example, your friend is standing next to an erupting volcano, sitting on the wing of an airplane, or shaking hands with the president. 👀
As you can imagine, such photographs are "not real": several pictures were simply "combined" with each other.
It's not that hard to do this kind of thing with modern software. It is enough to take a photo, cut out a certain object from it (for example, some object or the right person), and place it on a different background. This kind of background replacement allows you to work wonders, create the most amazing and interesting images!
By the way, such an operation can also be useful for restoring unsuccessful photos (when something "unnecessary" has fallen into the background).
Actually, in this article I will offer several simple options for how you can crank up such a "replacement". 👌
Now closer to the subject ...
*
👉 Recommendation!

The better to watch pictures in Windows: programs for viewing images and photos
*
Background replacement: easy ways
👉 Method # 1: using photo editors for beginners
If you are not going to work with graphics professionally, then you do not have to "tinker" with everything with large and complex editors.
Now there are enough programs for beginners, which in a few mouse clicks allow you to perform all the most necessary operations with an image (including replacing the background). One of these is "Photo-Master".
*
Photo-Master
Official site: //photo-master.com/

A simple graphic editor for novice users. All actions in the program are performed in steps (which is very convenient!). The editor is completely in Russian, with tips. Works in all modern OS Windows 7/8/10.
*
Below I will consider in it all the actions for changing the background in a photo.
1) I omit the installation of the editor (it is standard). After starting the program - first of all, open the desired photo ( "File / open photo" , see the screen below 👉).

Open photo (Photo-Master)
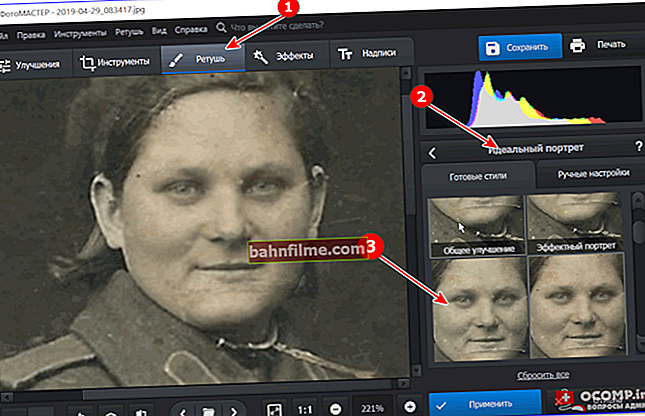
2) Next, go to the tab "Instruments" and click on the tab "Background replacement" (on the right in the menu).

Tools - background replacement
3) An important point: select a green brush ("Object") and indicate the person (animal, object, etc.), which you want to leave in the photo.
Note: It is not at all necessary to trace the entire object.
It is enough to put a few points on it. In my example, I just put a point on every part of the body: head, torso, arms, legs ...

Marking the object to be left
4) Now select the tool "Background" (red brush) and put dots on the background (i.e. on what you want to delete).
In my example, it was the sea, which the program removed automatically (almost immediately after the first point was set).

Marking the background to be removed
5) If the program has deleted something superfluous (after all, it works automatically), you can touch up and restore the desired object with a brush.
In general, in most cases, you can skip this step, because the program usually quite accurately defines the boundaries (in high-quality photos).

Can be corrected if unnecessary has been removed
6) Next, select a new background image (the background can be left transparent or filled with a solid color), and resize the object (if necessary).
I also recommend paying attention to the tool "Adapting colors to the background" , "Blur" and "Borders" ... By adjusting these parameters, you can achieve that the object will be the same shade as the background behind it.

Setting up the object against a new background
7) By the way, I can't help but note that in "Photo-Master" there are a fairly large number of effects: a photo can be brightened, enhanced some shades, or made it generally black and white.

Giving effect and preserving
In general, that's all - all that remains is to save a new photo ... ✌
*
Method number 2: using online services
Their advantage is that you do not need to install anything to work (although this is their disadvantage - you will have to upload personal photos to some third-party service, which you would not always want ...).
In addition, their functionality and quality of work are noticeably lower than those of many editors (especially, this is noticeable when processing large photos).
But nevertheless, if you need to change a very small picture, then the option is quite working. Moreover, if you want to do it from your smartphone.
So...
*
Service 1 - //burner.bonanza.com/
In my opinion - one of the best services for beginners (albeit in English). To get started - follow the link above and click on the menu "Choose a photo" (photo selection).

Photo selection
Further, the service will automatically recognize where the object is in the photo and where is the background. In my case, he quickly "found" the girl in the photo and removed the background behind her (though he partially removed her torso too ...). To fix it - just click on the tool "Touch up" .

We will finish it manually
Then select a green brush and manually paint over the place you want to restore. By the way, if you choose a red brush, then you can perform the opposite operation (i.e. remove those places that are not needed).
When remove / add everything you need - click on the button "Finish" in the corner of the screen.

Where the excess is removed - use a green brush
Next click on the tool "Replace background" (replace background).

Replace the background
Then either upload your picture as a new background, or select one from the base. An example on the screenshot below (to download the resulting image - click on the "Download" button).

Load the finished picture
*
Service 2 - //online.photoscissors.com/myimages
In many ways it is similar to the previous service (unless there are more options, and photo processing is in manual mode, not automatically).
To get started with it - just follow the link above, and click on the button "Upload Image" (upload image).

Loading an image
Then use the green and red brushes to select the subject and background (see example below).

Specifying an object and background
Next, the service will leave what you have highlighted in green (see example below). Then pay attention to the menu on the right: in the section "Background" (background) select tool "Image" (image) and click on the button "Select Image" (picture selection).

Choosing a new background
The last step is to save the resulting image (to do this, just click on the button with the floppy disk in the right corner of the screen ...).

Preservation
*
Additions on the topic are welcome!
Happy work!
✌
First publication: 26.04.2019
Correction: 10/10/2020