Good day!
I think that many have dozens of old memorable photographs in their family photo albums. On the upcoming May holidays, everyone will probably look through them and remember about grandparents, relatives, some significant events ... 👀
But, unfortunately, time is inexorably running forward, and some of the photos look worse and worse every year: scratches, scuffs, white dots, etc. appear on them. If you do not digitize and restore them (i.e. restoration), then after some time you can completely lose them.
Actually, in this article I will suggest a way to improve an old photo at home (in general, any novice user can handle it). For those who doubt - I recommend flipping through the article to the very end, it shows a photo before and after restoration (all questions after should disappear by themselves ...).
So...
*
Restoration of an old photo at home
❶
Scanning photos
The first thing we need to do is to overtake the photo from paper into digital form (called the digitization operation).
It is best to do this with a scanner: this will avoid glare, reflections, and other defects (which may occur if you try to photograph an old photo).
As for the settings: when scanning, select the "color" (or "grayscale" mode), the quality is at least 300/600 DPI.
As a result, you should get a scan in the JPG format (i.e. the format of a regular picture). My example is shown below (as you can see, it has enough defects ...).

The photo I will be correcting in this article
If you don't have a scanner, you can try to take an old photo with your phone (if you have a good enough camera, it can turn out pretty good).
To avoid glare, take photos indoors where there is no bright sunlight (it's best to experiment here).
👉 Help!
How to scan a document using an Android smartphone - see the instructions for steps
❷
Choosing and installing a photo editor
Now you can find dozens of various graphic editors. As a rule, for tasks such as ours, it is recommended to use Photoshop, Gimp and other rather complex and cumbersome applications (at least for beginners).
In order not to complicate everything and to make the restoration accessible to any user, the program is best suited Photo-Master (download link below). Why:
- the editor is designed for a novice user;
- he has a special. tool "repair brush" - it automatically removes scratches, folds, dots, etc.
- dozens of filters and effects to help give old photos a fresh look.
*
👉 Photo-Master
Website: //photo-master.com/

A simple photo editor, all actions in which are performed in steps. Allows you to perform the entire basic range of editing: removing defects, changing brightness, shades, trimming edges, etc. Completely in Russian, compatible with Windows XP / 7/8/10.
The installation of the editor is standard, like any other program (therefore, I omitted it).
❸
Getting started: trimming jagged edges
And so, now we go directly to editing ...
First, we launch the Photo-Master program and open our photo in it (which we scanned in the first step, see the screen below 👇).

Photo-Master - open the photo
Pay attention to the edges of the photo: they are uneven, yellowed. It would be desirable to cut them off immediately.
To do this, you need to go to the tab "Instruments" and select the option "Cropping" .

Cut off jagged edges in the photo
Next, you will have a rectangle in the photo (see arrow-1 in the screenshot below 👇): just select the area you want to leave with it.
Everything that remains outside this rectangle will be deleted. After highlighting - press the button "Apply" .

Select the area you want to leave with a rectangle
By the way, in the same section "Instruments" you can rotate the photo slightly (left / right) if it was scanned at an angle. To do this, use the option "Geometry" .
❹
Removal of scratches, scuffs, white spots
We proceed to a more difficult stage of restoration - the removal of defects (I highlighted them in the photo with red circles so that it is clear what is at stake).
And so, go to the section "Retouch" and choose a tool "Healing Brush" .

We remove scratches and dots, scuffs
Now very important point: Select the size (diameter) of the brush as thin as possible for the specific scratch. Ideally, the diameter of the brush should only cover the defect that you want to fix with it.

We select the brush as thin as possible under-scratch
Then just run the brush along the scratch line (without touching anything unnecessary) - the editor will remove it almost instantly! See example below.
Please note: if the scratch hits several objects, then it is best to fix each object separately. For example, in my case, the scratch touches the girl's hand and the background. I need to fix the "hand" first and then the background - ie. use the brush tool twice (in general, it's a matter of practice ...).

There was a scratch - there is no scratch
So, step by step, working with a brush, you will need to remove all scratches, dots, and other various defects. In general, all this is not difficult - it just takes time (the larger the size of the photo and the lower its quality, the longer it will take to "crawl" over it with a healing brush).

We remove other scratches and inaccuracies in the same way.
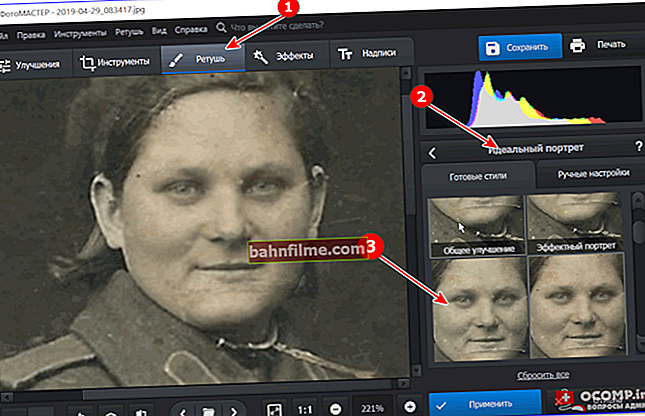
❺
Improving facial features
If you have people in your photo, I highly recommend using another editor tool - "Retouch / Perfect portrait" .
This thing can automatically correct facial features: remove unnecessary "noise", make it more expressive, correct shades, etc.

Improving facial features (perfect portrait tool)
The screenshot below, in my opinion, does not convey the result from this tool very well, but when working in the program, it is visible to the naked eye.

Changed face tone / The difference is not visible on all monitors
❻
We give the photo the desired effect
I also recommend that you see how the photo will look by applying some Effect (in the program they can be found by opening the section "Effects" - then just experiment ...).
Thanks to this tool, you can significantly make a photo brighter, clearer, correct shades, etc.

Add an effect (change the brightness, saturation and shades of the photo)
Note. There are a lot of effects in the editor: vanilla, in blue tones, grayscale, HDR, etc.
❼
Saving results
When the photo is restored and you don't want to change anything else in it - just click on the button "Save" , indicate the format and, on this, in fact, everything ...

Save ...
What happened in my example is shown in the screenshot below. I deliberately combined the original photo with what I managed to do in the editor in 3-5 minutes. In my opinion, it's pretty good for a person who practically does not work with photo editors ...

It was - it is (the result is obvious ...)
*
PS
By the way, you can try to make some old black and white photographs in color (this is not an easy task, but still ...). Of course, this will not work with all the photos, but still, the result may be (the try is worth the game!).

An example of what this is about
*
Additions on the topic are welcome ...
Happy work!
👋
First publication: 04/29/2019
Correction: 10/29/2020