Good day!
In office work, some users accidentally turn on specials. print mode - when typing, the next letter is deleted (i.e., each new character replaces the old one). Of course, when editing ordinary documents, this is very inconvenient and very annoying! 👀
Actually, after another case, when I was disturbed about "this" issue, I decided a similar article with "treatment" to lay out problems not only in the local network, but also here, in your "office" notes. I think it will be very useful to all inexperienced users!
So...
*
👉 STEP 1: turn on the "normal" print mode
The thing isthat Windows has two typing modes:
- "insert" is the most common mode that everyone is used to (when typing, text appears immediately after the cursor, and everything on the right is automatically shifted);
- "replacement" - special. a mode in which a new added character appears instead of the old one that was in front of the cursor (this is convenient to use only in certain cases).
👉 Important!
1) To switch between the "insert" and "replace" modes in Windows, use the key Insert (or "ins" on laptops). Please note that on the same laptops it must be pressed together with the Fn key!
2) To return the erased characters and words to their original form - you need to press the combination Ctrl + Z (you can several times ...).
Of course, users most often use this mode when they press the "0" key on the numeric keypad (with the "num lock" off).

Insert key (or ins on laptops)
Actually, as soon as you are faced with the wrong printing mode - just use this key and change it ...! 👌
However, for those who want to disable this mode altogether, I recommend a couple of methods below.
👉 STEP 2: how to prevent MS Word from switching the editor to "replace" mode
If you relatively often "stumble" on this not very convenient mode of the editor (and erase the necessary words ☝), then, as one of the solutions, you can propose to disable this "replacement" altogether (that is, when you press the Insert key - nothing will happen in Word!).
Is being done it's simple enough: first you need to open the menu "File / options" , and then in the tab "Additionally" uncheck the item "Use INS key to switch between insert and replace modes" (see screenshot below 👇).

Use INS key to toggle insert and replace modes
👉 STEP 3: Another radical solution is to disable the Insert key
This option is more suitable for users with a classic keyboard (on laptops this "trick" is less common).
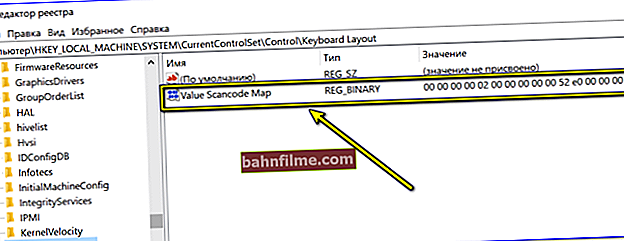
The essence of the method is to tell the Windows OS that nothing happened when the Insert button was pressed (that is, to "reset" it). This can be done 👉 through the registry editor, there are only three steps:
- first open the branch: HKEY_LOCAL_MACHINE \ System \ CurrentControlSet \ Control \ Keyboard Layout;
- create in this branch a parameter (Binary) with the name "Value Scancode Map" (without quotes);
- well, set the following line to the parameter value (see the screen below 👇, for more details here).
Disabled INS

👉 By the way!
To more easily disable the Insert key, you can use the special. utility MapKeyboard ... It is very simple to use it: you just need to run and install something "harmless" instead of Insert (Shift, for example, see the screen below 👇).

MapKeyboard: There are three steps in total to replace a key.
👉 To help!
How to reassign one key to another (for those who do not have a button press on the keyboard)
*
Additions on the topic are welcome!
Happy work!
👋