User question
Hello.
I have a Wi-Fi router installed at home: a hospital station is connected to it via a cable (note: PC). 2 laptops are connected to the router via Wi-Fi. How can I create a shared folder on a laptop (or PC) to transfer files from one device to another through it? Not to run with a flash drive ...
PS Windows 10 is installed on all devices (constantly updated).
Alexey M.
Good day!
The task, in general, is not difficult: it is enough to spend 5-10 minutes once. time to set everything up. Below in the article I will give several steps, by following which you will solve a similar task.
Note: of course, all your devices connected to the router must be turned on both during setup and during file transfer (exchange)!
*
Creating shared folders on the local network for working with files
STEP 1: set up PC name and workgroup
The first thing to do is to open "My Computer / This Computer", right-click in any free space and select properties .
In Windows 10, to open "This PC": just open Explorer (the combination of Win + E buttons), and select "This PC" from the menu on the left (see the screenshot below).

Properties (this PC)
By the way, to immediately open the PC properties (as in the screenshot below) - just press the key combination Win + Pause .

Computer name and workgroup (clickable)
pay attention to computer name and working group :
- computer name must be unique on each PC / laptop connected to the local network (to the router). If the names of some PCs are the same - rename!
- working group on the contrary, it should be the same on all computers.
To change the name of a PC or workgroup: just click on the button "Change parameters" in the PC properties (it is located to the right of these values).

Change working group
After should open a window "Properties of the system" : left to click on the button "Change" (see screen below), and enter the required data.

PC properties
Please note that after setting these parameters and saving the settings, the PC / laptop must be rebooted! Otherwise, the changes made to the settings will not be taken into account and accepted.
STEP 2: allow access to shared folders / printers
In new versions of Windows, "increased" security measures are enabled by default (and therefore it is not so easy to take and create a folder that can be accessed by other PCs on the local network).
To disable such protection, you need to follow a series of steps. Below I will show them by example (relevant for Windows 7, 8, 10).
- first you need to go to the Windows Control Panel and open the Network Control Center (full address: Control Panel \ Network and Internet \ Network and Sharing Center);
- in the menu on the left you will need to follow the link: Change advanced sharing options ;
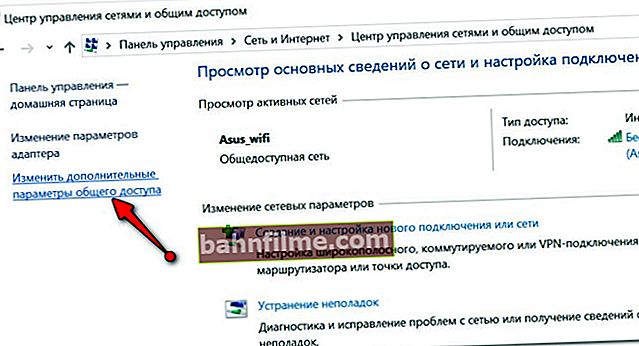
Change add. sharing options (clickable)
- then you will (most likely) have three profiles: "private", "guest", "all networks". You will need to go into each of them and move a couple of sliders ...

Private, guest, all networks
- for the "private" profile, you must enable network discovery and file and printer sharing (see the screen below);

Private (clickable)
- for the "Guest" profile, you must also enable network discovery and file and printer sharing;

Guestbook (clickable)
- for the "All networks" profile, you must enable general access for network users, and disable password protection (see example below, clickable).

All networks (clickable)


Such sharing settings must be set on each PC / laptop for which you plan to work in the local network (i.e., share folders, files, etc.)
Note that after setting these parameters, you can start sharing your folders and files with other users. How to do it - see the next STEP.
STEP 3: "share" the folder (make it accessible to the local network)
You can, of course, use the shared folders provided by Windows, but this is not always convenient. Therefore, a little below I will show how you can open any of the folders (or even an entire disk) for reading (or for reading and writing) local users.
So...
We take any folder on any disk and open it properties(if anyone does not know how: open the explorer, find / create the desired folder, then right-click on it and select "Properties" in the menu that appears) ... Next, in the "Access" tab, click on the button "General access" (see example below).

Folder Properties: Sharing
Then add (the "Add" button) the "Everyone" user group, and set the "Read and Write" permission to it (this means that all users in this folder will be able to view, modify and delete files).
Note! If instead of "Reading and Writing" set just "Reading" - then local network users will only be able to view files in this folder. Choose the best option for each of the folders that you share.

Add permission to read and modify files in this folder for ALL users of the local network
After you click on the "Share" button - this folder (and all files in it) will become publicly available for all users of your local network (ie for all devices that are connected to your Wi-Fi router).
STEP 4: copy / download files from the shared folder
Many users, after completing all the previous steps, cannot always find a shared network folder. The fact is that after setting all the settings, there is no link or icon anywhere to open it (at least not in any visible place). Windows "seemingly" will work all the same ...
To view all shared folders, open the regular one conductor (combination Win + E), then in the menu on the left, click on the icon "Net" : a window should open in which all computers on your local network will be presented. Opening one of them - you will see all the folders that it has shared (you can go to any of them and view / edit files).
In the example below, 2 folders are shared: "USERS", and "New folder"

Explorer - browsing the shared folder
If suddenly the computers of your local network are not shown in the "Network" tab, check:
- whether they are all enabled, and whether Windows is loaded on all (whether it is being updated at this time);
- whether they are all connected to the network (whether the network icon is lit on all of them);
- try to update the list of PCs in the "Network" tab (to do this, right-click in any free space, and in the menu that appears, select "Update", see the example below) .

Refresh
As for direct reading / copying, it goes in a standard way: just as if it were a simple folder on a disk.
An example of copying a file is shown in the screenshot below.

Copying the image file
STEP 5: how to add a network folder to "My Computer"
Agree that it is often not very convenient to constantly look for the necessary network folder (disk) somewhere in the explorer. Moreover, if you have several such "favorite" folders, and even more so if this PC will also be used by people who are poorly versed in all this.
In this case, for convenience, it is recommended to add the necessary folders to "My Computer / This Computer", which almost all PC users can use.
How to do it:
- first open the explorer, go to the "Network" section and find the desired network folder;
- then right-click on it and select "Map network drive" (see screenshot below).
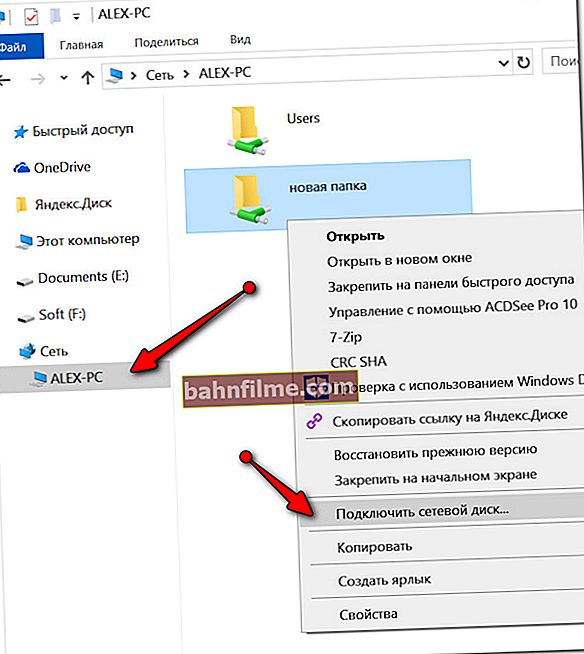
Mapping a network drive
- after that you will need to specify the drive letter and click the "Finish" button (see example below).
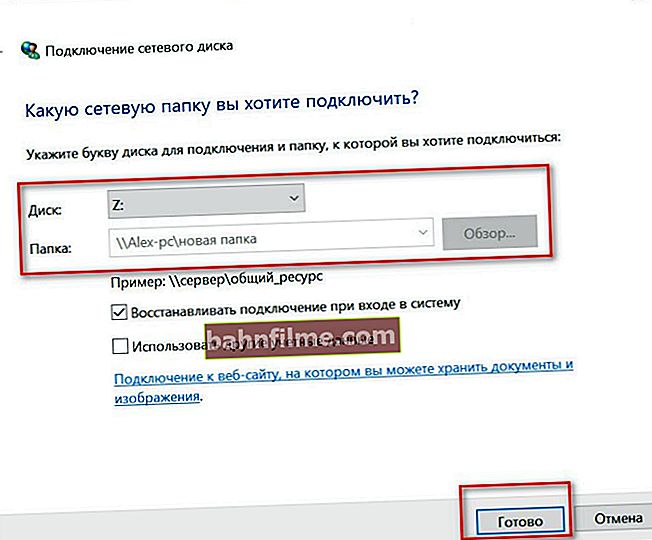
Choose a drive letter and agree
- now the selected directory (disk) will be visible every time you enter "My Computer" (see example below). Actually, in this form, this folder is easy and convenient to use for all PC users ...
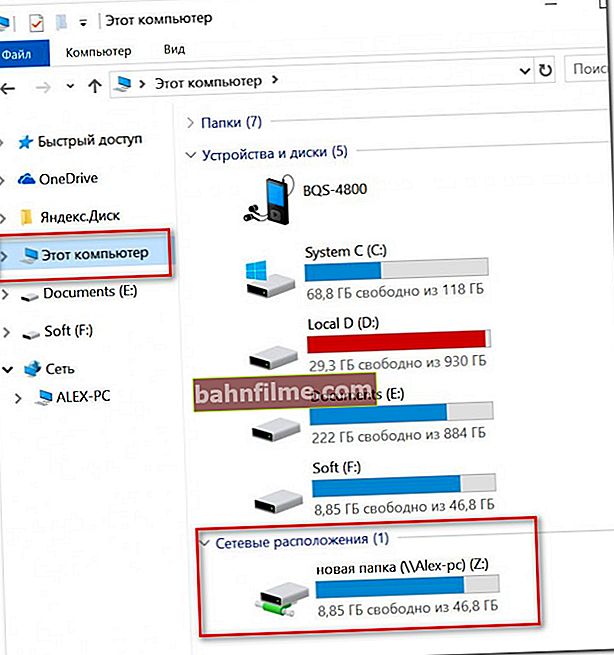
This computer, we are viewing the network drive


*
PS

By the way, if you need to transfer a large amount of information not over LAN, but over the Internet (between PCs located in different cities / countries), then use the recommendations from this article: //ocomp.info/kak-peredat-fayl- po-internet.html
*
That's all, for the addition - Merci in advance!