Good time!
Probably, almost everyone noticed that in some photographs a person's eyes may have a red tint (sometimes so intense that it may seem that a person is sick ...). By the way, a similar effect can be observed when photographing animals. 👀
It does not always occur, both the shooting conditions and the peculiarities of the eye of a particular person affect. Sometimes it's a little surprising to see that everyone's eyes in the picture look normal, while some of them have red ...
If you have photos with a similar problem - do not despair, in just a couple of minutes you can correct the picture and return it to its natural shades (even without the knowledge of Photoshop!).
Actually, this article will just be about this ...
As an example, I give a photo "BEFORE" and "AFTER" processing (by the way, all processing took about 1-2 minutes).

It was - it is now (the photo was improved in the Photo-Master, see the description below)
*
How to remove red eye in photos
Method 1 (Photo-Master)
Required program - //photo-master.com/
The "Photo-Master" program is good first of all because it is designed for a novice user:
- simple interface;
- everything is in Russian;
- There are many tools, but they are all simplified as much as possible;
- the program has built-in elements for auto-improving photos.
I will show all actions for removing red-eye in "Photo-Master" with a concrete example.
1) And so, the first action is standard - open the desired photo (combination Ctrl + O).

Open photo (Photo-Master)
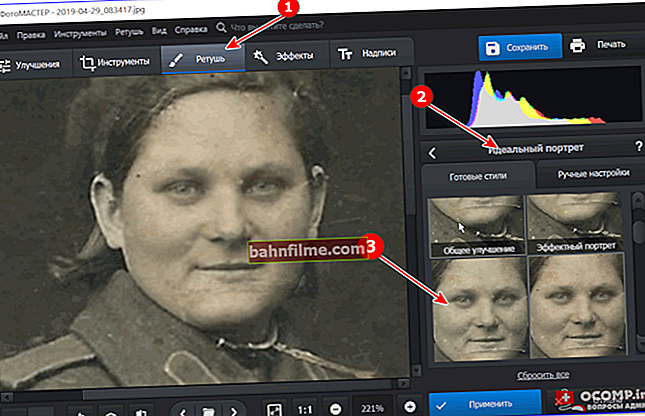
2) Next, you need to go to the section "Retouch" and choose a tool "Red Eye Correction" .

Retouching - Red Eye Correction (Photo-Master)
3) Then adjust the diameter of the brush so that it covers only the red area of the eye, and click on it. You will immediately notice how the redness has disappeared somewhere ...

Adjusting the brush size and removing the effect
4) Then press the button "Apply" to approve the edited photo.

Red-eye effect removed!
5) Before saving the photo, I also recommend to go to the section "Effects" and see how Photo Master can change the hue and brightness of your shot. Sometimes, playing with the effects, it is possible to significantly "revive" the photo.

Photo enhancement
The original task is completed!
*
👉 By the way!

Perhaps you will be interested in how you can restore an old photo, for example, remove stains, scratches, white dots and other defects from it
*
Method 2 (XnView)
Required program - //www.xnview.com/en/
(note: download the extended version of the program - XnView MP).
XnView is a free program (for private use) for viewing and editing graphic files (pictures, photos, etc.). By the way, it is very convenient to use it, you can say a complete replacement for the conductor!
As for the "red" eyes, there are specials in it. a tool to correct this flaw in the photo. I will consider it below.
1) The first step in XnView, as elsewhere: first you need to install the program, run, and find the desired photo. Then open it in a separate window. See example below.

XnView - open the desired image
2) Next, you should enlarge the photo and highlightone the red area of the eye with the mouse (you do not need to select any tools to select, just use the left mouse button!).

Enlarge the photo and select the red area of the eye with the mouse ...
3) Then go to the section "Picture" and click on the tool "Red Eye Removal" ... An example is shown in the screenshot below. 👇

Image - Red Eye Removal - Menu in XnView
4) Repeat step 2, 3 (described above) to remove the red tint from the second eye (and other people, if any in the photo ...).

Result
It remains only to save the resulting photo (Ctrl + S). Simply? Yes, it seems to be yes!
*
Method 3 (Photo! Editor)
Required program - link to the "Photo! Editor" review
Photo! Editor is a relatively small image editor that can automatically transform and correct your photo beyond recognition!
For example, you can lighten the skin, remove redness from the eyes, make pimples and some imperfections invisible, etc.
Let me give you a simple example.
1) After installing the program - find the photo you want, and click on the tool "Fix Red Eye" ... An example is shown below.

Photo! Editor - auto-red eye removal function
The editor will automatically remove the "redness" effect and bring the photo to natural color (see the example in the screenshot below).

Auto-mode did a great job
Then I recommend opening the tool Lighting - Photo! The Editor will give you 9 options to auto-change the lighting of the original photo It is often possible to significantly liven up a picture and make it more enjoyable.

Auto-change photo lighting (Lighting tool)
*
Method 4 (Photoshop)
Link to the official. website: //www.adobe.com/
Probably, almost everyone has heard about this program ... On the one hand, with the help of Photoshop you can make almost any edits and adjustments from the photo, on the other hand, the program is quite complicated, cumbersome and quite expensive. In general, as always, "two sides of the coin" ...
As for our current task, there is a special one in Photoshop. tool "Red Eye Tool" (as it is called in the original in English; it is quite easy to use). Let me show you with an example.
1) After you have opened the desired photo - pay attention to the toolbar on the left. Among the variety of different "pieces", find the coveted "Red Eye Tool" (you can also use the "J" button).

Selecting the Red Eye Tool
2) Then select the red area of the eye - and Photoshop will automatically remove this "redness". Then the next section, then another ..., etc.

Selecting the red area of the eye
3) Thanks to the repeated use of the tool "Red Eye Tool" it is possible to achieve very high-quality photo processing. See example below.

Photoshop automatically fixed the problem
*
Method 5 (online services)
Service 1 - //kras-glaz.haqteam.com/
Service 2 - //makeup.pho.to/ru/
Over the past 5-10 years, digitalization has been doing its job - now for many tasks (including for "red" eyes) there is even no need to install any programs - you just need to go to the site and upload a photo (then everything will be done automatically) ...
However, I cannot but note that it is still far from "full" automation, and the quality of photo processing, at times, leaves much to be desired. In addition, there is not always a desire to upload personal images to some third-party resources.

Automatic photo processing (screenshot from Fan Studio website)
Nevertheless, if there is nothing else at hand - why not use it? ..
*
Why red eye appears and how to reduce its intensity
This effect in the photo appears due to the fact that the fundus of the eye in humans (and in a number of animals - they can also have this effect) is red.
When photographing: light rays fall on a person's face and eyes, of course, some of them are reflected and paint the eye in a red tint.
The effect can have different intensities: it depends both on the characteristics of the eye of a particular person and on the shooting modes. And if the first reason cannot be influenced, then the second one can be "corrected" ...
What to look for:
- Flash. Most often, the eyes turn red from a bright flash - try turning it off (or decreasing the brightness);
- Camera quality. It is noticed that when shooting with a cheap camera (the so-called "soap box") or a mobile phone, the quality of the photo suffers (including the color of the eyes ...). If you need to get a very high quality photo, take a look at SLR cameras;
- Distance to camera (and flash). Try increasing this distance - the effect should decrease its strength ...
- Foreshortening and shooting angle. If a person looks not directly into the lens of the device, but a little to the side - the "redness" can either completely disappear, or its intensity will become very low and barely noticeable (refraction of light rays, the angle of reflection and so on ...).
*
That's all for now. Add-ons are welcome!
Happy shots!
✌
First published: 14.05.2019
Correction: 10/14/2020