Good day!
Sometimes, when working with a video, you need to enlarge a fragment (to make an emphasis on it, so to speak). For example, you shot some video, and then noticed an interesting subtle detail on it: for everyone to see it, it is enough to enlarge this fragment 2-3 times ... 👌 (to make it clear what this is about, see the example below with "turtle").
To do this, you need to use one of the video editors. Because many of them are quite complex and it is not so easy for a beginner to deal with them with a snap, I will give several screenshots with step-by-step actions in some of the simplest editors.
Note: you cannot enlarge the area to infinity (much depends on the quality of the original video - the higher it is, the more zooming possibilities ...).

An example of what we will do (of course, this is "rough" processing without filters)
*
Magnify a specific area in a video
Method 1
The first editor in which I will show you how to solve a similar problem will be "Video-Editing".
Video Editing
Official website: //video-editor.su/

This editor is designed for beginners (however, it should be noted right away that it has all the necessary functions for video processing). The program has a very simple interface and is completely in Russian.
Supported OS Windows 7, 8, 10.
*
1) After installing and running the editor - create a new project and find your video folder (see screenshot below 👇). Further add the desired video on the video track!

Adding a clip to a video track (Video Editing 9.25)
2) Now find in this video Start of the moment that you want to bring closer. When you find - click on the button "Divide" (the video will be divided into 2 sections).
After find end the moment where the approximation will be completed - and also divide track (your original video will now have 3 parts).

The beginning and end of the right moment
3) Next, select with the mouse one of the 3 sections of the video on the video track and run the function "Cropping" . 👇

Crop the right moment
4) Then select with the mouse that areawhich will remain and press "Save" (in my case, the selected rectangle will stretch to fill the screen - thanks to this, the image will be enlarged / zoomed in!).

Cropping video
5) Then, just start watching the video to see the difference ... 👌

The turtle has become closer at times!
Notice how the video scale has changed in the second part of the video: the selected image is now larger and closer to us.

What was and what became
6) If necessary, you can add smooth transitions between clips (however, this action is not required, since "Video Editing" inserts one of the transitions into the video track by default).
To save of the obtained result (video) click on the button "Save video" and select the "AVI video file" option (see example below). 👇

Save video
*
Method 2
I will show the second example in the Movavi Video Suite program.
Movavi Video Suite
Official website: //www.movavi.ru/

This is a large video processing harvester. Supports all the most necessary (and not so) functions, allowing you to create very beautiful and high-quality videos.
Of course, the current task can also be solved in it. Below I will briefly show how this is done.
*
1) After installing and running the program - the first thing we need is to create new project .

New project - Movavi Video Suite
2) Next, add the desired video to the project (and transfer it to the video track).
Then find the beginning of the moment (to get closer) and cut the track into 2 parts (using the tool scissors ). Then find the end of the desired moment and cut the track again. 👇 (in my example, I got 3 parts)

Cut the video into 3 parts
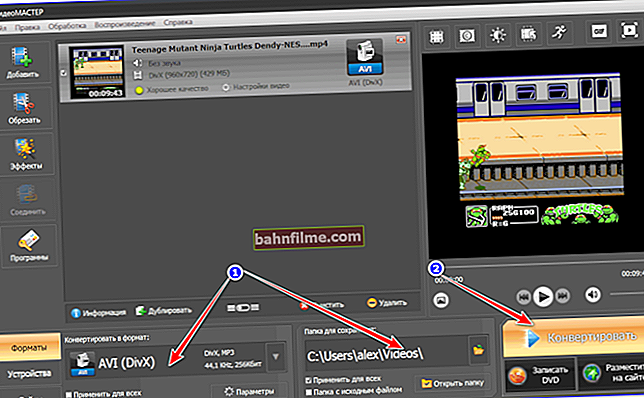
3) Now we need to select the part in which we want to zoom in the video, and use the crop function (the icon -  ). See arrows 1, 2 👇.
Next, it remains only to select the area we need (arrow-3 👇) and click on "Save" .

Rotate and crop - select a frame to zoom in
4) The result was / is now shown in the screenshot below. As you can see from my example, I managed to increase it by about 150-200%!

It was / is
5) The final touch is to save the resulting video. I don't think there is much to comment on here ...
*
Method 3
I will present the third example in another very interesting program - Bolide Movie Creator ...
Bolide Movie Creator
Official site: //movie-creator.com/rus/

This video editor is also designed for novice users, has its own set of quite interesting tools, transitions, effects, etc.
Unlike the first program, it is easier to work with a video track (and besides, you can enlarge not only a rectangular area, but also an oval one ...).
*
1) The installation of this editor is standard (so I do not include it here). After starting the editor, open the desired video and drag it to the video track in the lower part of the window (see the screenshot below).

Open the video and transfer it to the video track
2) Next, find the beginning of the fragment that you want to enlarge - and divide the video track (see example below).

Find the beginning of the moment to be enlarged and cut the video
3) Then find the end of the fragment (for enlargement) and divide the video again. Thus, the video track will consist of 3 parts.
Now select the center piece (which we cut out) and click on the tool "Cropping and Zooming" (Ctrl + W).

Cut off a certain area, select it and click on the zoom button
4) Actually, it remains only to select the desired area on the video and click on the green checkmark (note that you can also select the oval area).

Choosing the area to enlarge
5) After the performed procedure, if you put the cursor on our fragment, you will immediately see that the picture on it has become noticeably larger (only our selected area is shown).

The video has been zoomed in in the cropped area
6) If necessary, you can add transitions to the video (there are quite a few of them in the program, see the example below).

Transitions for smoother picture changes
7) To save the processed video - go to the project menu and select the item "Save as video file" (keyboard shortcut Ctrl + Enter).

Saving the project
*
On this, in general, that's all ...
Happy editing!
👋
First published: 08.08.
Correction: 11/18/2020