Good day!
Recently, when creating bootable USB drives for installing Windows, there has been a real confusion (with these UEFI, BIOS ...). But if you write down the USB flash drive incorrectly, then either the installation will not start at all (the PC / laptop simply will not see it), or an error will occur during the Windows installation process (for example, the OS will inform you that the system cannot be installed on this disk ...).
To avoid this, I decided to sketch out a note in a simple few steps (a kind of mini-instruction).
I will also note that in the process of work I will use the utility Rufus 3.x version (one of the best utilities for preparing installation drives) ... In version 3, it has slightly changed its design compared to 2.x (a number of articles on my blog now also need a little adjustment, which I will carry out with the help of this note  ).
).
And so, closer to the topic ...
*
Creating a bootable USB flash drive with Windows 10
❶
STEP 1: decide on the configuration of the PC for which we are creating a USB flash drive (UEFI or BIOS)
The first thing I recommend to start with is not to download a system image (as in many other guides), but to decide: your computer is running BIOS or UEFI (Note: Extended BIOS that supports larger drives, faster and more secure) .
To do this, it is enough to press the key several times when booting the PC / laptop (immediately after turning it on) F2 (or Esc, or Del - depending on the device model). When the settings menu appears, the difference between BIOS and UEFI can be seen with the naked eye (in UEFI, you can work with a mouse, by the way).
To help! You can find out how to enter BIOS / UEFI, what keys are used for this here: //ocomp.info/bios/

BIOS - UEFI - a clear difference
If you already have Windows installed on your computer (and you want to create a bootable USB flash drive to reinstall it), then you can find out about the BIOS and an alternative way:
- press the key combination Win + R (the "Run" window will appear), and enter the command msinfo32, click OK;
- a window should appear "System Information" : look at the line "BIOS Mode" (see example below).

BIOS Mode - UEFI
❷
STEP 2: Download the required Windows 10 image
Where and which image to download with the system - everyone chooses for himself ✌. But I still recommend that you pay attention to a few important notes (will help you save a lot of time!).
1) I highly recommend choosing something specific. Those. in one image - only one system. See example below:
- "Windows 10 x64 home" is a good option;
- "Windows 10 home / Pro / Ent x32 + x64, 5 in 1" - unsuccessful.
A similar image can be downloaded from the official Microsoft website (how to do this - //ocomp.info/kak-skachat-win10-legalno.html).
2) Try not to mess with various assemblies from "folk" craftsmen. It is not known what is there and how it is configured, and what tricks await in the future ... 🐱🐉
3) If you have 4 or more GB of RAM (random access memory), then choose a 64-bit system (in its designation there will be an abbreviation "x64"). The point is, 32-bit systems won't see more than 3GB of RAM.
4) If you are going to create a USB flash drive for UEFI - choose a 64-bit OS (64 bit).
To help!
How to find out how many 32 or 64 bits my Windows, which one to choose for installation [their difference] - //ocomp.info/kak-uznat-skolko-bit-32-ili-64-windows-7-8-10.html
❸
STEP 3: download the latest version of Rufus
Detailed description about Rufus (+ link to official site): //ocomp.info/soft-sozdaniya-zagruz-fleshki.html#Rufus
To record the downloaded image (ISO file from Windows) - we need a special. program (you can, of course, use a tool from Microsoft, but in my opinion this is not the best option). For these purposes I prefer to use the utilityRufus.
To install the latest version of the program - just go to its official. website and click on the link under the heading "Download" (see the screenshot below, at the moment it is 3.4).

Screenshot of the official Rufus page
Note that Rufus does not need to be installed, and after the first launch, you can immediately start using it. Which is what we will do in the next step ... 
❹
STEP 4: insert the USB stick, and burn the image
A flash drive is needed with a volume of at least 8 GB * (although in some cases the image can be written to a 4 GB drive, it is better not to rush around again). I will also add that in the process of working with a flash drive - all data on it will be deleted! Therefore, save everything you need from it in advance.
And so, after you connect the USB flash drive and run Rufus, you need to:
- specify the device (1) - note that if you have several flash drives connected to your PC, the correct one is not always selected by default (double-check!);
- specify the location of the ISO installation image (2) - we downloaded it in step 2;
- select partition scheme (GPT or MBR) and system (BIOS or UEFI). I mentioned this in step 1: if you have UEFI - select "UEFI" and "GPT" (if BIOS - then "BIOS", "MBR", respectively). See screenshots below;
- press the button "Start" .

Rufus - creating a USB flash drive for UEFI (GPT) / Note that the FAT32 file system
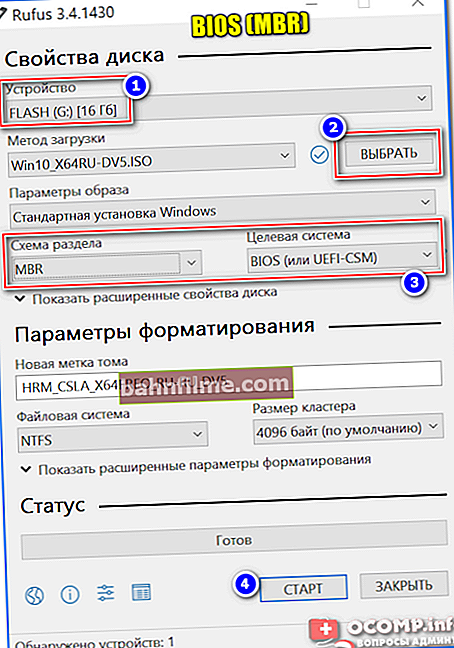
Rufus - creating a USB flash drive for BIOS (MBR)
Further, before recording the image, Rufus will warn you that during operation all data on the drive will be destroyed. If you made a backup in advance, just click OK.
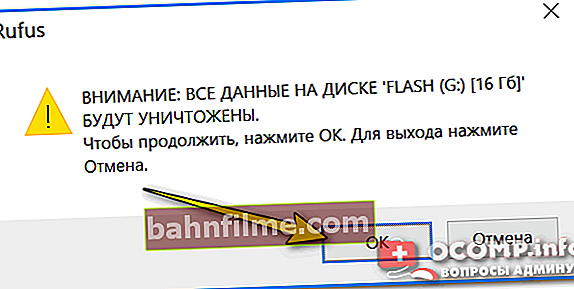
Rufus warning
When the flash drive is ready, in the program status (at the bottom of the window) - you will see the status "Ready" (the green bar will fill the drain by 100%).

The flash drive is ready!
❺
STEP 5: configure BIOS / UEFI or use the boot menu
To check the USB flash drive (well, or immediately proceed to installing the OS from it), you need to restart your computer / laptop and open boot menu ... In it, you need to select our created USB flash drive and agree to the download.
Boot Menu / Boot Menu - used to tell the computer from which drive to boot.
In BIOS / UEFI there is a tab with a boot queue, and by default, the computer looks for boot records on the hard disk (and in order for it to "see" our flash drive, it needs to be indicated through the boot menu (chaotic, but I think the meaning is clear 😊 ) ).
Each PC / laptop may have its own buttons to call the boot menu (usually F1, Esc, F12). I have a separate article on my blog with buttons for different devices: //ocomp.info/goryachie-klavishi-dlya-vh-bios-boot-menu.html
Note! You need to press the Boot Menu call button (in my example ESC) immediately after turning it on (and it is better to do this not once). Usually, one click is enough when the first manufacturer's logo appears.

Press the Boot Menu entry button several times (before and during the appearance of the first logo)
The boot menu is a regular list, from which you need to select one of the drives and press Enter. See example below.

Boot menu example
Alternative option
You can also do without the boot menu (everything can be done through the BIOS / UEFI settings). To do this, you need to enter the BIOS (how to do this), and open the tab "BOOT" ( "Loading" ).
The screenshot below shows an example of how to open the Advanced Mode menu, which contains the coveted "Boot" tab.

Advanced Mode (UEFI)
In the Boot tab, you need to change the boot queue: move the hard drive (with Windows, as in the example below) to the second line, and put the USB flash drive on the first line (if you have a new version of UEFI, as in the example below, you can do this with the mouse; if "old" BIOS - using the function keys F5, F6, and others - see the menu on the right).

Boot section - note the sequence
After changing the settings (see example below), save them (F10 key in most cases) and reboot the device. If everything is done correctly, the computer will boot from the USB flash drive ...

Changed the boot priority
If everything went well, you will see the first welcome window with a choice of language for installing the OS (example below). You can find out about further installation steps here: //ocomp.info/ustanovka-windows-10.html

Installing Windows 10 from a USB stick / Getting Started ...
*
Add-ons are welcome ...
Good luck!👣