Good day!
The PDF format has recently become one of the most popular for documents. Yes, in general, this is not surprising, tk. it has a high compression ratio (allows you to put an entire book in several megabytes!), a good level of security, and it is supported by almost any device ...
But PDF files also have one serious drawback: they can be changed not so easily (for example, change or add some section of text, insert pictures, sheets, etc.). Because of this, many users, when it becomes necessary to edit a PDF, simply re-create it (of course, wasting a lot of time).
In this article, I wanted to present one relatively simple way to work with PDF (I will show by example how you can change or add text or an image to PDF).
So...
*
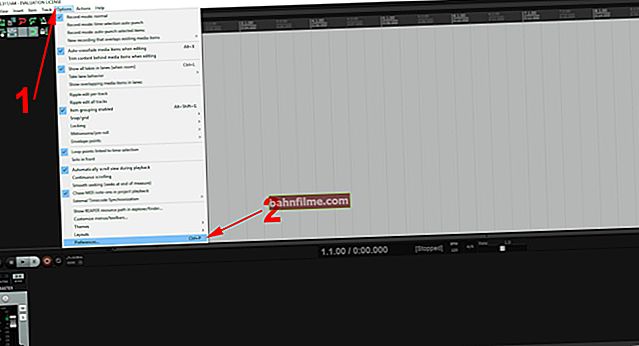
Edit PDF in a few steps
STEP 1
Selecting a program, opening a document
On the one hand, there is now a huge number of programs for working with the PDF format, on the other hand, there are not so many among them that allow you to fully edit it (even fewer that would allow you to do this with 2-3 mouse clicks ... ). In general, one of these programs isPDF editor by Movavi ...
Movavi PDF editor
Officer. website: //www.movavi.ru/
Link to the page with the editor: //pdf.movavi.ru/

Multifunctional program for working with PDF. Allows you not only to conveniently view files, but also edit them: add / delete sheets, change text, insert pictures, prints, etc. It can easily "assemble" a PDF document from scans, images, Word and Excel documents, and other files.
The program is completely in Russian, supported by all popular Windows XP, 7, 8, 10.
Because the installation of the program is standard, I omitted it. I will show my example of editing PDF on one document (receipts). To open it, by the way, you can use either the menu "File / Open", or by pressing Ctrl + O.

Movavi PDF editor - open document
Please note that the top menu of the program has all the basic options for scaling a sheet, selecting a page, etc.

Selecting a page for editing
STEP 2
Search for the desired section of text
If you have a large enough document, sometimes it is not so easy and quick to find the desired section of the text (which needs to be changed). Movavi's editor has a search function that allows you to find all parts of the text where the word (phrase) you need is found. To use it - just click on the icon in the top menu "Magnifiers" (on the right side of the window).

Search for the desired section of text
In the line that appears, enter the search word and press Enter: all such words in the document will be highlighted in brown. Using the arrows in the right menu of the program, you can quickly switch through all the search results.

Found words
STEP 3
Editing text
We will assume that the required piece of text has been found. Now how to change it.
Click on the tool first "Editing" , another menu will appear below - select "Text" , then just specify the area you want to change. All text from it will be framed and you can edit it (including changing the font and its size).

Change text
Adding new text to a document is similar - just by using the tool "Text" specify an empty area (in which there is nothing). By the way, the block you edited (created) can be moved to any area of the document and even made it vertical (using the mouse ...).

Wrap text in the desired area
STEP 4
Adding pictures / scans
Often it is required not only to change the text, but also to add some scan (image) to a document already created earlier.For example, insert a check-payment from a bank into a receipt (so that nothing gets lost ...). This is done quite simply: you need to click on the instrument "Edit / Image" .

Picture
Next, select the desired image (a scanned payment order, say) and agree to insert it into the document. Next, all that remains is to move it to the desired place in the document and edit the size. See the example in the screenshot below.
Note! How to scan a document using an Android smartphone - //ocomp.info/skaniruem-dokumentyi-android.html

Rotate and scale the added image
STEP 5
Adding a signature
If you need to sign scanned documents, then you do not always need to print them again, sign them and scan them again. This can be done much faster with the help of specials. instrument "Signature" in the editor from Movavi.

Adding a signature
You can either create your signature yourself on a PC, or just insert an image with it (if you had it prepared in advance).

You can draw or add a previously scanned
Then just transfer the signature to the desired place and resize it to fit the document format. An example is shown below.

Change the scale and position of a signature
Note!
You can find full instructions for adding a signature on the official website of the program: //pdf.movavi.ru/how-to-sign-a-pdf.html
STEP 6
Saving the document
In general, when the document is ready - just save it using the combination of buttons "Ctrl + Shift + S" , or menu "File / Save As ..." ... Any edits you make will be incorporated into the new document.

Saving the finished document
Note: Please note that by default the name of the saved document is the same as the one you opened ...
*
That's all for this sim, good luck!
✌