User question
Hello.
Tell me how you can set up the printer: I sent 3 documents to it for printing. As a result, he printed one, and the other two did not. Now how many documents I do not send - he does not print anything.
A window pops up with a print queue of documents - one of them seems to be frozen. There is no way to clear this print queue or delete it. How can I do that?
Marina.
Good day!
Yes, there is a similar problem: when sending several files for printing (especially if they are large and weigh several tens of megabytes, contain graphics, drawings, etc.), it is not uncommon for the print queue to freeze. And, of course, until it is cleared, the printer may not react in any way to sending new documents for printing.
Actually, today's article will be on this issue ...
👉 By the way!
All possible reasons why the printer does not print documents and puts them in the queue are described in detail here: //poprinteram.ru/stavit-v-ochered-no-ne-pechataet.html
*
3 ways to cancel printing documents on the printer
Method number 1: through printer properties
1) First you need to open the 👉 Windows Control Panel at:
Control Panel \ Hardware and Sound \ Devices and Printers
2) Next, right-click on the printer to which you are sending documents for printing. In the pop-up window select "View the print queue" (as in the screenshot below).

View the print queue
3) After that, having selected any of the documents present in the queue, you can cancel (to remove it from the queue, just select it with the mouse and press the Del key). See example below.
I would also advise you to try restarting the printing of the document before removing it from the queue.

Right-click on the document and cancel its printing ...
This method will help solve the problem in half the cases. However, sometimes, no matter how many times you press the Del button, not a single document can be deleted from the print queue. In such severe cases, use the options below.
*
Method number 2: stopping the service and cleaning the PRINTERS folder
Windows has a special service responsible for printing documents (called "Print Manager" or "Spooler").
So, if its work is stopped, then it will be possible to "manually" delete all the files that were sent to print. Actually, below it will be shown how to do this.
1) First you need to open the list of services. To do this, press the key combination Win + R , and enter the command services.msc ... Example below (works on all Windows versions).

services.msc - open the list of services in Windows
2) Next, find the service named "Print Manager" or "Spooler" - you need to stop it. See the screenshot below.

Stopping the print manager
3) After stopping the service, go to the folder: C: \ Windows \ System32 \ Spool \ PRINTERS
4) In this folder, you must delete all files with the .SPL and .SHD extensions (on my computers, this folder is generally empty ...).
👉 Note!
If suddenly the files will not be deleted, use the recommendations from this article.

This folder is empty
5) Enable the service "Print Manager" (which was previously disabled) and check the operation of the printer. The problem must be resolved.
*
Method number 3: using the command line
In some cases, the previous methods may not work, for example, when the explorer hangs. In this case, everything can be done on the command line in a few steps.
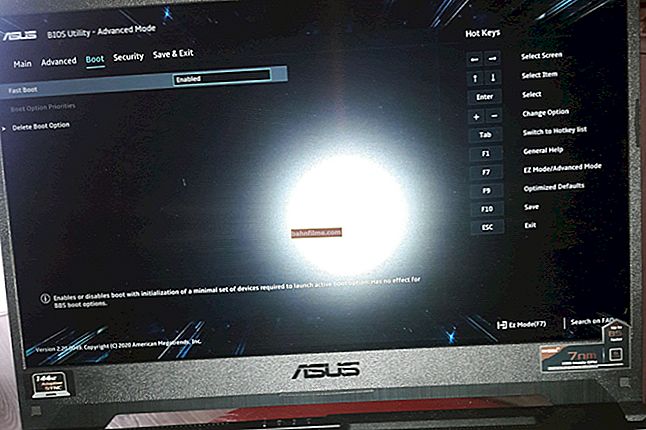
1) The first thing to do is open 👉 a command prompt as administrator. To do this, open the Task Manager (shortcut Ctrl + Alt + Del or Ctrl + Shift + Esc) and press "File / new task" , enter the command CMD and check the box that the task should be as administrator ... See example below.

Run command line as administrator
2) Next, enter the command net stop spooler and press Enter. The print service must be stopped (see example below).

Print service stopped
3) Then enter two commands in sequence:
- del% systemroot% \ system32 \ spool \ printers \ *. shd
- del% systemroot% \ system32 \ spool \ printers \ *. spl
After entering each - press Enter. Thanks to these commands, temporary files for printing will be deleted from the system PRINTERS folder (they are exactly those that are present in the print queue).

Temporary files sent to print have been deleted
Please note that after entering each command, nothing should be written in response (this means that the command was completed successfully).
4) Next, start the print service by entering the net start spooler command.

Print service started again
PS
If, after clearing the print queue, the printer still does not print the newly poisoned documents (sorry for the tautology), I recommend that you familiarize yourself with this article: //ocomp.info/ne-pechataet-printer-chto-delat.html
*
Hope your problem gets resolved ...
All the best!
👋
First published: 03/23/2018
Correction: 04/06/2020