User question
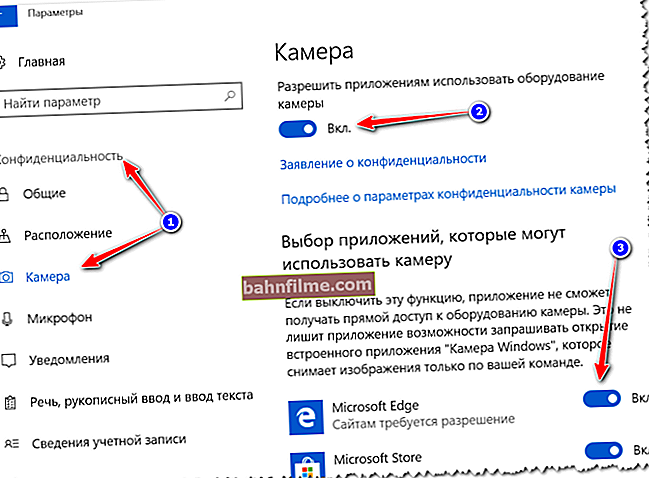
Hello.
Not so long ago I bought a Lenovo B70 laptop with Windows 10 preinstalled. Honestly, I would like to reinstall the system, I prefer Windows 7. But my laptop stubbornly does not see the bootable USB flash drive, I tried to create it in 2 different utilities. Perhaps something needs to be "rotated" in the BIOS for everything to work.
How to install Windows 7 on a new laptop, and is it possible? I saw drivers on the manufacturer's website for Windows 7 ...
Good day!
I should note that even experienced users face certain difficulties when installing Windows 7 on new laptops. Most often, the problem concerns the drivers: they need to be found and downloaded from the manufacturer's website, since the old ones that came with your laptop will not work (they are for the new Windows 8/10)!
Also, some difficulties may arise with writing a bootable flash drive and configuring the BIOS. In general, much of the above is solvable, more on that below. 👌
In this article, by the way, I will consider the process of installing Windows 7 on a Lenovo B70-80 laptop (for laptops of other brands and manufacturers - many steps will be similar, unless you have to "deal with" the BIOS setting separately).
So...
👉 Important!

January 14, 2020 Microsoft has discontinued those. Windows 7 support - in more detail on what to do ->
*
Preparation: Partitioning a Disk
It is not at all necessary to delete and format the disk completely with your Windows 10 operating system in order to install Windows 7. I would even recommend just installing another system and choosing the one you want to use at boot time (a menu with a choice of Windows OS will appear automatically at startup!).
Why 2 systems are better:
- firstly, it is not known how Windows 7 will behave, perhaps Windows 10 will be more stable and productive;
- secondly, you will have a more stable system: if something happens to one OS, you can boot into the second;
- thirdly, some games and programs may not work in one of the systems, while in the other, everything will be fine.
Basically, if you do not plan to install 2 OS for yourself, you can skip this step. In it I will talk about disk partitioning.
👉 To help!

An article on how to partition a hard drive (in Windows without installing additional software)
For another Windows OS - I recommend allocating a separate partition on the hard disk, for example, create some kind of local disk "F: \"... This can be done without losing data and without installing additional software.
First you need to open 👉 disk management (combination of buttons Win + R, and the command diskmgmt.msc).
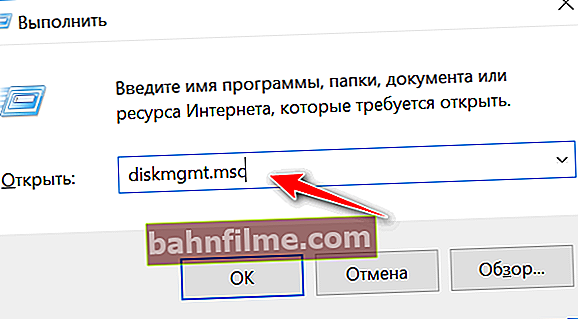
diskmgmt.msc - start disk management
Next, you should select the disk from which you want to "take away" part of the free space to create another local disk (for a new OS). By the way, for Windows 7 you need to allocate at least 30-35 GB!
After that, you need to right-click on the desired partition of the disk, and select the option "Shrink Volume" .

Shrink volume - drive C: \
Then specify the size of the space to compress (in my example, I indicated 30,000 MB, which is about 30 GB).

Making a 30 GB disk
And you have one more section - it is marked in black and there is an inscription on it: " Not allocated " (note: the disk partition from which we "took away" part of the free space has become 30 GB less).
This section cannot be used yet, as it is not formatted. To format it - right click on it and select the option "Create Simple Volume" .

Create simple volume
Now specify in sequence:
- the size of a simple volume (do not change anything at all - leave it at the default, see the screenshot below);
- drive letter - you can also leave it alone;
- file system (NTFS), cluster size, volume name - you can also leave everything by default;
- the last step is to agree with the settings and click the "Finish" button (all actions correspond to the numbers in the screenshot below) .

Setting up volume and formatting
Actually, now you should have another local disk - now you can copy files and folders to it, work like with any other disks (we will install Windows 7 on it).

The disc is prepared for installation
In general, now you can start preparing the bootable media.
*
Create bootable media
When installing Windows 7 on a new laptop (the same Lenovo B70), there is one problem: the fact is that the standard Windows 7 installer does not have built-in drivers for USB 3.0 port (and all modern laptops do).
And even if you connect a USB flash drive to a USB 2.0 port and start installing Windows 7, the OS will not see it anyway. Requires a driver for the Universal Serial Bus controller (for USB 2.0 and USB 3.0 to work).
How can you get out of the situation:
- Find and download a Windows 7 ISO that has built-in USB 3.0 and SATA drivers. There are quite a lot of such images, however, there are also many that are made "crookedly". Next, this image must be written to a USB flash drive or disk;
- use a DVD for installation, to which you burn a regular ISO image from Windows 7.
👉 Important!
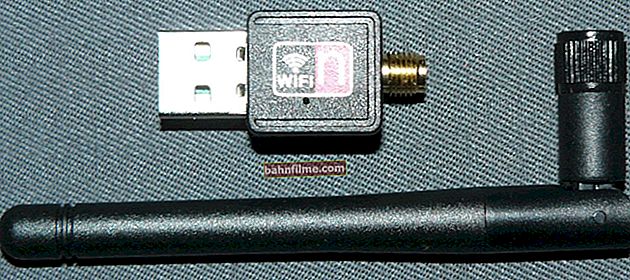
I recommend downloading the drivers for the network adapter (or the utility 👉 3DP Net - installs drivers on almost any network adapter without an Internet connection) and the universal serial bus controller in advance (and copy them to your hard drive). Otherwise, there is a risk that after installing Windows 7, neither USB ports nor the Internet will work for you.
Also, it will not be superfluous to have a 10-12 GB ISO image on your hard disk with drivers (for example, Driver Pack Solution or 👉 Snappy Driver Installer).
*
USB flash drive with Windows 7 (using WinSetupFromUSB)
One of the best programs for creating bootable USB drives is WinSetupFromUSB. This is where I'll show you how to quickly and easily create bootable media.
👉 WinSetupFromUSB
Developer site: //www.winsetupfromusb.com/downloads/
The main features of the utility:
- supports most versions of Windows (32 and 64 bit);
- the ability to write multiple operating systems to one USB flash drive;
- creating a USB disk that can be loaded into both BIOS and UEFI;
- pop-up tips at all stages of work;
- there are a number of programs for working with disks: MULTIpartitionUSBstick, Grub4DOS, SysLinux.
So, insert the flash drive into the USB port and run the program WinSetupFromUSB ... Next you need:
- choose a flash drive to write an image from the OS to it (see number-1 on the screen below);
- tick against the item "Auto format it with Fbinst" (attention! All data on the flash drive will be deleted);
- specify filesystem (for our laptop, you can use both FAT 32 and NTFS. If you select FAT 32, the flash drive will be written under UEFI - almost all laptops are now under this standard);
- in the graph "Windows Vista / 7/8 ..." specify a bootable ISO image with Windows 7 (note: and "embedded" USB 3.0 drivers);
- push GO button.

USB flash drive with Windows 7 in 4 steps
Next, WinSetupFromUSB will ask again 2 more times whether to delete all data from the media (just agree).

A warning

Warning 2
Then the program will start recording the media. In some cases, this procedure is quite lengthy. On average, it takes 5-20 minutes.
The recording status (green bar) is shown at the bottom of the program window. If the USB stick is successfully written, you will see a small "Job Done" window at the end.

flash drive recorded
DVD disc (using UltraISO)
To write a Windows 7 ISO image to disk, in my opinion, the best way is to use the UltraISO program.
👉 UltraISO
Official website: //www.ezbsystems.com/ultraiso/
One of the best software for working with ISO images. Allows you to write them to disks, flash drives, edit (add and remove files from them), emulate, etc.
In general, an indispensable thing for everyone who often has to deal with ISO.
After launch UltraISO program, the first thing to do is to open the image with Windows 7 in the program itself. To do this, press the Ctrl + O key combination, or press File / Open.

Open image with Windows 7
Then press the key F7 or Tools / Burn CD Image... Now you need a regular 4.5 GB DVD.

Burn CD Image
Insert the disc into the drive tray and press the record button. In principle, you do not need to enter or change any settings.

Recording settings
The recording time of a standard DVD is about 10 minutes (a green bar with a progress status will be displayed during the entire recording time).

We are waiting for the end of the recording
*
Installing Windows 7
Calling the boot menu (Boot-menu) and starting the installation
And so, the bootable media is ready, the drivers are preloaded, the backup is done. Now you can start installing ...
Windows 7 (as mentioned above) does not see USB 3.0 ports (they are marked in blue). Therefore, insert the USB flash drive into the USB 2.0 port (the difference is shown in the photo below).

Another case in point: USB 2.0 and USB3.0
Further on laptops Lenovo B70 there is a special button to enter the BIOS and call the boot menu (Boot-menu). It is located next to the power plug, on the left side of the device. Click it (photo below).

Lenovo B70 - BIOS entry button next to the power input. It is most convenient to press with a pencil or pen
By the way, on some laptops this button may be next to the power button (photo below).

Lenovo G700 - button to enter device settings (including BIOS)
👉 To help!

For those who have an excellent laptop from the one in question, I recommend that you read the article about calling the Boot-menu
Next, the "Novo Button Menu" menu should appear - select the third item in it Boot Menu .

Boot Menu
Then we select the device from which we will boot. In our case, this is USB DISK 2.0.
note, if you created a bootable DVD, then you need to insert it into the drive tray, then turn off the laptop and turn it on using the button to enter the BIOS (see above in the photo). Otherwise, your boot disk will simply not be in the list of devices and you will not be able to select it.

Boot device selection
Then (if everything went well) the GRUB4DOS window should appear, in which you need to select the boot option - select the first one with the line "Windows NT6 (Vista | 7 ...)" (as in the screenshot below).

GRUB4DOS
If you used a USB flash drive (and it is written correctly) - you should see how the download of Windows files "Windows is loading files ..." (installation started ...) will start.

Windows is loading files
Those who install from a disk - do not miss the moment when there will be only one message "Press any key to boot from CD or DVD ..." on the screen - at this moment you need to press a key to start installing the OS!

Press any key to boot from CD
*
Those who have an error at the beginning of the installation or the USB flash drive / disk is simply not visible in the boot menu
In most cases, the problem lies in the BIOS settings (support for older operating systems that do not support secure boot is not enabled).
Therefore, you need to go into the BIOS settings - on a Lenovo B70 laptop, you can use the same arrow button on the device case for this (only when the menu appears, select not Boot Menu, but Bios Setup).
👉 To help!
Instructions for entering the BIOS (for those who failed, or another laptop model).
Boot menu button
In BIOS you need to open the BOOT section and set the following parameters:
- Boot Mode - [Legacy Support] (support for older OS);
- Boot Priority - [Legacy First] - boot priority;
- then go to the Exit section and click the "Exit and Save" button (save and exit, this is also achieved by pressing the F10 button).

BIOS Settings (Legacy Support)
Then, call again Boot Menu, select boot from a flash drive (disk) and start the installation. I think there shouldn't be any problems now ...
*
Further installation process (setting parameters)
After the files are downloaded, you should see the first welcome window with the Windows 7 logo. This is a window with a choice of language for further installation. By default, there should be Russian - click the "Next" button.

Language selection during installation
Now click on the big button in the center of the screen - "Install" (screenshot below).

Install Windows 7
I recommend choosing the type of installation "Full installation (additional parameters)".

Complete installation
Next, specify the drive on which the installation will be performed. In this step, be careful: do not delete or format partitions if you do not fully understand or are not sure of your actions (otherwise you will lose all information on your hard drive).
If you prepared a partition for Windows 7 in advance (as recommended above), then all you have to do is select it (note: in the first step of the article I made it for 30 GB) and click the "next" button.
👉 If you don't need no information on the hard disk: you can delete all partitions. Then create two partitions: one for 50-100 GB for the system, and the second for all the remaining space - for files. Then format the partition for the system and continue installing Windows into it.

Select the partition for Windows 7
Next, copying and unpacking files will start. Just wait until the computer / laptop starts to reboot. Next, remove the USB flash drive (just in case, so that the installation continues and does not start over).

Unpacking files ...
After rebooting, the installation will continue and you will be asked for a computer name and username. You can ask any, the only thing I always recommend is to write them in Latin (to avoid "kryakozabr" in some programs, when they give an error if there are Russian characters in the path to documents).
You will also be asked to enter a password for the account. If you are not alone at the PC (or there are curious comrades in the house), I recommend installing it.

Computer and username
Next, Windows will ask you to set security settings - you can just click for now "Use Recommended Settings" .

Configuring OS protection
Setting the date and time - I think it will not cause problems: choose your time zone, specify the time and date (in principle, when you set up the network, this data is adjusted automatically through the update center).

Date and time setting
The last step: setting the location of the computer. In most cases, it is optimal to select "Home network", and set the rest of the parameters already in Windows itself.

Selecting the current PC location
Actually, in a few moments you should see the desktop (on which there will be one basket for now). In general, the installation is complete!

Windows 7 desktop
*
PS
1) Now a Lenovo laptop with Windows 7, which means my mission is complete ...
2) If you downloaded the drivers for USB 3.0 and network adapters in advance (as recommended), then there should be no problems. After installing these, everything else can be downloaded on the network, or copied from USB disks (flash drives).
*
That's it for now ...
Good luck!
👣
First publication: 10.06.2017
Correction: 1.02.2020