User question
Hello.
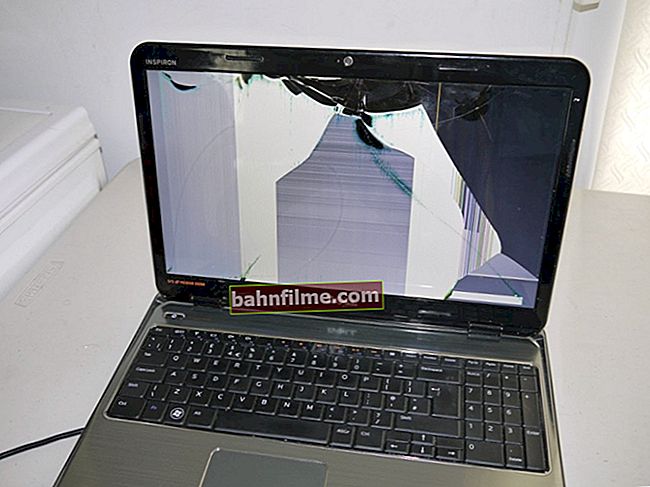
I got a white dot in the center on my monitor, and another red dot in the corner. The one in the corner - I don't care about her, but in the center - sometimes annoying and interfering. When a color picture is shown, it is not yet so noticeable, but with a monochromatic (and especially dark) picture, it does not look very good.
They refused to repair the monitor, they say that these dead pixels cannot be restored (it's easier to buy a new monitor). Is this true, and is it possible to somehow remove these points, restore the broken pixels?
Michael.
Good day!
In fact, one of the most common problems with monitors is the appearance of dots on the screen, which do not change their color (i.e. do not work). Most often they glow with just a single-color light: white, dark, red, etc. Such pixels on the monitor are called broken .
In this article I will try to answer both your question and similar ones related to this topic. I will show you how to check the monitor for these dead pixels, and also give some recommendations that can bring such pixels back to life. So...
👉 Help!

By the way, some people confuse dead pixels with ripples, stripes and other interference on the PC screen. If you have exactly ripples and other artifacts on the screen, I recommend this article.
*
Checking the monitor: doing a test for dead pixels
Several important points
If you think that broken pixels can appear only on old monitors, then you are deeply mistaken ... It is even more offensive when you buy a new large monitor, and then in the process of work you find that one pixel in the center does not "burn" (more precisely, it burns red) ... And what's even more offensive is that you most likely cannot return such a monitor back under warranty!
Important!
According to the standard, monitors are divided into different classes (I, II, etc.). Each class is allowed a certain number of dead pixels, and until this number is exceeded - this is not a warranty case!
Therefore, be very careful when buying a new monitor, I recommend that you test it right in the store!
One of the tables with the allowed number of dead pixels is shown below. In general, class IV is essentially a marriage (and they are not on sale on the mass market), most often, a regular home monitor is a class II or III device.
Therefore, for delivery under warranty - you need at least 2-3 dead pixels. All this I mean is that checking when buying is very important!

How many dead pixels are allowed on the monitor (depending on its class). Important: This label is just an example, the non-conformity regulations change frequently.
And so, now about how to check ...
The essence of the check: you need to fill the screen alternately with different colors: white, red, green, black, etc. With each fill, be sure to carefully look at the entire surface, if there is any point that stands out from the rest. See 2 photos below, they show very well what to look for.

In a color picture, a broken pixel is practically invisible!

But it is very clearly visible on a black (dark) background
It is best to "fill" the monitor with colorful paints using special utilities. One of the most convenient is IsMyLcdOK (more about it below).
*
Using the programIsMyLcdOK
Official website: //www.softwareok.com/?Download=IsMyLcdOK
One of the best utilities for checking the monitor for dead pixels!

IsMyLcdOK - main program window - tips on control buttons
The utility is very simple and does not need to be installed and configured. It weighs only 36 KB and can be written to any medium.After launching - you just need to press the numbers on the keyboard: 1, 2, 3, etc., or the Ctrl key - and the whole screen will alternately be filled with different colors. All you have to do is watch what is happening carefully.
Thus, using IsMyLcdOK, you can evaluate the state of the monitor in a few minutes. I definitely recommend using it!
The main advantages of the utility:
- small size - only 36 Kb, can be written to any USB flash drive;
- nothing needs to be installed or configured - just launch and press one Ctrl button;
- The utility is free and works in all versions of Windows.
Online way
Monitor Test
Website: //tft.vanity.dk/ (monitor test)

Flatpanels Online monitor tool
You can also check the monitor online, however, you need access to the Internet (not in all stores the tested PC / monitor can be connected to the network). In addition, another disadvantage of this method is that not the entire monitor is filled in entirely, but only that part of it that is shown in the browser (this is 90-95%, the stripes at the bottom and top remain not filled).
Otherwise, this is the same effective way: I gave the site address above, following the link, you can run the test and click on different colors with the mouse. When the screen is filled with the desired color, carefully examine the entire surface, then fill it again. After 3-4 iterations, it will already be possible to talk about the presence / absence of dead pixels.
*
Regarding the recovery of dead pixels
How many people - so many opinions ... ☝
To begin with, it is worth saying that the beaten is different. There are two types of dead pixels:
- those that are "dead" (they cannot be restored, as a rule, they glow just white, or they are just dark);
- those that are "stuck" (or, as they say, "stuck") - they are lit in red, green, blue. Here you can try to restore them! The probability of recovery is quite high, up to 30% -40% (however, it is difficult to say how long they will work before a new "stuck").
Important!
Inexperienced and not careful actions, when using such methods of recovering the monitor, you can spoil it. This may also be the reason for the refusal of warranty service (therefore, I would recommend first consulting the service center, and then, after their refusal, go to the top).
Method number 1: forced color change
The method is to make a small area of pixels (in the center of which is a "stuck" pixel) to quickly change colors. Moreover, do it within 10-30 minutes! Due to this, nearby pixels "pull out" the desired pixel from the stuck state, and it starts working. The method is quite effective.
How to do it? It is logical that you need some kind of special. utility, and I recommend sticking with UDPixel.
UDPixel
Official website: //udpix.free.fr/
You can download it at MyDiv: //soft.mydiv.net/
A very simple and effective utility that can revive (restore) dead pixels. The utility is free, works in all versions of Windows, and takes up very little space. In addition, with her work, you can simultaneously go about your business. That is why I stopped my gaze on her ✌.
How to work with it (step by step):
- first you need to specify how many dead pixels you have on the monitor (indicated in the "Flash Windows" column) and click the Start button;
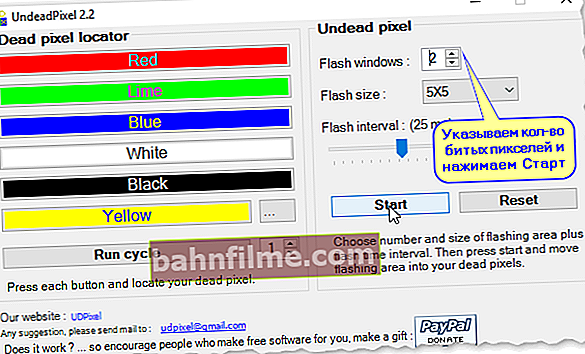
UndeadPixel 2.2 - how to start treatment
- Next, you will see 2 dots 5 by 5 on the screen, which blink quickly. You need to drag them with the mouse to the place where you have a broken pixel. Then wait 10-30 minutes: during this time the program will load this area by changing colors.
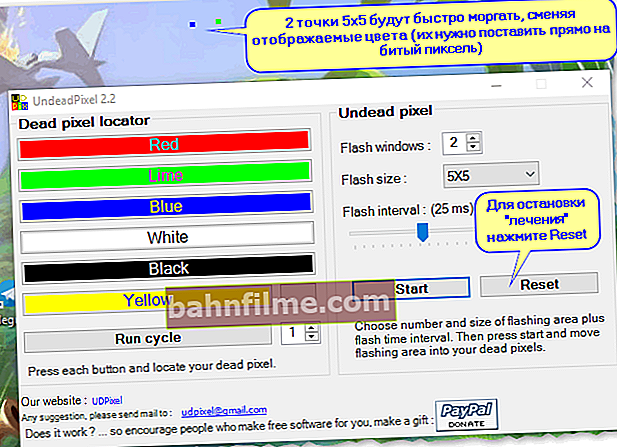
Recovery process
- After the restoration is complete, press the Reset button. The dots on the screen will disappear, the program will stop doing its work ...


Method number 2: discharge ...
In some cases, this method can help restore pixel performance. Its essence is to disconnect the monitor from any power sources and let it stand for several days (4-5 days is recommended!).
If you have a laptop: disconnect from the mains, remove the battery, disconnect all wires going to the device (network cable, mice, speakers, etc.). That's it, leave the device in this state for a few days.
If you have a regular PC monitor: also disconnect it from the network and from the computer.
If you leave the device in this state for these 4-5 days, then all the capacitors in the device will be discharged, the residual voltage will go out of the thin-film transistors. And when you connect the monitor to the power supply and turn it on, there will be a shake-up to the stuck pixel, perhaps it will return to "life" (I note right away that this method does not always help, in about 5-15% of cases).
Method number 3: mechanical pressure
If the software method doesn't help, try using a cotton swab (or a pencil with an eraser at the end). Then place this stick or pencil approximately in the center of the broken pixel and slightly press (if streaks appear on the screen, remove the object).
If the pixel does not start working, repeat the operation (you can slightly increase the effort). Thus, try 20-50 iterations.
Also, try turning off the monitor completely, then pushing down on the area where there is a dead pixel, and then turning on the monitor. In some cases, the "stuck" pixel wakes up and starts working as expected ...
Important: it is not recommended to use your fingers for pressing! First, they have a large contact area; secondly, it is more difficult to control the force that goes to different areas under the finger.
*
That's all for me, for additions on the topic - I will be very grateful.
Good luck!
👋
First publication: 27.12.2017
Correction: 02/10/2020