All the best!
Almost everyone takes photos today (after all, cameras are installed in almost every phone!). But how do you organize these photos and make them even more attractive to view?
One good way is to create colorful slide show (by the way, you can also create a collage of photos - also very attractive!).
Slide show - This is a kind of presentation video, consisting of photos, placed in a certain order. As a rule, the slideshow is colorfully decorated, the photos are placed on some themed background, music is playing, transitions, animation and other decorations are inserted.
In this article, I will look at several ways to create such a colorful slideshow (in a few minutes without any preparation!). The article is aimed primarily at a novice user, so that anyone can figure out how and where to click to get the result ... 👌
*
3 ways to make slideshow
In the program Photo-SHOW
Official website: //fotoshow.su/

An excellent program for creating modern and colorful slideshows. In just 5-10 minutes from your photos, you can easily and independently arrange them beautifully into a colorful video, pleasantly surprising your relatives and friends.
One of the main advantages of the program is the presence of a step-by-step wizard that will help you go through all the "thorns" even for those who just sat down at the computer yesterday! By the way, the program is completely in Russian, works in all versions of Windows XP, 7, 8, 10.
Actually, I'm going to the main thing - for example, creating a slide show in the "Photo-SHOW" program.
- So, first you need to install from run the program. Next, in the first window, select the link "Slideshow Wizard".

Slideshow Wizard
- Then you need to choose a design option for your work: for those who entered the program for the first time, I recommend the first option -by pattern... Actually, I chose this option in my example.
By pattern
- Then you need to select a template. There is a lot of room here, there are a lot of categories: simple, old, wedding, children's, travel, festive, modern, etc. In my example, I chose a template about summer vacations.
Choosing a template
- The next step is uploading photos. There is nothing complicated here - you do not have to comment (I recommend only to arrange the photos in the order in which you want to watch them).
Adding a photo
- After adding photos, the program will offer you to add background music (I recommend to do this, a slideshow with music looks much more impressive than without it). By the way, pay attention to the total duration of the music and the total duration of the slideshow - it's just that some users add more music than the duration of the slideshow itself.
Adding background music
- Now the most interesting thing - Photo-SHOW will prepare a preliminary project for you, which you can already launch and see how everything will look like. If this is your first time doing a slideshow, I think you will like almost everything! To start viewing a slideshow - click the play button in the lower left part of the window (see screenshot below).

Project view
- As for the further refinement of the slideshow to perfection - here the scope for work is quite wide: you can add transitions, screensavers, choose a different design. In order for all this goodness there are several dozen in the program! For example, what kind of screensavers there are: auto, Egypt, road, book of nature, summer, space, wedding, etc. Add to that there are static and animated options, and you can create your own splash screen yourself.
Setting up screensavers, design
- The last step is to save the finished project. To do this, press the button "Create" in the top menu of the program. You are given several options for saving: in the form of a video; A DVD, in the form of a screen saver, and an executable EXE file (like some program).
Saving a finished slideshow
- Actually, having chosen the save option, you just have to wait until all the files are recoded and saved in the option you have chosen. Congratulations on that - the slideshow is ready!


Power Point
Power Point is one of the most popular presentation software. Included in the Microsoft Office package, which is installed on every third home computer. Actually, that is why I also want to consider the option of creating a slideshow in it (especially since it has all the necessary functions, and everything is done quite simply).
Note!
If you do not have the ability to install Microsoft Office, I recommend paying attention to the free analogs: //ocomp.info/chem-zamenit-word-i-excel.html (note: in addition to Excel and Word, these software packages have a full replacement and Power Point).
I will consider all the steps step by step (using the example of Power Point 2016, as one of the most recent versions to date).
- After starting Power Point, you will see a window with a choice of templates and themes. I recommend staying at "Blank presentation" .
Blank presentation
- Next, you need to open the section "Insert" and click on the tool "Photo album" .
Insert - photo album
- Then click on the button "File or disk" and add all the photos you would like to see in your slideshow.
Adding photos to the project
- Then check the boxes of all added photos and press the button "Create" (an example of this action is shown in the screenshot below).
Create an album from a photo
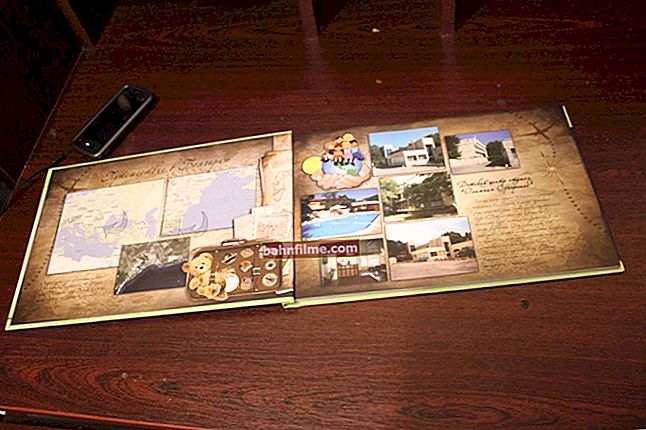
- Actually, the photo album is ready (i.e. slideshow)! Now you can proceed to its detailed setting.
Photo album ready
- To set the display time - go to the section "Slide show" and click on the item "Time setting" : Your slideshow should start previewing, where you can set the timing for each slide.
Slide Show - Time Setting
- Various transitions between photos look very impressive (I recommend adding them). To configure them - open the section "Transitions" and select the one for each slide. The choice is wide enough, among them there are: fade, shift, appearance, panorama, cut, etc.
Transitions between photos
- Music. To insert music into your work - use the section "Insert" then subsection "Multimedia / Sound" .
Insert music
- Quite a common question from users -"How to Save Your Power Point Slideshow in Video Format"... If you have a modern version of Power Point - just press to "File / Save As" , then select a folder to save, and specify the file type, for example, "Video Mpeg-4" ... In this regard, Power Point has a lot of different formats for saving!
Save as video (Power Point)


Online ways
There are dozens (if not hundreds) of sites on the web that offer to create slideshows without any programs at all, simply by uploading a dozen or two photos to the site. On the one hand, it is convenient, but not always suitable: not everyone has a good and fast Internet, not always there is a desire to upload very personal photos to an unfamiliar site ...
But nevertheless, the method is working, and is gaining popularity!
Note: I recommend updating Adobe Flash Player (If you haven't done this for a long time), because many sites use flash animation. How to do this, see here - //ocomp.info/ustarel-adobe-flash-player.html
//slide-life.ru

Themes and templates
An excellent site with a huge set of various slide show topics: wedding, greeting, children's, travel, etc. All actions are carried out easily and naturally. You will have to fork out a little for high quality slideshows ...
//fromfoto.com/

Another site with some cool free slideshow templates. By the way, on this service you can create quite large slideshows - from 20-30-40 photos! A real space for those who like to take pictures.
*
That's all for me, all good and pleasant views!
Good luck!
👋
First publication: 13.05.2017
Revised: 1.09.2019