Good day!
Despite the fact that the laptop screen has much fewer parameters that can be changed (compared to a regular classic monitor), it is still better to pay attention to something ... 👀
For example, if it is incorrectly set resolution - then the image will be of poor quality, with low definition.
That is, we will spend more time on solving certain tasks, because you need to "peer". In addition, the eyes start to get tired of "such" pictures on the screen (especially when reading and working with small details).
In general, one of such cases prompted me to write this article: an acquaintance showed his vacation photos on a laptop. Everything would be fine, but the picture on the screen was kind of "cute", not clear. At first I thought that the quality of the photo was "lame", but as it turned out, the matter was in the absence of resolution and calibration...
But more about everything in order below ...
*
How to set up your laptop screen correctly
Resolution and scaling
Resolution Is the number of dots that "paint" the picture on the screen. On monitors with the same diagonal there may be a different number of these points! (many people just confuse diagonal with resolution)

What is the diagonal, how to measure it
Those. a 15.6-inch laptop, for example, might have a resolution of either 1366x768 or 1920x1080.
The higher the resolution (with the same diagonal), the sharper (and usually smaller) the image on the screen. Well, so that the picture on the monitor is not completely "small" at high resolution, there is a special in Windows. "scaling", which increases the size of elements and text (proportionally).
Therefore, it is very important to properly adjust the screen resolution and its scaling!
The most popular resolution options today are 1920x1080 (FullHD), 1366x768 (15.6-inch laptops), 1600x1200, 1280x1024, 1024x768.
*
Soto open Display Settings in Windows, press the key combination Win + R and enter the commanddesk.cpl, press Enter (this is a universal option for different versions of Windows!) .

How to open the resolution setting in different versions of Windows
How the display settings window looks in Windows 10 is shown in the screenshot below. The main thing here is to pay attention to whether you have the recommended parameters (Windows is quite a "smart" system, and if there are installed drivers, it knows the optimal resolution of your screen) .

Choice of resolution and scaling
By the way, if the recommended resolution is not indicated in Windows, you can try a little experiment - check all available resolutions and compare the image quality.
There is also a special. utilities for viewing 👉 computer characteristics - in them you can find out the parameters of your display (see the screen below, using the example of AIDA).

How to find the recommended resolution
By the way, when you have installed drivers for your video card, there will be a link to their control panel in the tray (and 👉 Windows control panel).
👉 Important!
If you do not have such a link, most likely you simply do not have (or have not been updated) drivers for the video card. The best utilities for autosearch and updating "firewood", I indicated in this article.

Intel Graphics Settings
In the graphics control panel, in general, the same parameters are: resolution, refresh rate, scaling, etc.

IntelHD - Resolution (Basic Settings)
*
Brightness and contrast
The brightness of the screen affects not only the speed of battery discharge, but also our vision. In a dark room, it is recommended to reduce the brightness, in a light room, on the contrary, to add.
By the way, in complete darkness, I would not recommend working with a laptop at all, tk. a great burden on vision is created.
You can use the "batteries" icon in the tray to adjust the brightness (see example below 👇).
👉 By the way!
If you don't have any tray icons - see this note

Brightness
Also, most laptops have dedicated function keys for adjusting it.

Example of buttons for changing the brightness of the monitor (FN + F5, FN + F6)
And, besides this, the video driver control panel will help you to fine-tune the "juiciness", shades, color, contrast, brightness. The screen is shown below.
If you have brightness is not regulated (or the proposed methods do not work for you) - check out this material here.

Brightness, Contrast, Hue, Saturation - Intel Control Panel
*
Turn off adapted brightness
In new laptops (and in Windows 8/10), there is such a thing as adaptive brightness control. Those. the laptop automatically changes the brightness of the screen depending on the light in the room and on the image on the screen. Often, when viewing dark pictures, the brightness decreases, while viewing light pictures, on the contrary, it rises.
Maybe someone needs this, but most people quite often complain about this problem (it interferes with work and is very annoying). In addition, from the constant change in the brightness of the screen, vision quickly gets tired.
To turn off responsiveness:
- press the button combination Win + R;
- in the window that appears, enter the commandpowercfg.cpl and press Enter.
As a result, the power settings should open. You need to select the power supply scheme used, and in its settings:
- set the same brightness both in normal mode and in reduced brightness mode (see screen below 👇);
- disable adaptive adjustment.

Adaptive brightness off
In addition, if you have Windows 10, go to the control panel in the section "Display" and uncheck the item "Automatically change brightness when lighting changes" ... Save your settings.

Windows 10 - display settings
👉 Important!

If these steps did not help and the brightness changes "on its own", check out one of my past articles.
*
Adjusting the legibility of text and colors
For those who read and work a lot with documents, I highly recommend performing "fine-tuning" of the fonts in Windows.
The fact is that in Windows there is a special. text customizer ClearType (with the help of it you can customize the most "readable" version of the text for a specific laptop / PC. After all, each of us has our own tastes and preferences, each of us sees the world in his own way ...).
How to start the font display setting (calibration):
- press the keyboard shortcut Win + R;
- in the "Run" window enter the commandcttune and press Enter;
- then the text customization tool should start (see screen below). Just click "next";
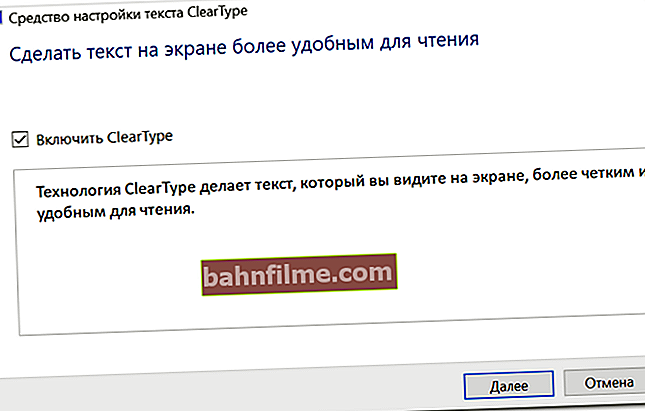
Make text on the screen easier to read
- Windows will start showing you small chunks of text: your task is to select the option that is most convenient for you several times. Thus, the precise adjustment of the fonts is achieved exactly for your "hardware" and your eyes.

You need to choose the most convenient option for you


By the way, I also recommend looking into the screen color calibration:
- you also need to call the "Run" window (the combination Win + R);
- enter commanddccw;
- then go through a few wizard steps to fine-tune the image.
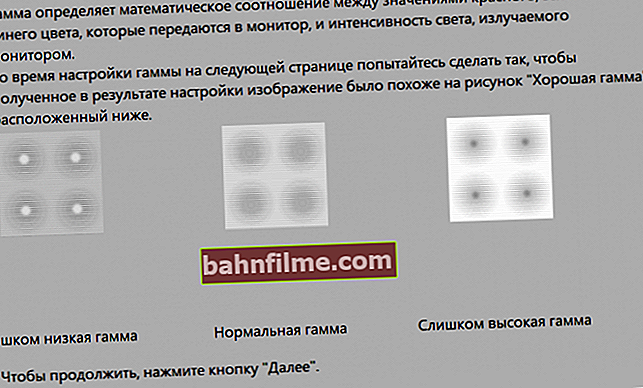
Adjusting the colors

*
A few words about the refresh rate
Refresh rate is a parameter that is responsible for the number of possible changes in the image per second. Those. relatively speaking, at 60 Hz your picture on the screen can change 60 times in 1 second.
The higher the number of Hz - the smoother and clearer the image! Pay attention to the screen below: the difference is very clearly visible on it.

Screen refresh rate - using the example of two screens 144 HZ and 60 HZ
The refresh rate was very important when working with CRT monitors. On them, if the refresh rate was less than 85 Hz, the picture began to flicker, and it was very difficult (and harmful) to work.
On modern laptop LCD displays, 60 Hz is quite enough for comfortable work.

CRT monitor
By the way, all laptop displays today support a minimum of 60 Hz (gaming models over 100 Hz). Therefore, in this regard, there is nothing to worry about ...
To find out the current frequency of your screen:
- press the keyboard shortcut Win + R;
- enter commanddesk.cpl and click OK.
A window with display settings should open. How it looks in Windows 10 - see the screenshot below. Need to find a link "Graphics adapter properties" .

Graphics adapter properties
Then select the tab "Monitor" and see the available refresh rates mode. By the way, if you have the opportunity to set the frequency higher than the current one, I recommend giving it a try!

Monitor, 60 Hz
👉 To help!
If you have a flickering image on the monitor, check out this instruction here.
*
PS
In addition to all the above-written, pay attention to the illumination of the monitor, as well as to the cleanliness of its surface (some have a layer of dust ... How to clean a laptop from dust) .
The fact is that many work at a laptop in complete darkness - which is good for the eyes. It is recommended to work under light, such as using a desk lamp (only one that provides uniform illumination of the entire desktop, and does not shine at one point to the left ...).

An example of lighting a workplace with a computer // not the best option
*
Add-ons are welcome.
All the best!
👋
First published: 13.06.2018
Correction: 10/19/2020