Good time!
Automatic driver update in Windows: on the one hand, it is a mega-convenient thing that allows you to use your computer almost immediately after installing the OS (or connecting new equipment); on the other hand, a thing that can interfere with the normal and stable operation of the system ...
For example, you have installed a certain version of the video driver from the website of your laptop manufacturer (which is stable and works correctly). Windows found a new version and updated your old driver. As a result, you started various "glitches": either a number of options do not work, then games crash with errors, then artifacts, then something else ...
Actually, in this article I wanted to give several ways how you can prevent Windows from automatically searching for and installing drivers (which is advisable to do after setting up the system in order to increase its stability). I think the note will be very useful to all novice users ...
So...
*
What are the ways to prevent Windows 10 from updating drivers
Method number 1: using the group policy editor
This method (in my humble opinion) is one of the most effective. First you need to open the Group Policy Editor. For this:
- press combination Win + R ;
- in the window that appears "Run" enter command gpedit.msc and click OK.

gpedit.msc - launch the group policy editor
Note: Group Policy Editor is not available on Home and Starter Windows! If an error occurs when you try to launch it, then you have 2 choices: either upgrade your OS to the Pro release, or use other methods.
By the way, the work in this editor is no different from the explorer ...
In general, you need to open a tab:
Computer Configuration -> Administrative Templates -> System -> Device Installation -> Device Installation Restrictions
Next expand the parameter "Prevent installation of devices not described in other policy settings" , turn it on and save the settings.

Prevent installation of devices not described by other policy settings / clickable
Note: When this policy setting is enabled, Windows cannot install or update device drivers that are not specified in the Allow Installing Devices Matching These Device Codes policy settings.
Then it is recommended to open another tab:
Computer Configuration -> Administrative Templates -> Windows Components -> Windows Update
This tab has a parameter "Do not include drivers in Windows updates" - it needs to be opened.

Don't include drivers in Windows updates
Then also move the slider to the mode "included" as in the previous parameter, and click on OK (example in the screenshot below).

Included!
And the last thing: in the same tab, find the parameter "Configuring Automatic Updates" and open it.

Configuring Automatic Updates / Group Policy Editor
Set the slider to mode "Included" , and set the setting "Allow local administrator to select options" ... Then save the settings and restart your computer.

Configuring Automatic Updates - Allow Local Administrator to Select Options
Now Windows will not automatically download and install drivers along with updates (well, we limited the download of the updates themselves ...).
It seems like the task is completed 😉.
*
Method number 2: through the equipment settings
First you need to open the tab: Control Panel \ System and Security \ System ... By the way, to very quickly open this tab - use the keyboard shortcut Win + Pause .
After, in the menu on the left, follow the link "Advanced system parameters" .

Additional system parameters
Next open the tab "Equipment" and click on the button "Device Installation Options" .

Device installation options
Then move the slider to mode "Not" (i.e. the system will be prohibited from automatically downloading applications from the manufacturer of your device, incl.and drivers).
Note: in different versions of Windows 10 - this tab (device installation options) may differ slightly ...

Whether to automatically download applications from manufacturers
Method number 3: through the system registry
This method is somewhat more complicated than the previous one, but it works for all versions of Windows 10 (even home ones, where the Group Policy Editor does not open ...).
- First you need to open the Registry Editor. To do this, click Win + R , and enter the command regedit , click OK (alternative options are //ocomp.info/sposoby-otkryit-redaktor-reestra.html);

regedit - open the registry editor
- then you need to go to the tab: Computer \ HKEY_LOCAL_MACHINE \ SOFTWARE \ Microsoft \ Windows \ CurrentVersion \ DriverSearching;
- after open the parameter SearchOrderConfig and give it the value "0" (no quotes). By default, it has a value of "1", which allows searching for a driver;
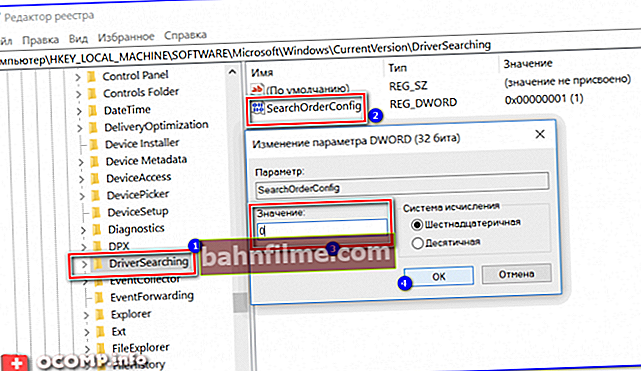
SearchOrderConfig - set the value to 0 / Clickable
- then open another branch: Computer \ HKEY_LOCAL_MACHINE \ SOFTWARE \ Policies \ Microsoft \ Windows \ WindowsUpdate;
- change the parameter value ExcludeWUDriversInQualityUpdate to the value "1" (without quotes). If you do not have such a parameter, create it yourself (note that its type must be REG_DWORD, see the example in the screenshot below).
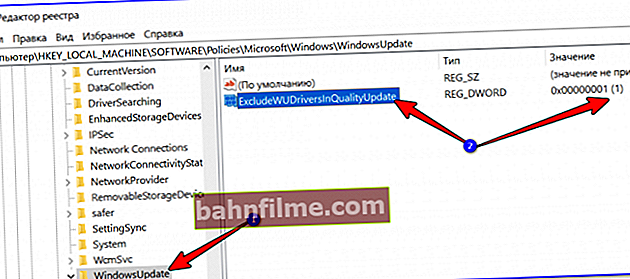
ExcludeWUDriversInQualityUpdate - set the value to 1


Method number 4: using the wushowhide.diagcab utility
Link to the Microsoft website - //support.microsoft.com/ru-ru/

Software download link at the bottom of the Microsoft website window
The utility helps to hide those devices for which you do not want to update drivers (usually, you need to hide updates for specific equipment ...).
It is quite simple to work with it, after downloading and launching, click on the option "Hide updates"(translated into Russian - hide updates) .

Hide updates
Next, select those devices (drivers) that you do not want to update and click "Further" .

Selecting devices (drivers)

Fixed!
How to roll back a driver to an older version (if Windows has updated it)
Modern Windows 10 when updating (usually) does not remove the old driver, and if desired, you can roll back to it.
To do this, you need:
- to run device Manager (if you don't know how to open it, see the instructions: //ocomp.info/kak-otkryit-dispetcher-ustroystv.html);
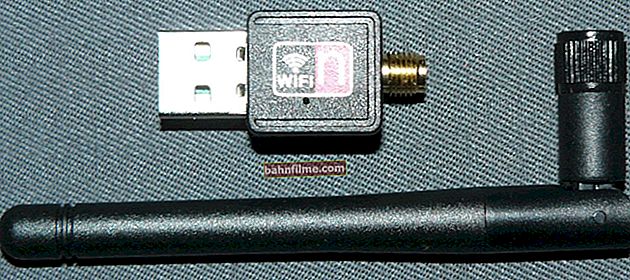
- then find the desired device in it, right-click on it and select from the menu "Update driver" (see the screen below, I'll show it using a Wi-Fi adapter as an example);
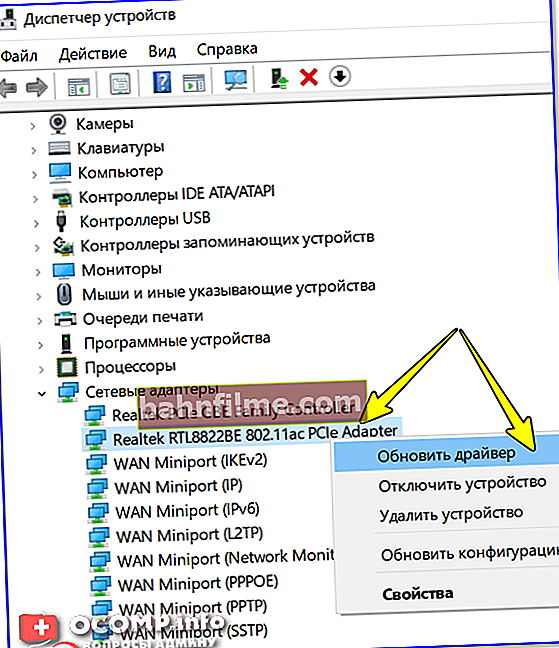
Update Driver - Device Manager
- then indicate that you need to look for the driver on this PC;

Finding and installing drivers on this computer
- then indicate that you yourself select a driver from the list available in this system;

Select a driver from the list available for this PC
- then you should see a list of available drivers (including the old one). It remains only to select the required driver version and agree to the update (i.e. rollback).

Selecting a driver from the list (in manual mode)


*
That's all for now ...
All the best!
✌