User question
Hello.
Not so long ago I ran out of disk space with Windows - and in the tray next to the clock the error "Not enough space on the system partition of the disk, this may be the reason ..." began to pop up.
The fact is that on the "C: \" drive there is actually little space - only 30 GB, but on the other drive "D: \" - 420 GB (about 200 GB free). Can I expand the capacity of drive "C" with drive "D" without losing data?
PS
Acer Aspire 5550 laptop, Windows 8 system, 500 GB hard drive (Seagate, if I'm not confusing).
Hello.
Most often, it is necessary to change the disk size when, when installing Windows, the required size of the system disk was incorrectly calculated (also when buying a PC - it is often not very convenient to partition the disk: either there is only one partition with Windows, or the size of the system partition is very small).
In general, a similar operation to resize partitions can be done even without installing additional programs if you have Windows 7, 8, 10 (if XP - use the link to special software for formatting, partitioning hard drives, link below).
Now I will show with a specific example where and how to press 👌.
👉 To help!

Programs for working with hard drives (HDD) and solid state drives (SSD): splitting, formatting, defragmenting ...
*
Increase the size of the "C: \" drive
(Actual for Windows 7, 8, 10. Without losing data and additional programs)
STEP 1: open disk management
👉 Important: to increase the size of the "C: \" drive, you must have free space on some other disk partition (a part of which we will take).
Modern Windows operating systems have a built-in utility for formatting and partitioning disks. It is called - 👉 disk management ... Of course, the first step is to open it.
To do this, press the combination of buttons Win + R.

Next, a window should appear "Run" - enter in line "Open" commanddiskmgmt.msc and press Enter (or OK, see screenshot below).
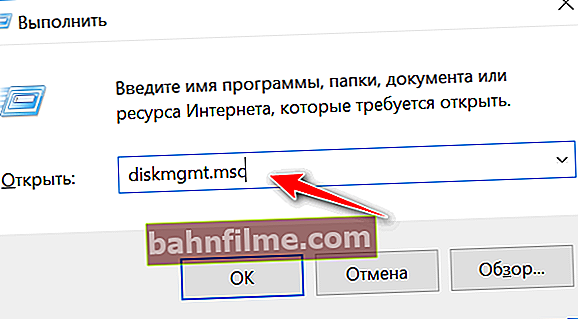
diskmgmt.msc - start disk management
Then the required utility should start ...

Disk management
*
STEP 2: separating some of the free space
Now we need to select the disk partition on which there is free space, and "take away" it for subsequent attachment to the "C: \" disk partition.
👉 For example, I have several sections:
- "C:" - 132 GB (see screen below 👇);
- "H:" is 751 GB (which has 187 GB free, and I'll give some of that space to the "C:" section).
To do this, right-click on the "H:" section and select the option "Shrink Volume" (Note that the data should not be affected!).

Shrink volume
Then Windows will think for a minute or two: it will analyze the free disk space to assess the possibility of compression.

Waiting - Disk Analysis
Now you need to specify how much free space you want to take away on the disk. In my example below, I took a figure of 5000 MB (i.e. 5 GB).

How much free space to take away in MB
After the section is compressed - you should see how you have unallocated space on the disk (a rectangle with a black stripe on top, see the screenshot below). This is the place and can now be attached to another partition of the disk.

Unallocated area
*
STEP 3: attach unallocated space to the "C: \" drive
We right-click on the disk to which we want to attach unallocated disk space (in the current example, we attach it to the "C: \" drive), and select the option from the menu "Expand Volume" .
👉 Note!
If you have an option "Expand Volume" inactive and lit in gray (you cannot press it) - read a couple of suggested solutions at the bottom of the article

Expanding the volume (drive C)
Next, you will be offered to attach an unallocated area on the disk (those 5 GB that we took away from another disk partition in the previous step). Select them and click next.

Volume Expansion Wizard
In general, the last step is to agree with the operation by clicking on the button "Done" .

Done!
Everything! Now your system drive is 5,000 MB larger. 👌
*
And what if the tab to expand the volume on the "C: \" drive is not active
In some cases, when trying to expand a volume, this option in disk management may not be active (it just glows gray and cannot be pressed, example below).

Extend volume is not active
There are two solutions:
- The easiest option in this case is to use the special. programs for resizing HDD partitions 👉 from this article (I personally show my example below in MiniTool Partition Wizard, I recommend it!).
- You can also try deleting unnecessary partitions used for recovery (usually, all this is because of them). As a rule, this is observed more often on laptops, where there are special sections from the manufacturer. In my example below, I will show how to remove them so that the function "Expand Volume" became active (Important! In this case, the recovery option will be disabled - i.e. rollback device to factory presets).
*
Option 1: using alternative software
And so, we will assume that the MiniTool Partition Wizard utility is installed and running. 👌
1) First you need to find the partition of the disk that you want to attach (in my example, this is a 25 GB partition, "E:"). Then right-click on it and select the option "Delete" (all information on this section will be deleted!).
To confirm the action - in the upper left corner, click on the "Apply" button.

Selecting and deleting the section that we want to join (it is empty)
The status of this section should become "Unallocated" (see screen below).

Unallocated
2) Next, you need to right-click on the system drive "C:" (that is, to which we will attach the unallocated area) - and select the option "Extend" .

Extend - expand OS disk
3) A window will appear in which you need to select our unmarked area (in my case, those 25 GB), move the slider to the right to the maximum and click "OK".

For the entire amount of free space
4) After that, you should see that the unallocated area will be attached to the "C:" drive (see the screen below 👇). It remains only to confirm the changes by clicking on the button "Apply" (left, top panel).

Now only OS partition
Note: in some cases, you may need to restart your computer to complete the operation ...
*
Option 2: by deleting the "bad" partition
You must first run the 👉 command line as administrator: to do this, open the task manager (the combination of buttons Ctrl + Shift + Esc ), then press File / new task , enter CMD and press Enter (example below).

CMD as administrator
- enter command diskpart and press Enter ;
- followed by the command list disk (all disks in the system will appear, in the example below - there is one disk with the identifier "0" in the system);
- select disk 0 - we indicate which disk you need to select. In your case, perhaps, instead of "0", you will need to specify an excellent disk identifier (screenshot with an example below).

Diskpart
Next steps:
- list partition - look at all the partitions that are on this disk;
- select partition 6 - select a specific partition on the disk. Please note that instead of "6" - you need to specify your number (make sure that the inscription "Selected section X" appears).

List partition (in my case, it was necessary to delete partitions 6 and 8 (used for recovery) in order for the "Expand volume" tab to become active).
And the last command to delete the selected section - delete partition override .
Important! Be careful, this command will delete the selected section, all information from it will disappear!

The selected section has been deleted!
To delete the next section, you need to select it again (for example, select partition 8 and then use the command again to delete delete partition overrid ).
*
Actually, that's all - the problem is solved!
Good luck!
👣
First published: 8.06.2017
Correction: 1.02.2020