Good day!
I think that almost everyone who photographs something at least sometimes has some not very good pictures. Photos often turn out to be too dark, sometimes indistinct, or somehow faded and not expressive (and so on).
However, despite all these reasons, in some cases they can be significantly improved! Moreover, for this it is not at all necessary to know all the "subtleties" of working with graphics - 5 minutes will be enough. for examples below (👇). Almost any user can repeat them!
I warn you in advance that I am far from an expert in photography and video shooting (and all of the following is just my little experience that I apply to my photos).
So...
*
Working with photos
Examples: before and after processing
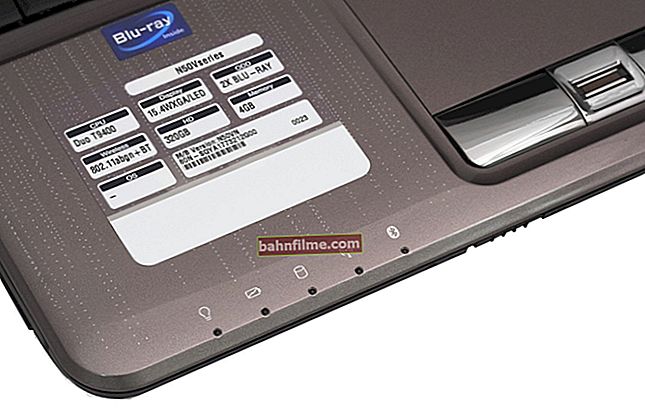
For clarity, I marked the photo before and after processing. As you can see in the first example, the photo before processing is too faded and the colors on it look gloomy.
But after processing, it is a completely different matter (by the way, the difference in brightness and tone of the picture can greatly depend on the monitor on which you are viewing this example 👇).

Enhancing photography with Home Photo Studio
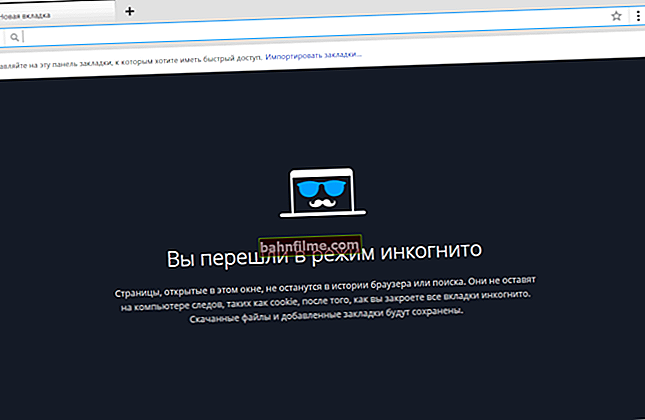
In the second example, it was required to "conjure" not only over the colors and exposure, but also over the horizon line. Please note that the image before processing is slightly tilted at an angle (this often happens when shooting with a smartphone or in a great hurry).

A beginner's job - a photo in 5 minutes. corrected
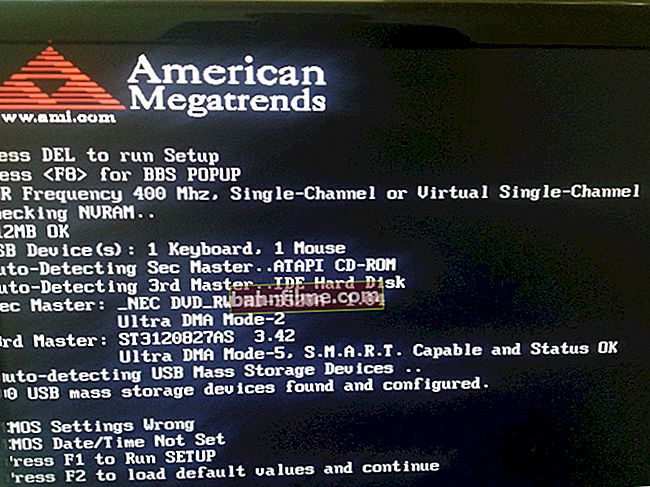
The third example is the most difficult ... The fact is that it has a lot of small leaves and they are all in the foreground (close). But nevertheless, in my opinion, it was still possible to "revive" a little and give the leaves a more "lively" shade.

Before and after - autumn leaves
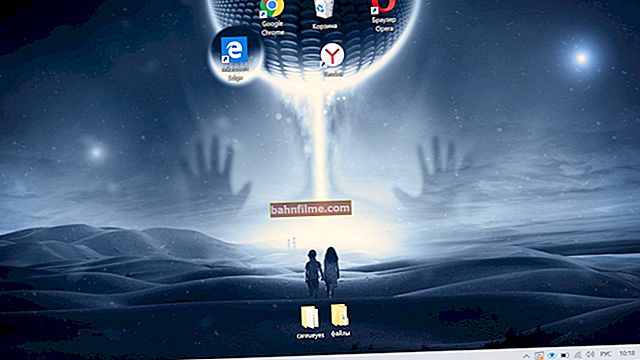
Another rather difficult photo taken at sunset and without a flash (moreover, not quite clear). Although not much, but he also managed to give colors ... 👇

Apples in the garden (Before and after)
Now how to do something like this ...
*
Editor's Choice
To work with photos - you need a special. editor program. There are a lot of them on the network now, but not all of them are simple and understandable for a novice user. I'm not even talking about "Photoshop", which "weighs" a lot, and it takes a long time to deal with it ...
But is it worth losingwhen there are simpler editors in which you can 2-3 clicks with a mouse to quickly fix all the most common photo defects ?! One of these editors (which I have been using myself for a long time) is yavl. program "Home Photo Studio" . 👌
Home Photo Studio
Developer site: //homestudio.su/

One of the simplest (and at the same time quite functional) photo editors for novice users. Allows any amateur photographer literally in a few steps to revive their pictures and make them of higher quality.

Image Processing / Home Photo Studio
Note that the program is completely in Russian, and has the entire basic range of functions: removing noise and defects from a photo, lightening / darkening, adjusting shades, adding various effects, decoration, etc.
Generally, it is in it that I will show the main steps to "revitalize" the photo. 👇
*
Photo processing (what was done with the photo from the examples above)
STEP 1
Program installation "Home Photo Studio" standard (and I am not considering it). After launching it, go directly to the photo selection (i.e. you need to click on "Open photo" ).

Open photo
STEP 2: toning
The first thing I would recommend is to use the tool "Toning" (In chapter "Effects" ). It allows with the help of specials. profiles quickly and easily "adjust" the brightness, contrast, and saturation of the photo.

Effects - Toning
Please note that there are generally enough presets (profiles) here: there are both "cold" and "warm" ones. The strength of the effect can be adjusted (depending on the desired result).

Selecting an effect
STEP 3: HDR Effects
Recently, HDR effects have become popular among photo enthusiasts. I will warn you in advance that they are not suitable for all photographs, but definitely worth a try! Some HDR shots look amazing!
IN "Home Photo Studio" There are three HDR effects: pseudo, contrast and maxim. detailing. See example below. 👇

HDR Effects
STEP 4
There is another important tool when working with photos - "Elimination of defects" (tab "Picture" 👇). It allows you to quickly lighten / darken a photo, remove "noise" (various minor inaccuracies) on it, sharpen it and correct the color balance.
Of course, all you need to do is choose what to do - the editor applies the effects on its own.

Elimination of defects
STEP 5
In pictures taken at an angle - it is recommended to align the horizon (i.e. the program will automatically rotate the photo so that the horizon is natural, see examples above).
To do this, open the section "Picture" and select the tool Horizon leveling ... Next, draw a line where the horizon is visible in the photo - click "View" and the editor will automatically expand the photo. Conveniently?! ✌

Horizon leveling
STEP 6: correction
For more accurate color correction (final), I recommend opening the menu "Image / Lighting Correction" ... After that, manually adjust the sliders responsible for detail, saturation, realism, and depth of development.
Often, with the help of such a "hand" tool, it is possible to quickly revive the colors even in the worst photo.

Lighting correction
STEP 7: trim jagged edges
At the end of the processing, they usually pay attention to the edges of the photo: sometimes they have defects, highlights, they may not be quite even, or something unnecessary could get into the frame.
The operation is used for trimming. "Cropping" (section "Images" ). 👇 The use is quite simple: after activating the function, you will need to select a rectangle that areafollowed byleave!

Cropping
STEP 8
When the photo is processed, all that remains is to save it: "floppy disk icon" .
By the way, please note that "Home Photo Studio" allows you to add a frame and captions to your photo. This can be done using the menu "Registration" (not everyone needs this, so I do not consider it).

Save photo
In my humble opinion, after processing the photo, it began to look much more like a professional one, and if you set it as your desktop wallpaper, not every user will be able to determine that this "picture" is your production ...!
*
Additions on the topic are, of course, welcome!
Good luck and good memories to everyone!
👋