Good day.
Not so long ago, I came across a compact laptop complaining about the impossibility of installing Windows 10 (the error "Installing Windows on this disk is impossible. Perhaps the hardware of this computer ..."). Well, I had to figure it out ...
In fact, the problem was (I think) related to the fact that the user incorrectly created the bootable media and tried to install the system from it. Although, I will immediately note that in some cases, incorrect BIOS / UEFI settings may be to blame.
In this article, I will show a step-by-step example of installing the OS on an ASUS ZenBook UX310UA laptop (I will add that on many ASUS laptops, especially from this line, the steps will be similar).
So...
*
Installing Windows 10 on an ASUS laptop
❶
Creating a bootable USB drive
To work, you need the Rufus utility and a boot image with Windows 10.
1.Rufus
Website: //rufus.akeo.ie/?locale=ru_RU
A small but very versatile utility for creating bootable media. Allows you to create flash drives for BIOS and UEFI (for GPT and MBR disks), with different OS (Windows 10 is supported!). In addition, it is completely free and supports Russian.
2. ISO image from Windows 10
Requirements: you need an image that does not exceed 4 GB in size. Secondly, discard the different "20 in 1" at once - you need a simple option, for example, "Windows 10 x64 home" - ie. in the image one specific system (ie do not use any "Win 10 home / Pro / Ent x32 + x64, 5 in 1"). There are a lot of such images on the network ... (for example, you can download it on the official Microsoft website).
And so, insert the USB flash drive and launch Rufus (Important! All data on the USB flash drive will be deleted, so copy everything you need from it).
Next, specify the ISO image (recommended for installation above), then select the option "GPT for computers with UEFI interface" (file system - FAT 32), "Standard Windows installation". Click the "Start" button (the settings are shown in the screenshot below).

Rufus 2.1 settings
Update from 01.24.2019 (since the Rufus program has been slightly updated, and its design has changed - I will give one more screen for version 3.4 so that no one gets confused).

Rufus - creating a USB flash drive for UEFI (GPT)
In general, the flash drive is ready, you can move on ...
👉 Supplement!
 How to create a bootable UEFI GPT flash drive with Windows 10, or why errors occur when installing the system on a new laptop (PC) - an instruction for beginners.
*
❷
Loading the optimal settings in the BIOS - enter the boot menu.
BIOS settings are not always set by default (default). Therefore, first of all, I recommend going into the BIOS and restoring them.
By the way, you can immediately connect the bootable USB flash drive created in the previous step. I recommend connecting to a USB 3.1 port (installation will be faster, especially if your flash drive supports this standard).

We connect the flash drive to the USB 3.1 port (installation will be faster!)
To enter the BIOS, immediately after turning on the laptop (the ASUS logo should appear), press the F2 key (preferably several times, to be sure ...).
👉 Remark!
Just in case, here is a link to an article on how to enter BIOS on a computer (or laptop)
In BIOS (UEFI): first of all, go to Advanced Mode (key F7) - see the bottom of the window. 👇

Advanced Mode (F7 key)
In chapter "Save & Exit" select function "Restore Defaults" (restore default settings). Then save changes - button "Save Changes" (you can just press the F10 button - after which all changes will be saved and the laptop will go to reboot - enter the BIOS again with the F2 key).

Restore Defaults - restore the default settings
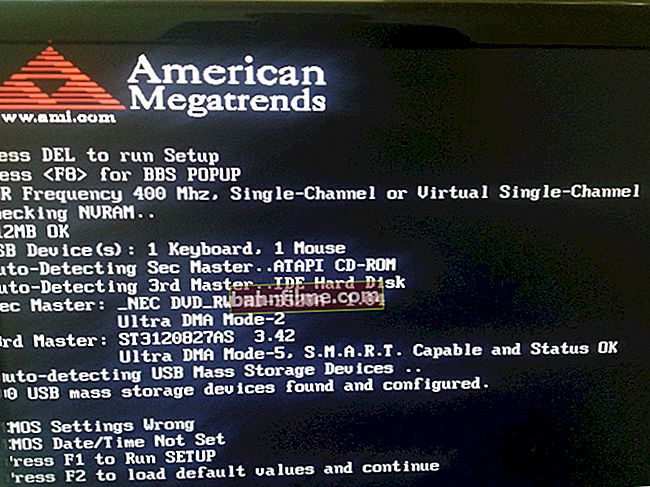
After restoring the settings, entering the main BIOS (UEFI) window again, press the button F8 (enter the Boot Menu). In it you should see our USB flash drive - select it and press Enter.
Note: in the boot menu you (most likely) should display 2 lines with the name of the installation flash drive. You need to select the one opposite which "UEFI OS" (👇) appears.

Boot Menu - select bootable media
Next, the laptop must start installing Windows - a "circle" should run in the center of the screen ...
If the installation does not occur, check if you correctly recorded the installation USB drive and set the UEFI settings.
*
❸
Windows 10 setup process
The first window is a greeting with a choice of language (I omitted it, just press Enter). In the next window - click the button "Install" .

to set
Next, a window will appear with the terms of the license - agree and click "next".

License agreement
In the window with the choice of installation option, select "Custom: Windows Installation Only (Advanced Users)".

custom installation
Next, the most important window is where the disk for installing Windows is set. In general, I recommend completely deleting everything on the disk (everything that came from the store) and performing a clean installation of Windows 10.
Note!
In some cases, reinstalling the OS may be the reason for the refusal of warranty service (although this is quite rare, but still ... Most often, the warranty is given for hardware, and you can install any software ...).

deleting all partitions on the hard drive
After that, you can create one partition on the entire disk and install it into it (some recommend creating two partitions - one for installing Windows, the other for user data). If you create two partitions, then under Windows I recommend allocating space for at least 100 GB.
In my case, I simply created one partition for the entire disk (931.5 GB) and pressed "Further" .

Creating a Windows partition
Boot Menu - select the bootable media, if at this step you see an error that "Windows cannot be installed on this disk ..." (see the screen below), then you most likely created a bootable USB flash drive incorrectly (see the first part of this articles). It is also possible that you downloaded an "incorrect" ISO image with the system.

error about the impossibility of installation
Actually, if all is well, the installation of Windows should begin. Here you just need to wait while I copy the files (if you connected a flash drive to USB 3.1 - then wait not long, 5-6 minutes).

File copying started
When the files are copied, the laptop will reboot and the installation will continue. Several windows will appear in front of you: but there is nothing interesting in them, you will need to enter a username, configure the network settings (you can also skip all the steps and do it after).
I lowered all these windows, tk. They are of no practical interest, and I think that everyone will cope with them on their own ...
👉 Remark!
If someone needs the full version with all the steps, then here are the instructions for installing Windows (general case, all steps are presented)
Actually, this completes the installation. Then you can start installing the drivers (in my case, it was enough to go to the official website on this page: //www.asus.com/ru/Laptops/ZenBook-Classic-Series-Products/ ).
But to be honest, just in case, I also resorted to Drive Booster and for extra. 5 minutes I updated not only the drivers, but also all sorts of libraries: DirectX, Visual C ++, Net FrameWork, etc. (without going anywhere and without looking for anything  ) .
) .

Installation completed...
A short video with the sequence of installing Windows on a device from ASUS.
*
That's all for now ...
Additions in the comments are welcome.
Good luck!
👣
First publication: 06.01.2019
Correction: 05/25/2020