Good time!
Many budget PCs for office and home use AMD Ryzen CPUs with integrated Vega graphics (for example, Vega 6, 8, 11, etc.). They work, in general, not badly, and in comparison with IntelHD they are even ahead of the curve. However, you always want more ... 👀
And here it is worth mentioning that some BIOS / UEFI settings, which are on by default, may "prevent" the cards' potential from reaching up to 20-30%! And, of course, by slightly rechecking and editing them, you can overclock (or better say, increase the performance) of these built-in cards (practically without risks *).
Actually, this is what today's article will be about. I think that "extra" ~ 20% to FPS will not hurt anyone ...
* Important!
As usual, there are several warnings in these articles:
1. Everything that you do according to the advice below is at your own peril and risk.
2. Overclocking - may cause denial of warranty service.
3. Before overclocking, I recommend trying 👉 raising FPS using other methods.
*
Improving AMD Vega Graphics Performance
👉 STEP 1: preparation, first recommendations
For work we need three utilities:
- CPU-Z (link to official website). You can do it, but it is convenient to quickly view basic information about the CPU, video card and RAM;
- TechPowerUp - view information about the video card (the same core and memory frequencies);
- FurMark - for tests and comparison, what happened before overclocking and what after ...
*
Also, I can't help but make one important remark: RAM has a significant effect on the performance of the integrated video card (APU) - is the dual-channel mode of operation enabled? Usually if you have two dice RAM - then the two-channel mode of operation is activated automatically!
To find out if this is the case, look at the tab in the CPU-Z utility "Memory" , line "Channel" ... If the memory works in dual-channel mode, you will see "Dual" .

Memory - two-channel operation mode (CPU-Z)
Topics, who has only one memory stick - I would first of all recommend buying one more. This will have a significant increase in productivity (fortunately, in 👉 Chinese online stores, if you run into a share, memory can be taken for "next to nothing" ...).
Now more to the point ...
*
👉 STEP 2: operating frequencies of RAM and video cards
Before moving on to overclocking, I recommend opening the TechPowerUp and FurMark utilities (both will be needed at the same time).
Take a look in TechPowerUp the lines "GPU Clock", "Memory" (frequencies of the graphics core and memory) and "Bandwidth" (on the screen below are marked with an arrow 👇). These are the default values that we need to change (it's better to remember or write them down).
Now run a stress test in FurMark (by clicking on the "GPU Stress test" button, no settings need to be changed). It is highly advisable to make sure that during the stress test the temperature does not go far beyond 70 ° C, there are no errors, artifacts and freezes.

Default graphics card test (TechPowerUp and FurMark utilities)
In my example above, the average (AVG) FPS was 19 at 45-50 ° C. Everything is relatively stable, you can "overclock" ...
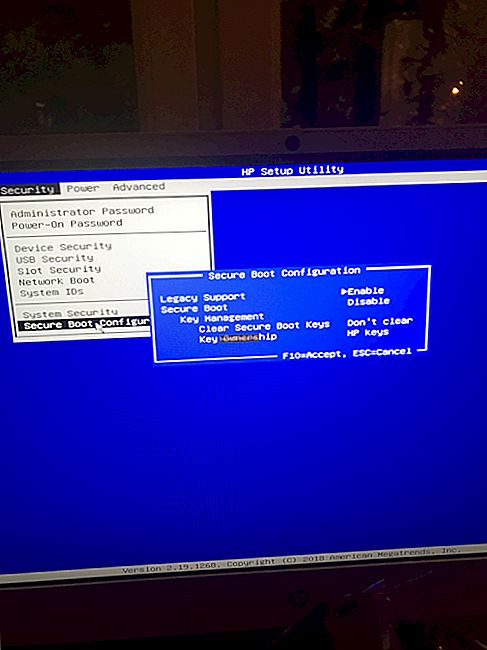
After, you need to 👉 go to BIOS / UEFI and find the tab "Tweaker" (in different versions of UEFI, the partition names may be different). Among the various settings and sections, we need to find two things:
- memory frequency settings. Usually marked as "DRAM Frequency" ;
- voltage and frequency settings graph. kernels ( "GFX Clock Frequency" and "GFX Core Voltage" ).
We need Auto change the mode to XMP 2.0 profile (for RAM), and set the graphic frequency. cores are ~ 5-10% higher than the base one (which we specified in TechPowerUp a little higher).
Note:
- Auto mode usually sets the memory frequency to 2400 (instead of 3000/3200, which "hold" most of the dies and the CPU).
- How everything looks on the mat. ASRock board, please see the screenshot below.

RAM and integrated graphics settings
Gigabyte motherboards have a section with the necessary "M.I.T" settings.

UEFI on Gigabyte boards
Important!
Some motherboards do not allow overclocking memory and video card (for example, the most budget ones on A320 chipsets (as opposed to the same B350 / B450)).
Actually, after changing and saving the UEFI / BIOS settings, you need to run TechPowerUp and FurMark again (and start a stress test). If you pay attention to the test in FurMark, then the number of FPS should increase (in my case it became 25, it was 19, i.e. FPS increased by 30%!).

Video card test after changing settings (TechPowerUp and FurMark utilities)
Of course, after such changes in the BIOS, you need to "drive" the card to FurMark, see the stability of the system, whether there will be errors, freezes, etc. If there are any, then you have set too high frequencies in UEFI / BIOS and you need to lower them somewhat ...
*
👉 STEP 3: the amount of "allocated" memory
For integrated (built-in) video cards (Vega, IntelHD), video memory is allocated from the "free" amount of RAM. Usually, by default, this process is automatic ...
But it's worth notingthat "auto-mode" does not always work optimally. Take a look at the benchmark below: Vega 11 card runs 60-70% slower in 3D Mark benchmark if video memory is less than 1024 MB! 👇

3DMark Sky Driver (8GB Ram, dual)
Of course, if you have 8 GB or more RAM on board your laptop / PC, it makes sense to try to set the amount of allocated memory to 2 GB (which can significantly speed up the built-in video card!).
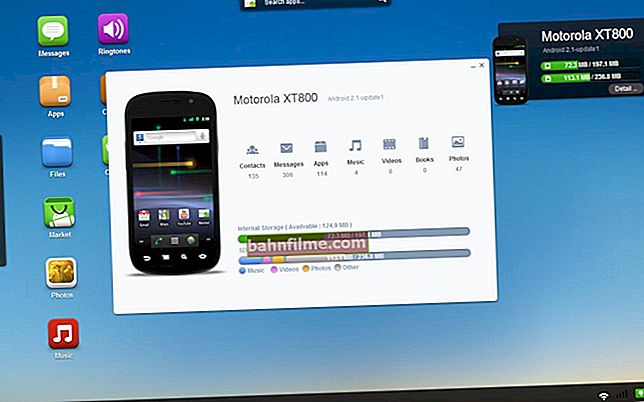
In general, to find out the current amount of Vega video memory, you just need to open Task Manager (on Windows 10; shortcut Ctrl + Alt + Del).

Task Manager - Windows 10
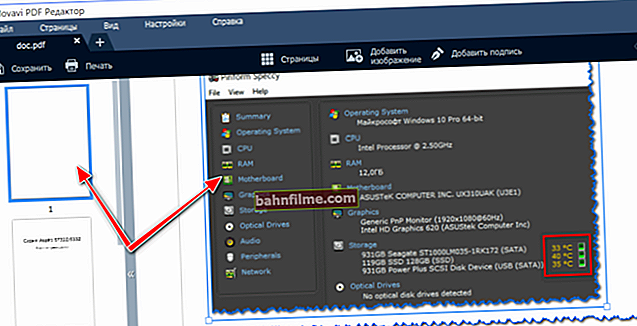
To change the amount of allocated memory (and disable auto-mode) - you need to 👉 enter the BIOS and find one of the following parameters : UMA Frame Buffer Size; iGPU Configuration; DVMT (Fixed Memory); Share Memory Size; Video Memory Size, etc. (note: depending on your BIOS version, it can be named differently).
👉 To help!
Allocating memory for the integrated video card: how to increase the video memory of the integrated IntelHD and AMD Ryzen Vega (UMA Frame Buffer Size)

UMA Frame Buffer Size - set 2 GB
Next, all that remains is to manually set the amount of video memory, save the settings (in most BIOS versions, this is the F10 key) and restart the computer / laptop.
*
👉 STEP 4: Setting up the video driver
A lot depends on the version and settings of the video driver: not only the number of FPS in games, but in general, the stability of the system.
In general, for a start, I would recommend 👉 update the video driver (install the latest version). After that, in its settings, you need to set a number of parameters - about them, follow the link in the article below (a note was already written 👌).
👉 To help!
How to speed up an AMD (Radeon) graphics card by tweaking the drivers

AMD graphics card settings
Usually, by optimizing the settings in the video driver, it is possible to "squeeze" up to 10-20% to the current performance of the card in games. And this is not a bad result!
*
👉 STEP 5: "fine-tuning" the game
And the last thing that greatly affects the FPS is the graphics settings in the game. To improve performance - try the following:
- reduce detail (for example, switch from high to medium);
- disable some of the effects (smoke, shadows, water splashes, etc. - depends on the specific game);
- lower the resolution (for example, switch to HD (1280 × 720) instead of FullHD (1920x1080));
- disable vertical sync;
- try switching from full-screen mode to windowed mode (or vice versa). 👇

Graphics settings for WOW Legion (clickable)

CS-GO settings
*
GenerallyAfter completing a number of the procedures described above, the built-in Vega cards are quite good at pulling all modern online hits (at low / medium settings *): Counter-Strike: Global Offensive, World of Tanks, World of Warcraft, Dota 2, etc. 60 frames can be achieved easily enough ... 👌
*
On and I am finishing my report on this ...
Additions in the comments are welcome!
Good luck!
👋
First published: 19.04.
Correction: 08/19/2020